I’m excited to announce some upcoming virtual and in-person events that you may be interested in attending. Please read ahead for details.
May 29th at 2PM EDT – Textile Talk, Textiles in 3D (online only)
June 14th at 1PM – Slide Talk, Once Upon a Stitch: The Artistic Journey of Salley Mavor at the Osterville Village Library in Osterville, MA (in-person only)
July 27, 2025 – mid-Feb., 2026 – Exhibition, Enchanting Threads: The Art of Salley Mavor at the Albany Institute of History and Art (in-person only)
Once Upon a Stitch: The Artistic Journey of Salley Mavor Osterville Village Library in Osterville, MA on June 14th at 1pm. I will give a slide talk about my life’s work and offer some insight as to where it came from, how it’s evolved and why I do it. A book signing will follow the presentation.
Birds of Beebe Woods
UPCOMING EXHIBITION Enchanting Threads: The Art of Salley Mavor Albany Institute of History and Art, Albany, NY. July 27, 2024 – mid-Feb.2025
Opening reception with the artist on July 27th. Artist talk later in the fall TBA.
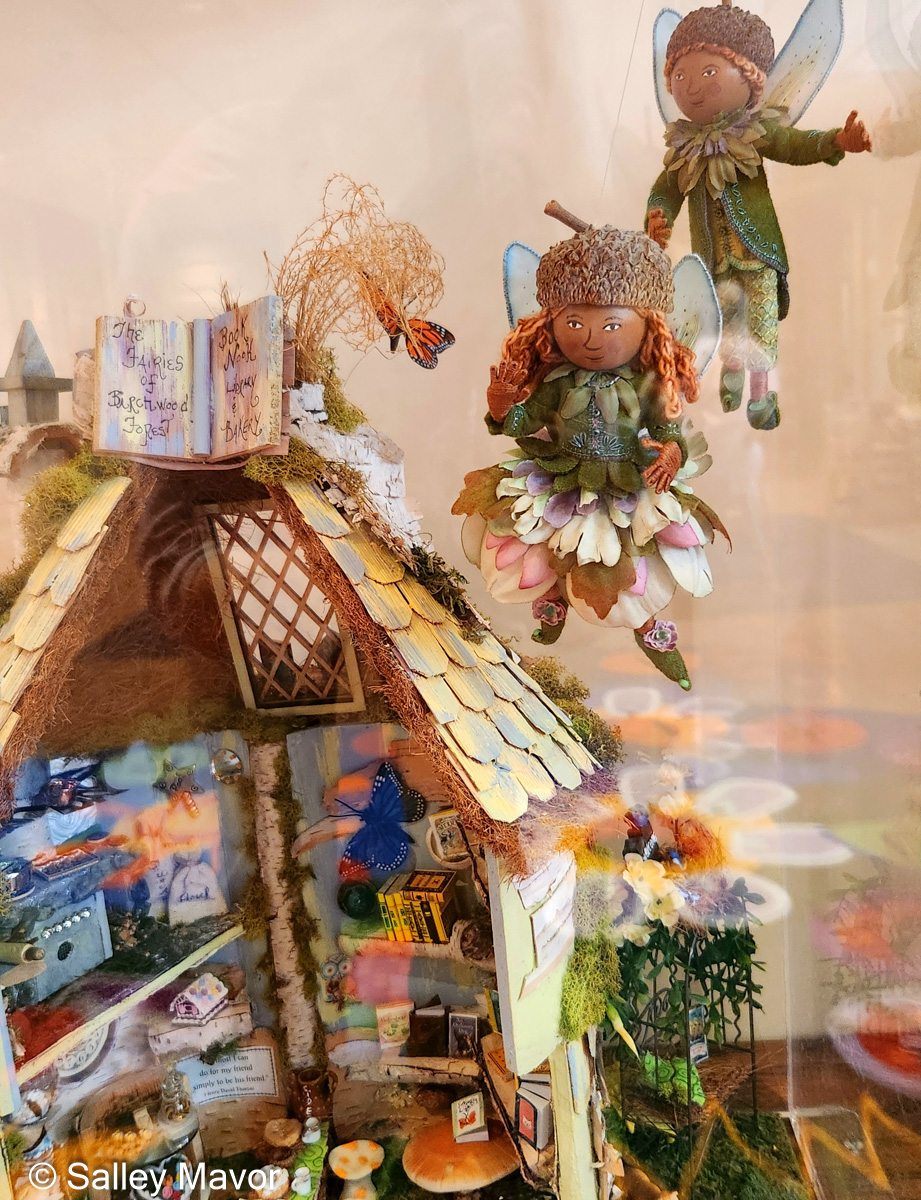
Starting this summer, The Albany Institute of History and Art will host a major exhibition of over 100 bas-relief pieces and sculptural objects from my collection. Enchanting Threads: The Art of Salley Mavor will be on view for 7 months, from July 27, 2024 – mid-Feb., 2025. The show will include a large selection of my artwork from the past 30 years, including Bedtime Stitches, the touring exhibit of original illustrations for my most recent picture book, MY BED: Enchanting Ways to Fall Asleep around the World. Also on display will be recent works that explore cultural diversity, migration, fashion, the natural world, and a range of social narratives, from the everyday to topical subjects.
To keep up with new posts, subscribe to this blog. If you’d like to see more frequent photos tracking the projects in my studio, please follow me on Facebook and/or Instagram.
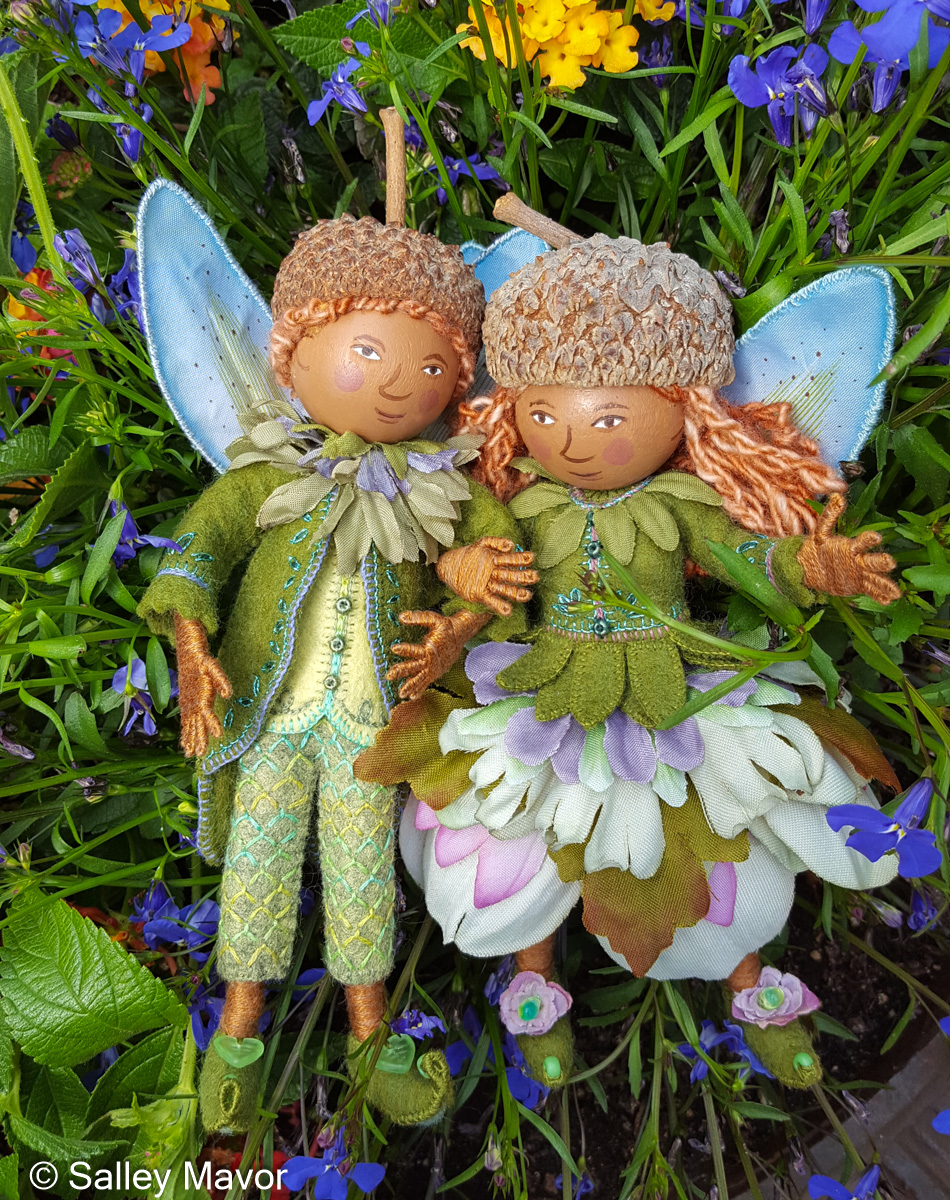
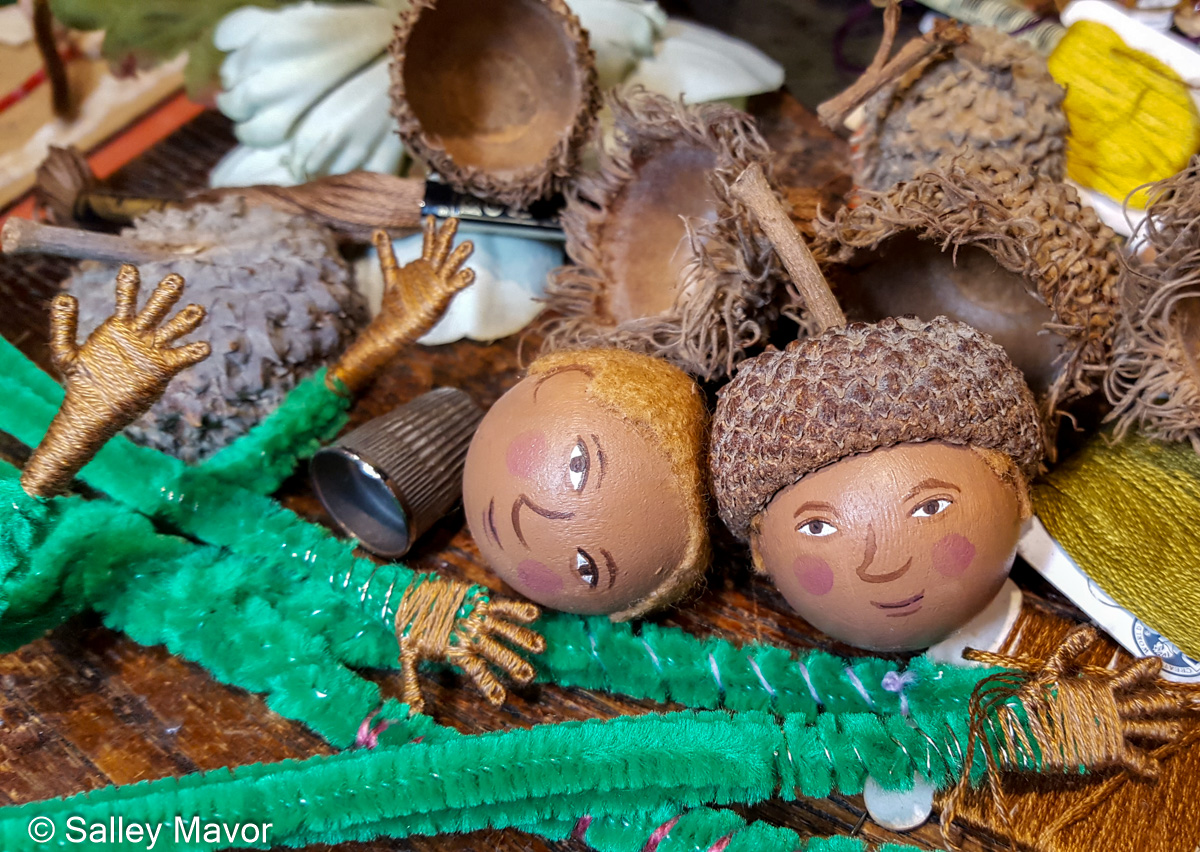
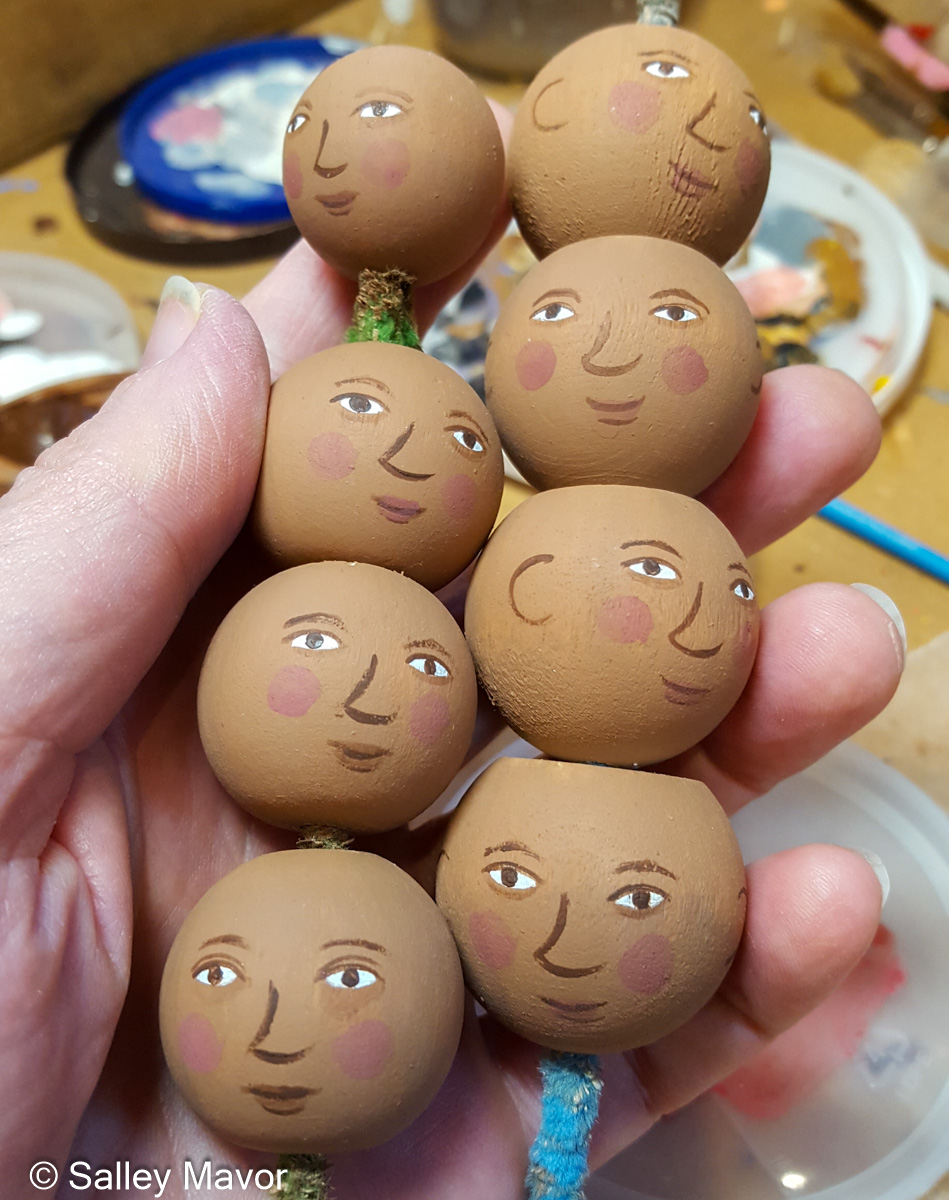
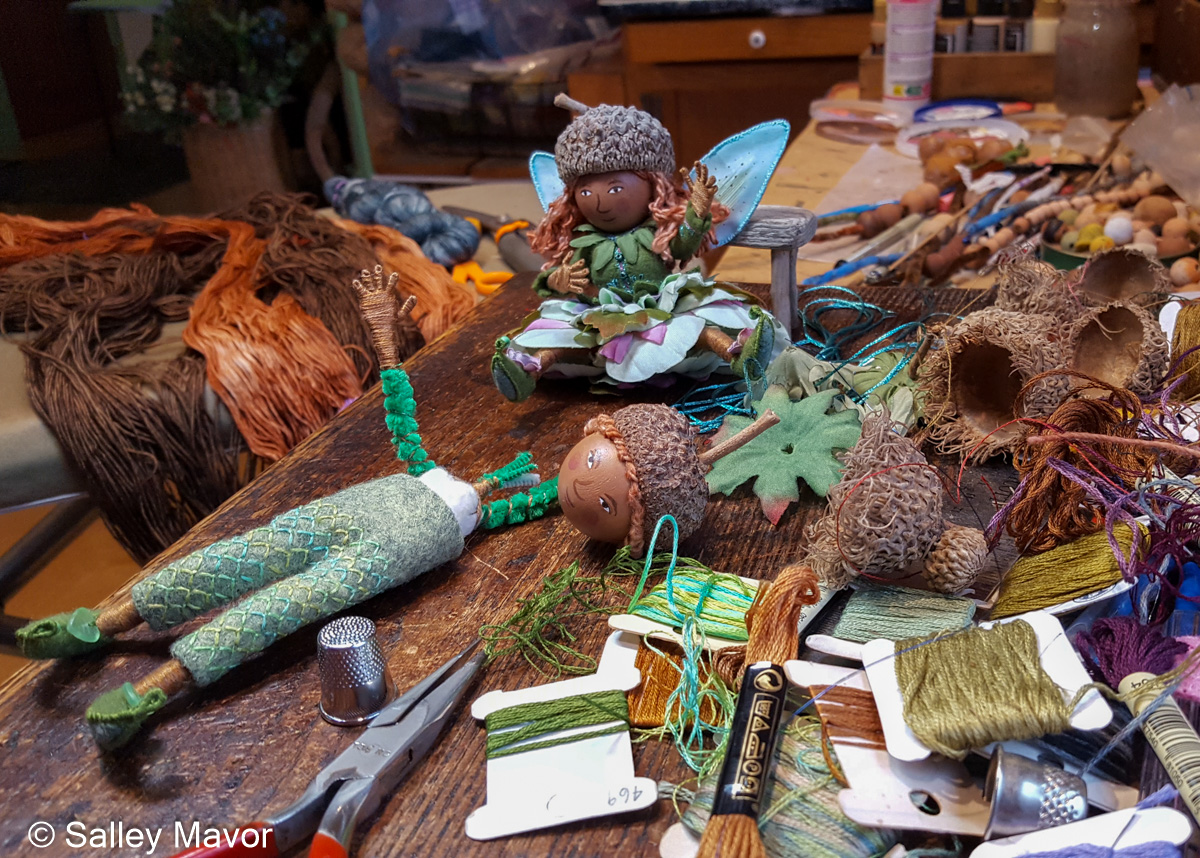
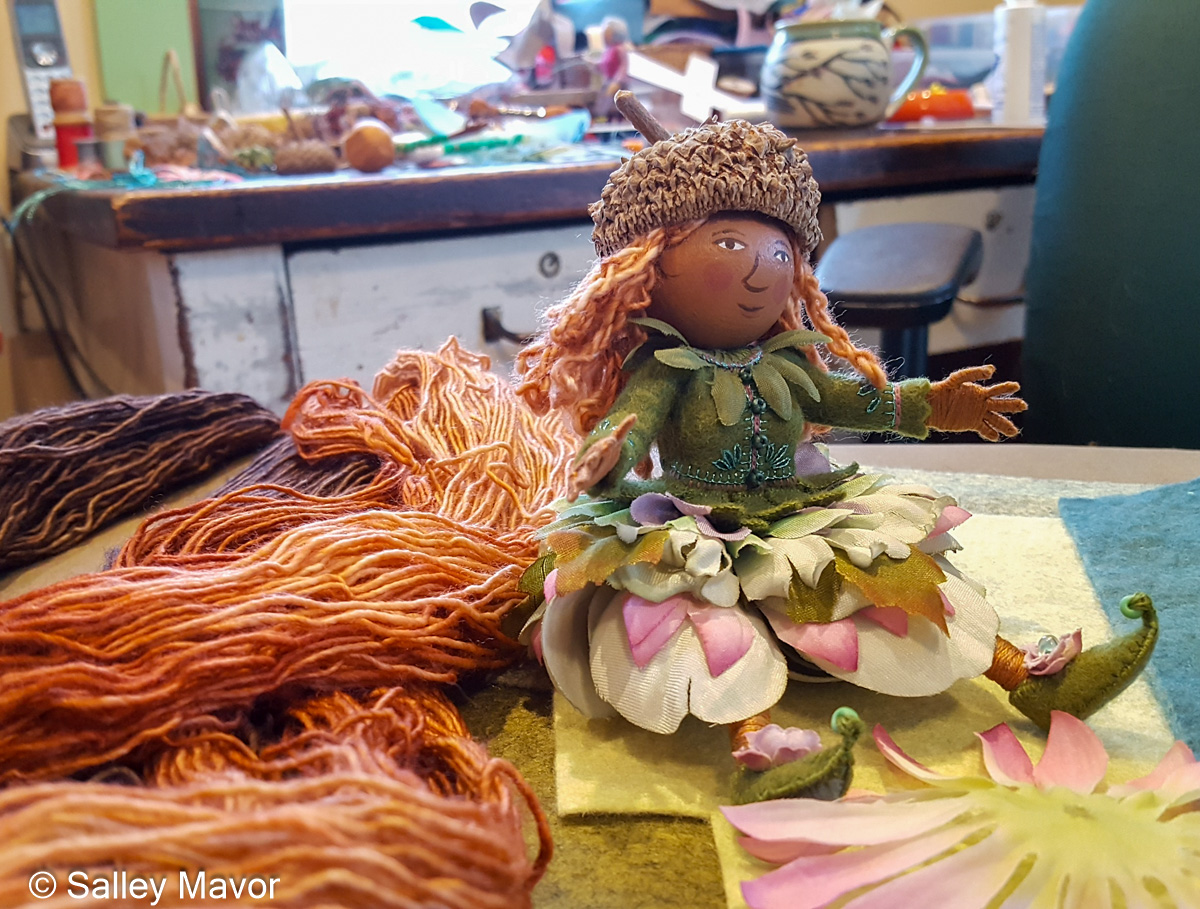
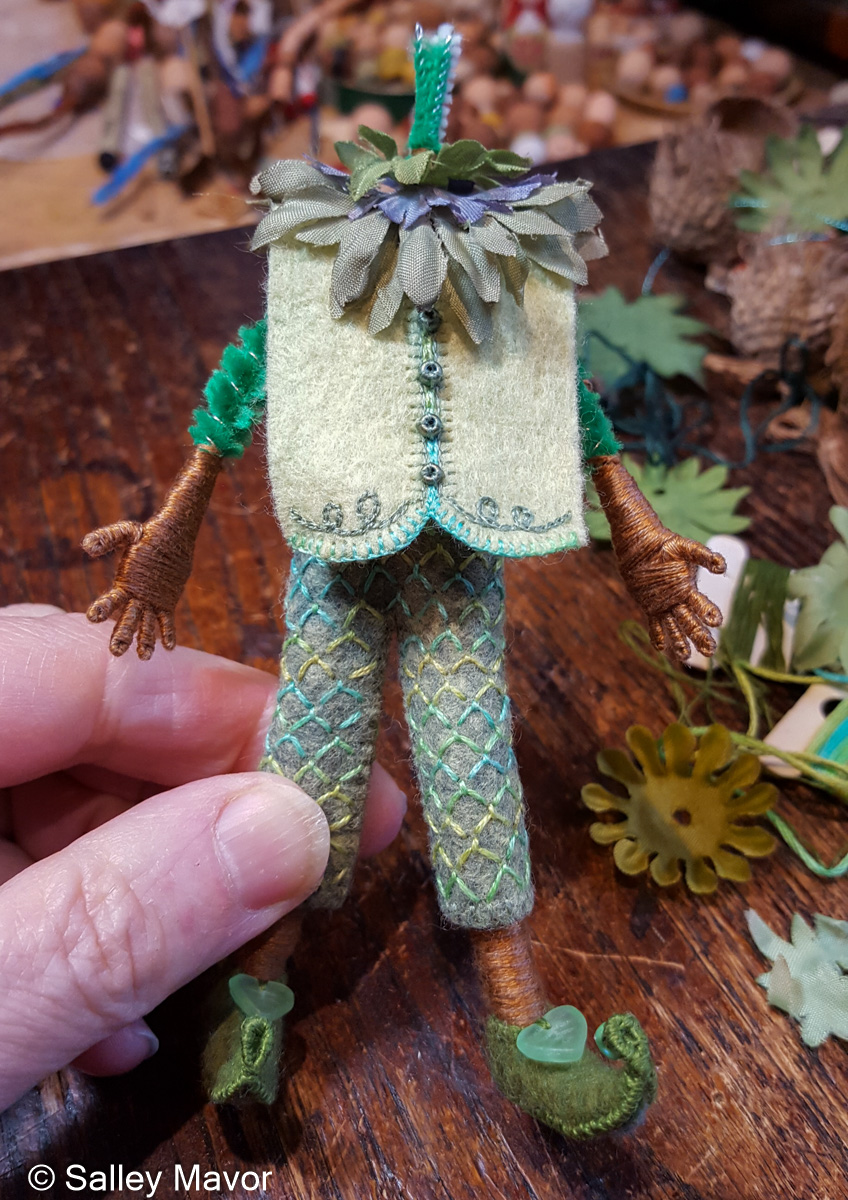
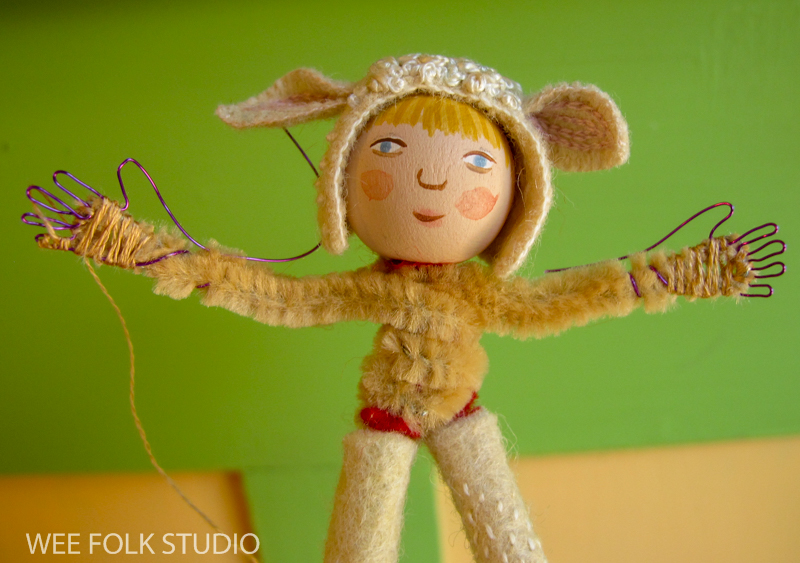
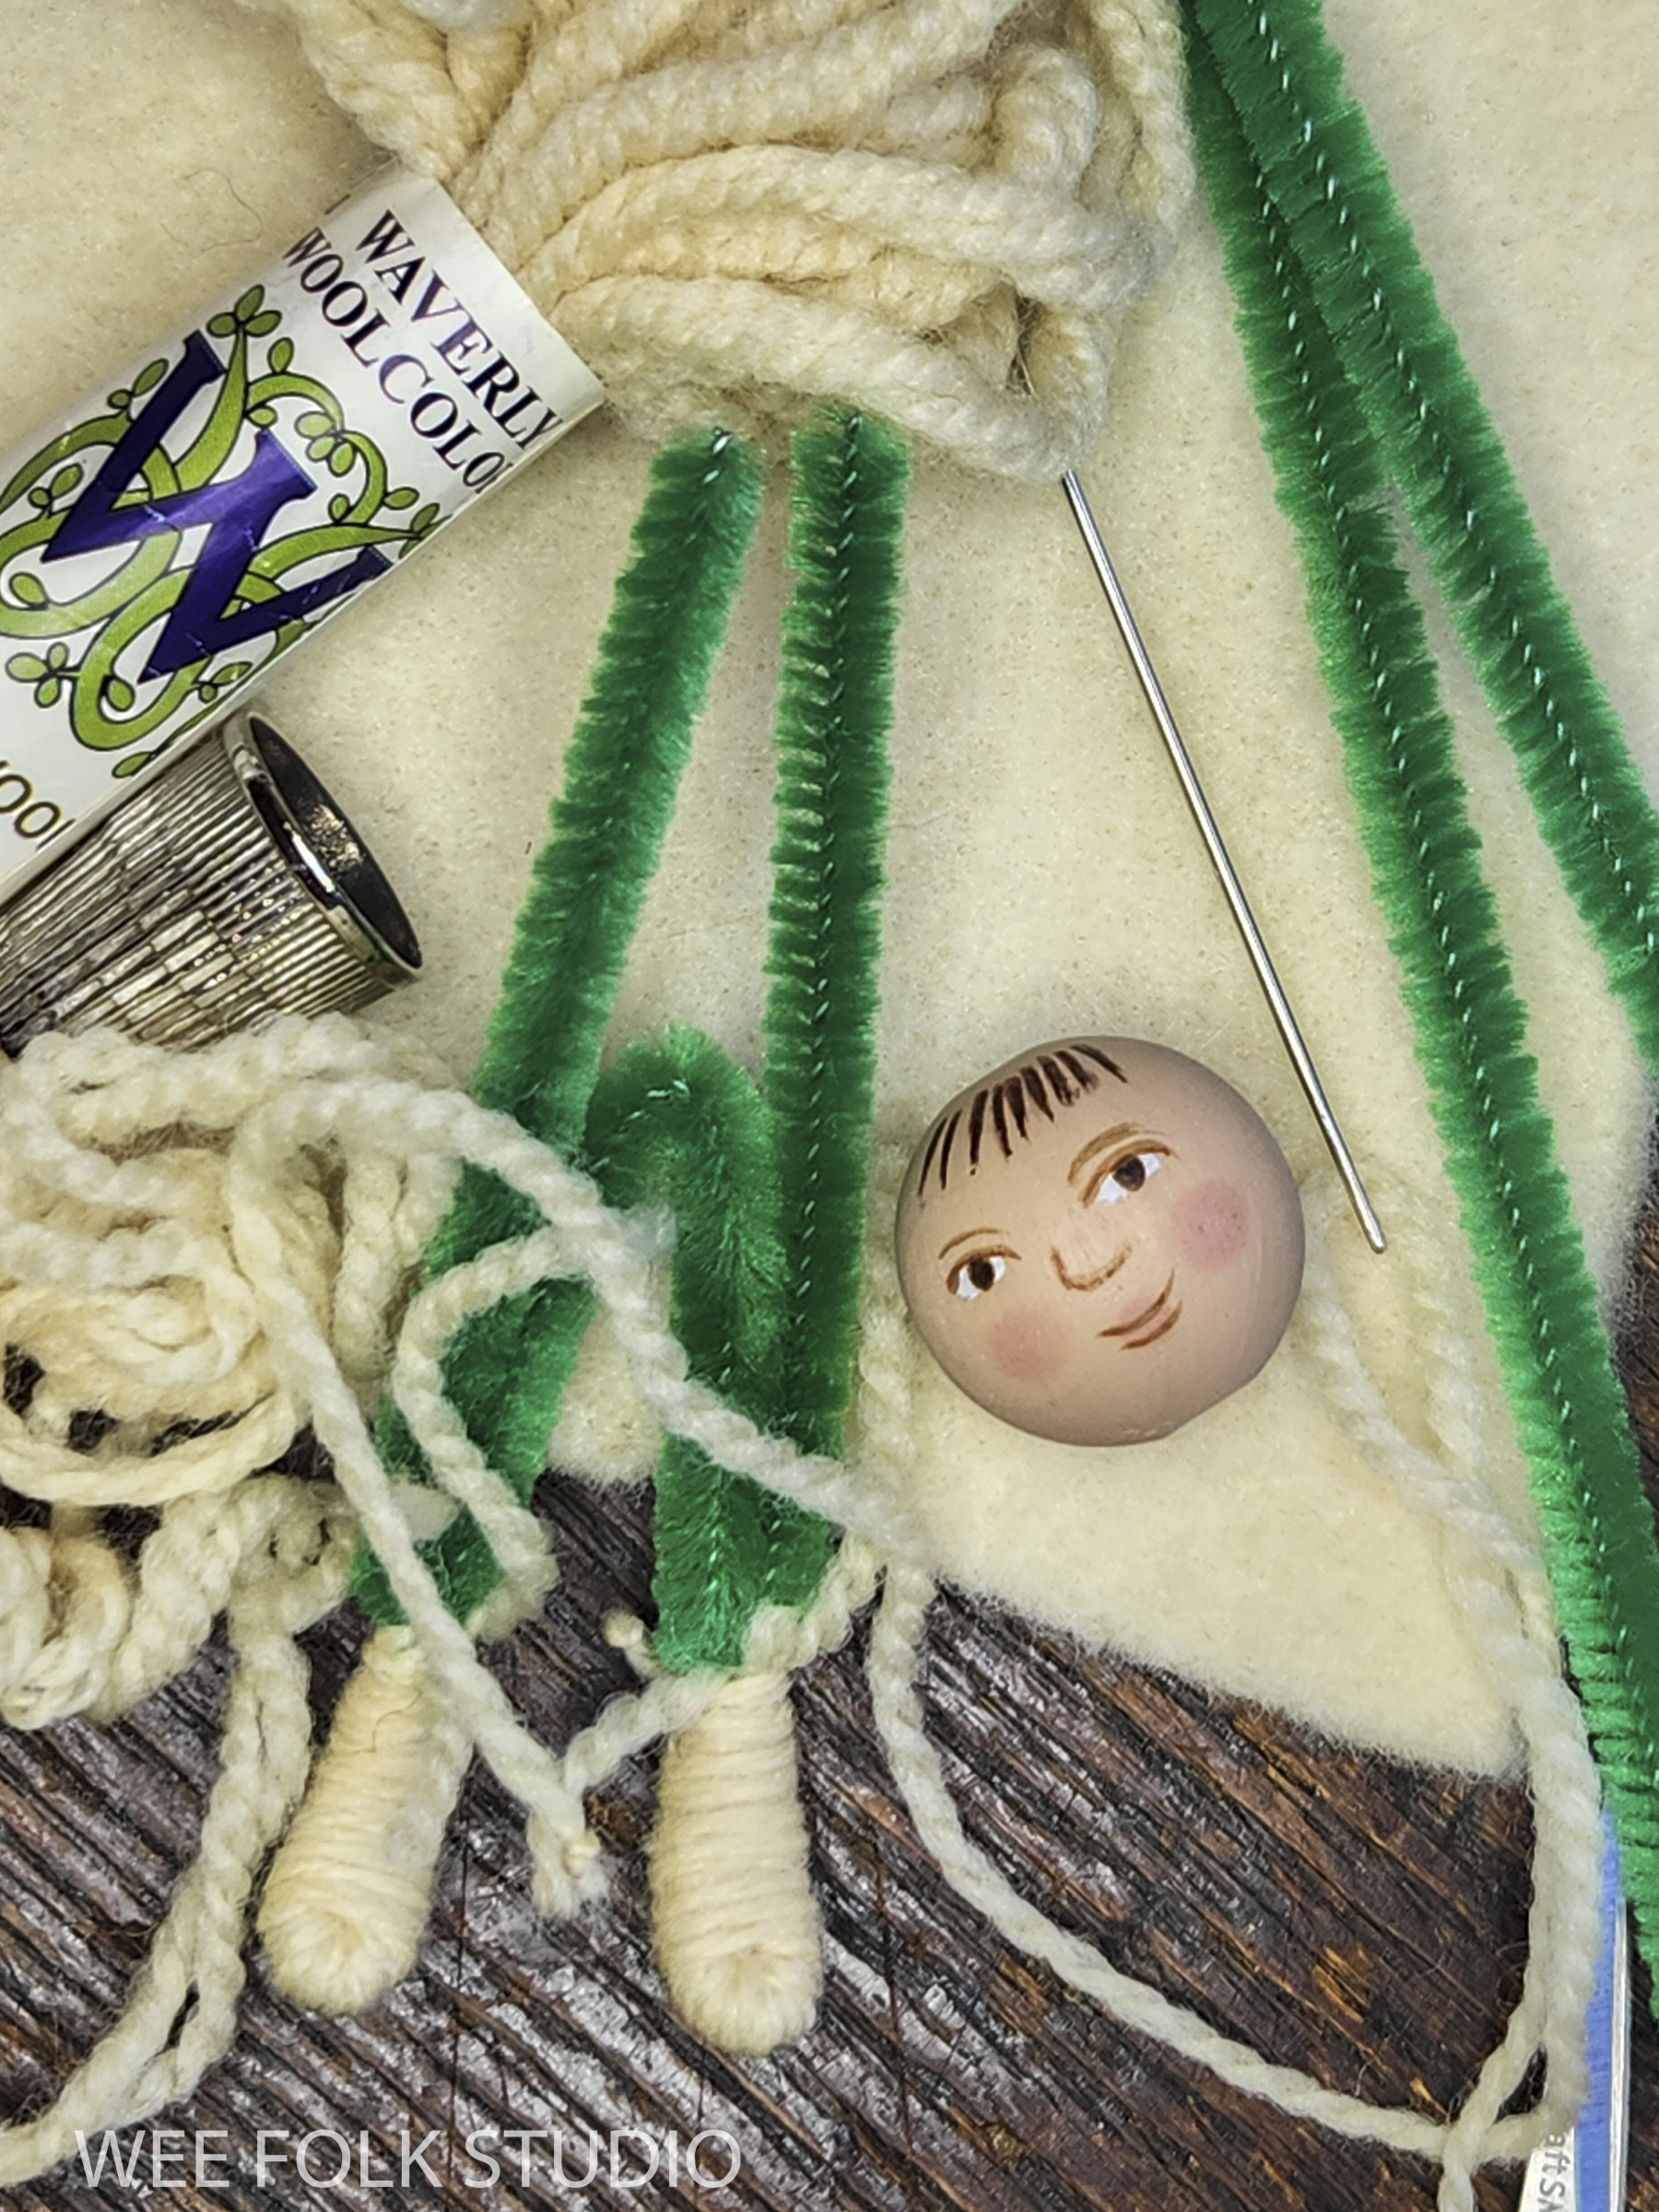
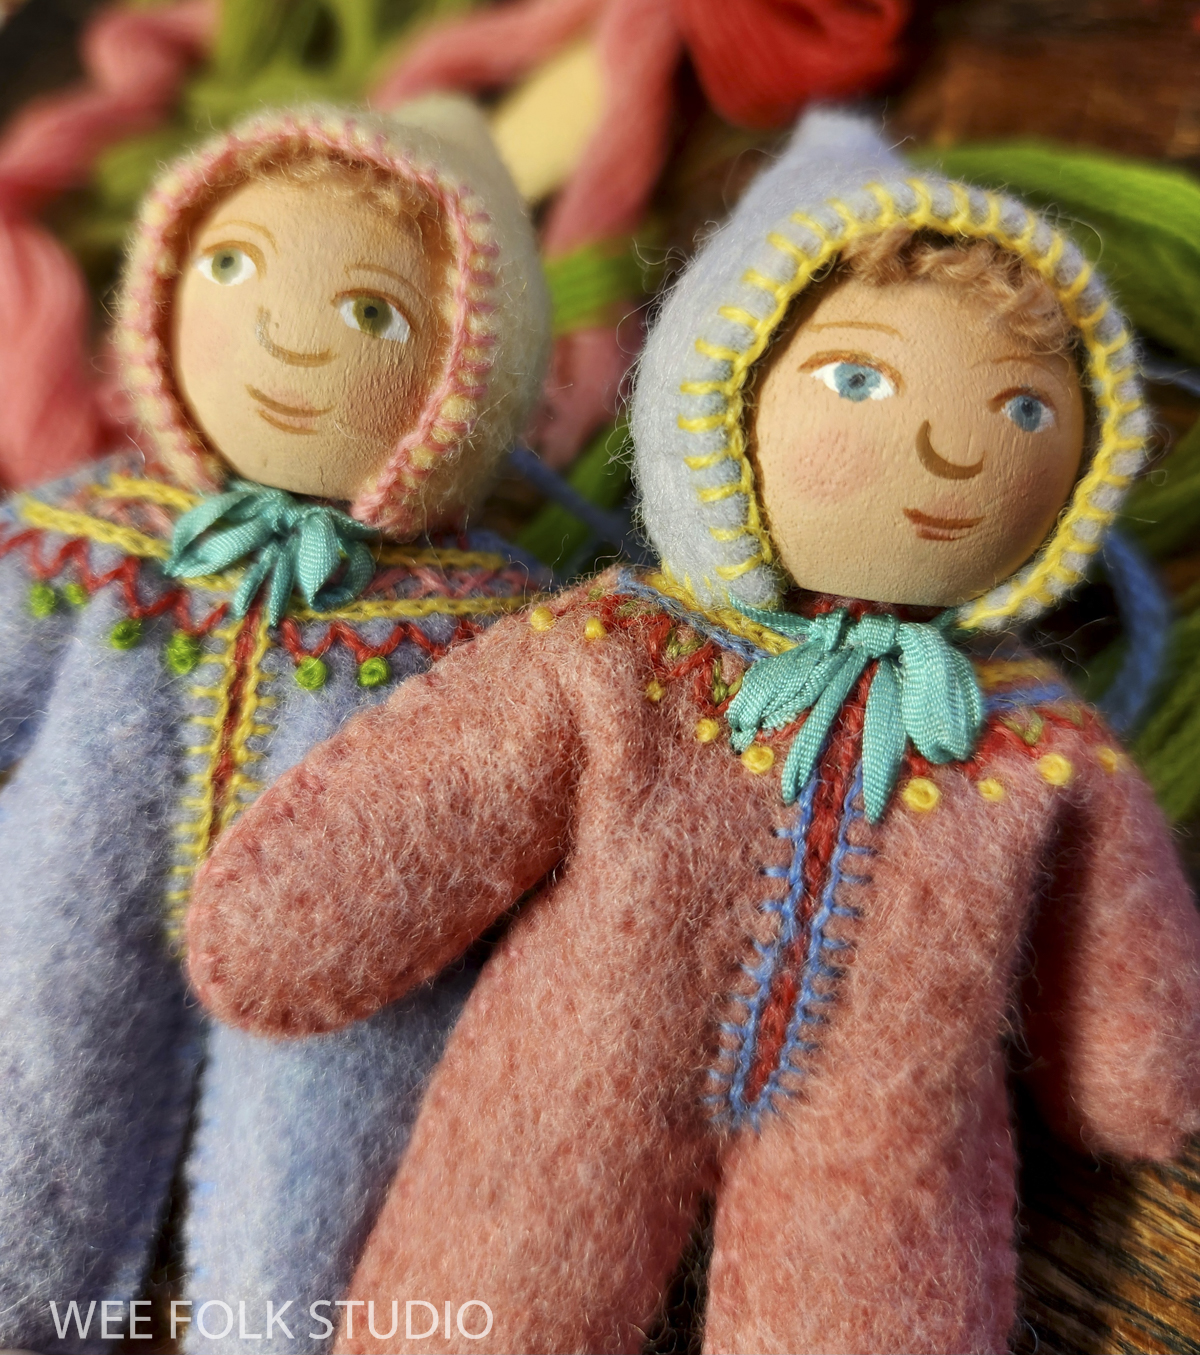
After a 4 year delay, I’m finally sharing photos, videos and commentary about how I made a pair of larger than usual fairies. A while back, a fan from the Midwest kindly sent a boxful of bur oak acorn caps. They are humongous compared to regular run-of-the-mill acorn caps that I used as hats for the 3-inch tall dolls in my how-to book Felt Wee Folk.
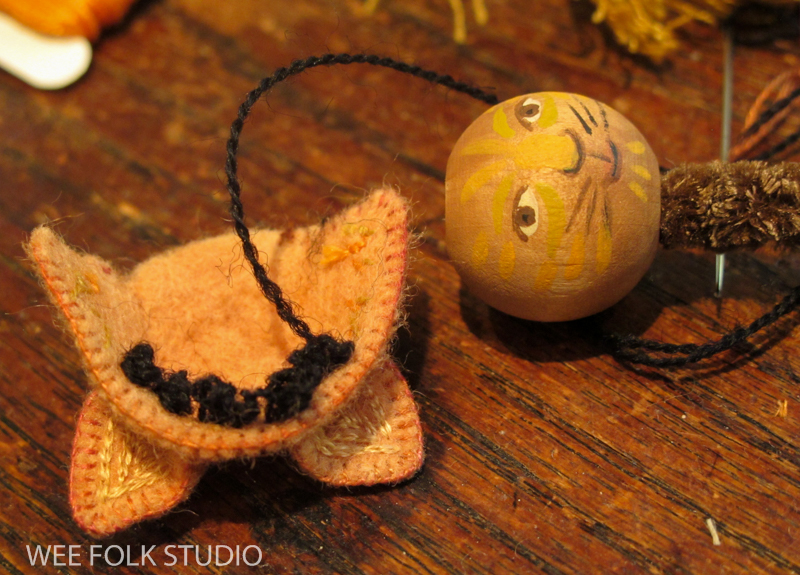
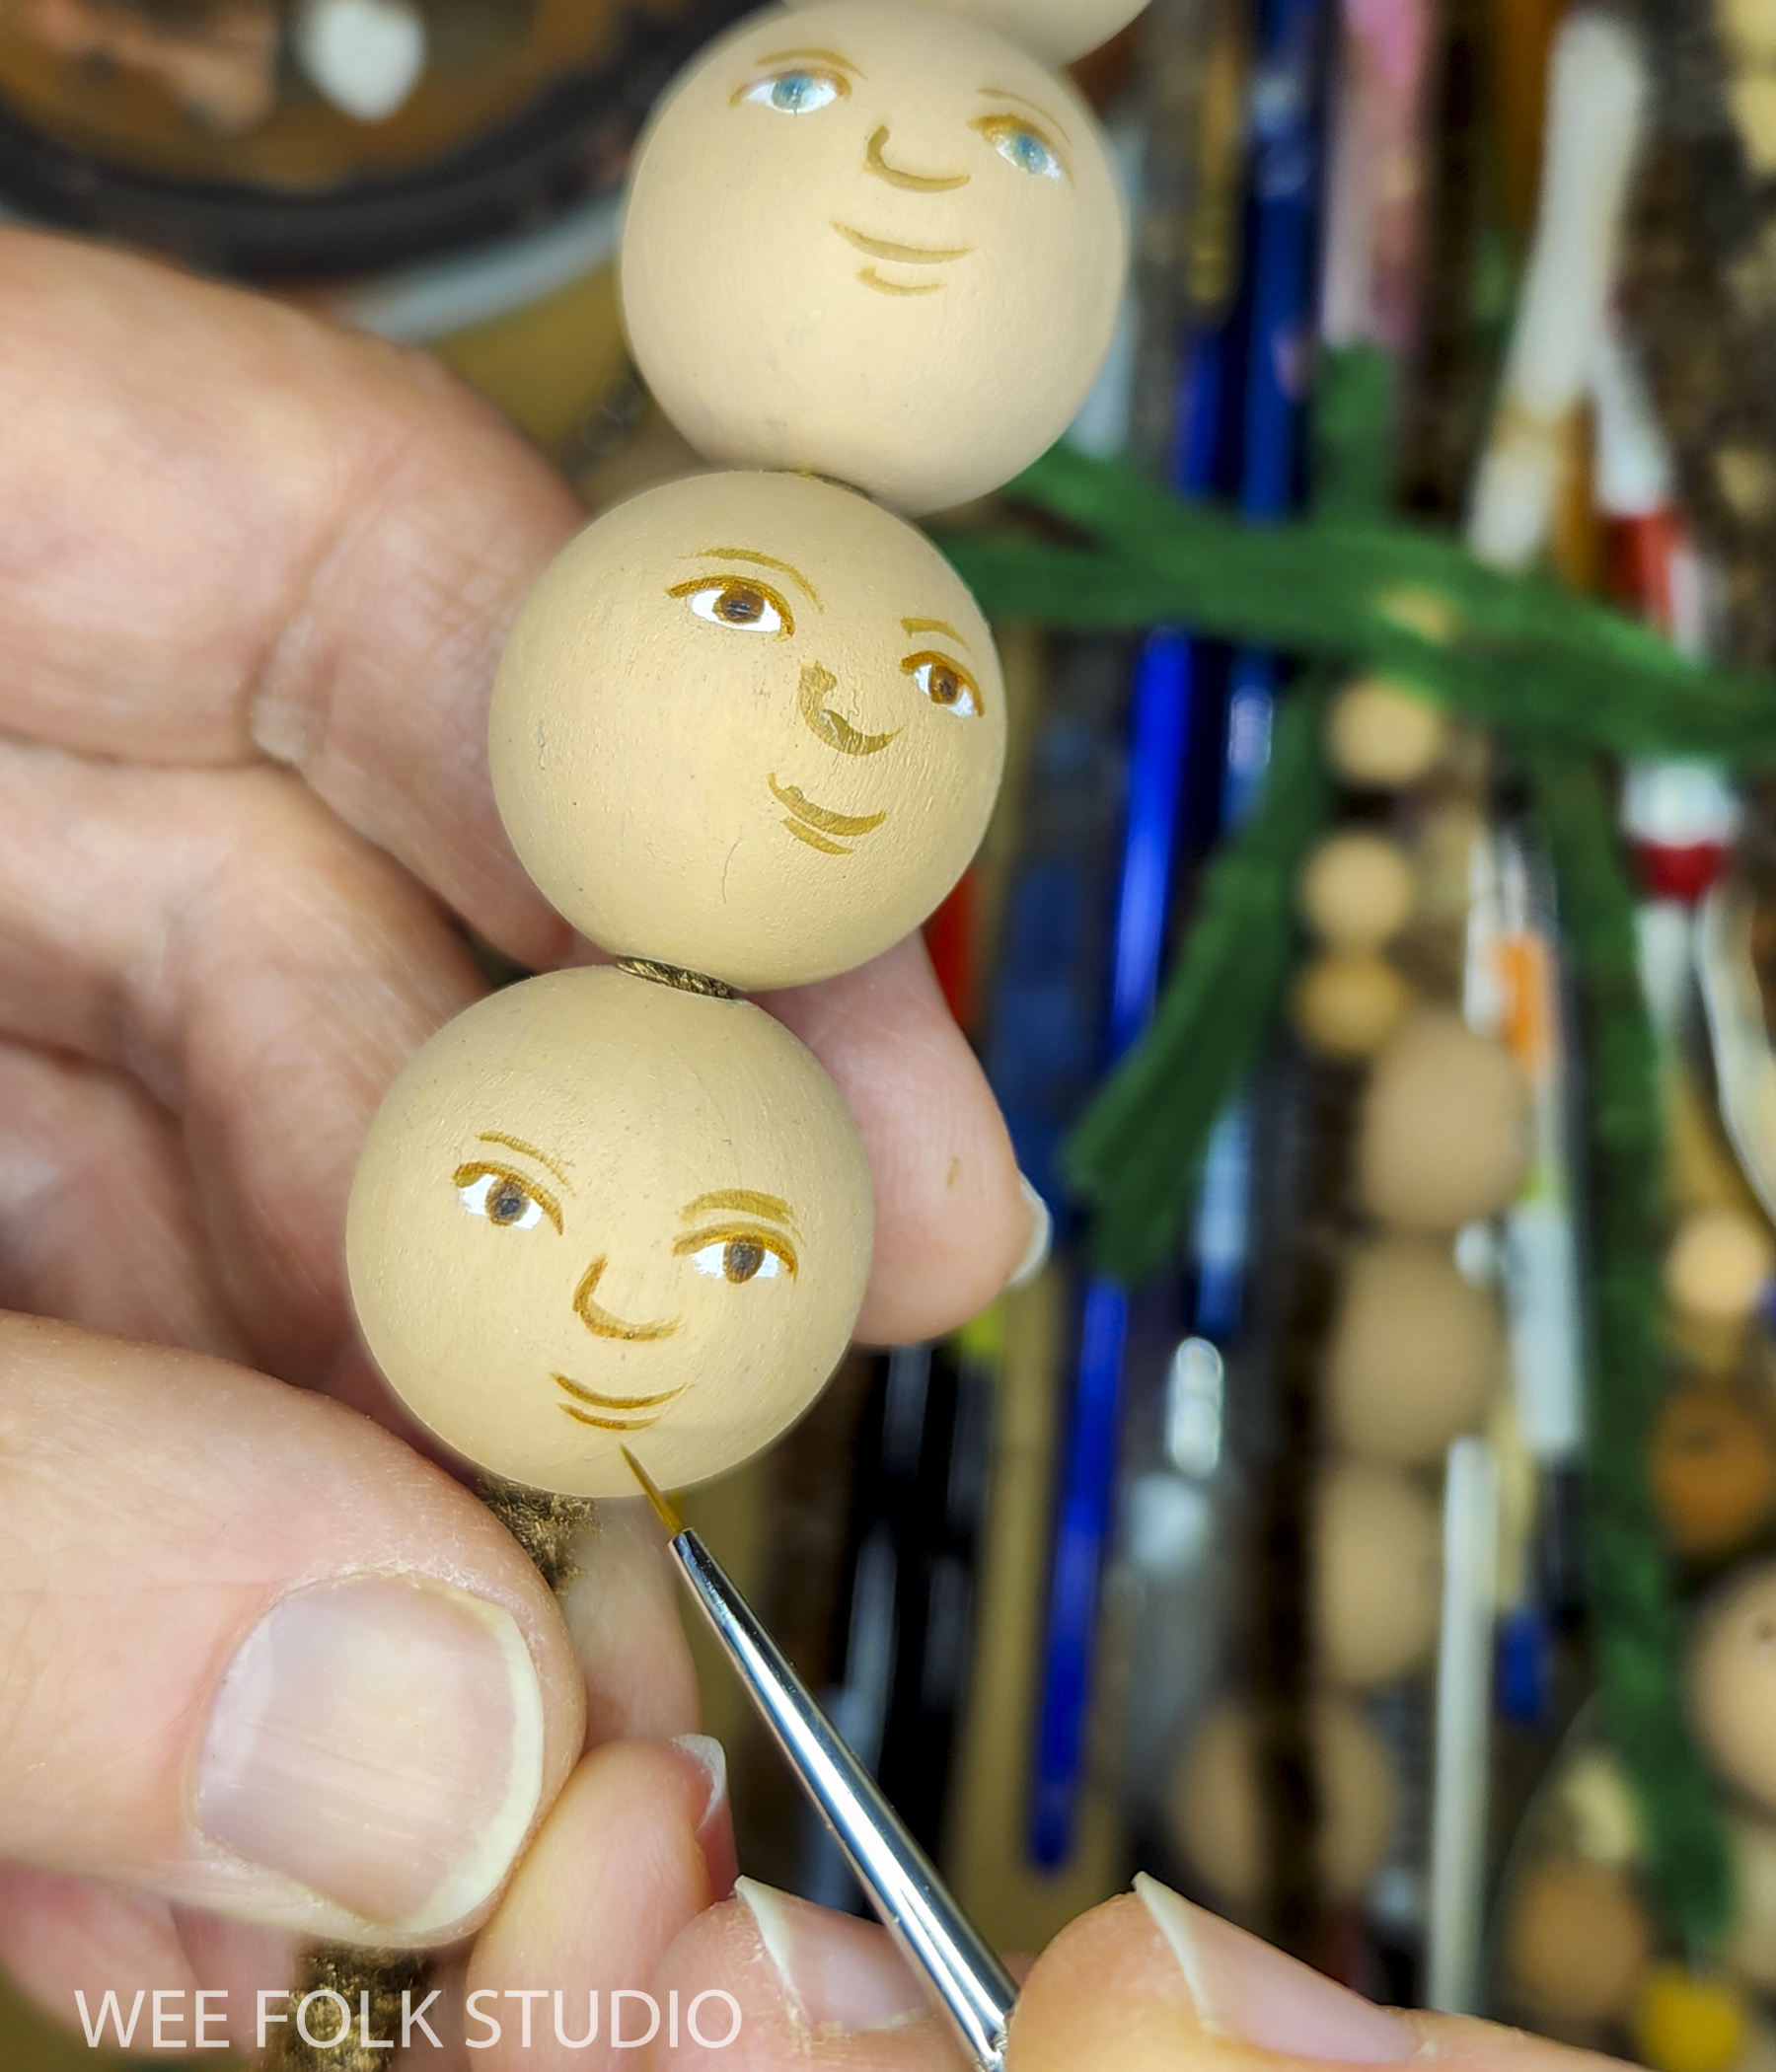
I really liked the hatlike quality of these caps, but to use them, I had to adjust my design to accommodate larger 5 to 6 inch figures with 1 1/4″ heads. To start, I painted faces on a bunch of wooden beads and ball knobs, until I was satisfied with a few impish ones with upturned pointy noses.
I increased the size of their pipe cleaner bodies and made hands to scale. It was also an opportunity to use larger faux flower petals from my collection for the skirt.
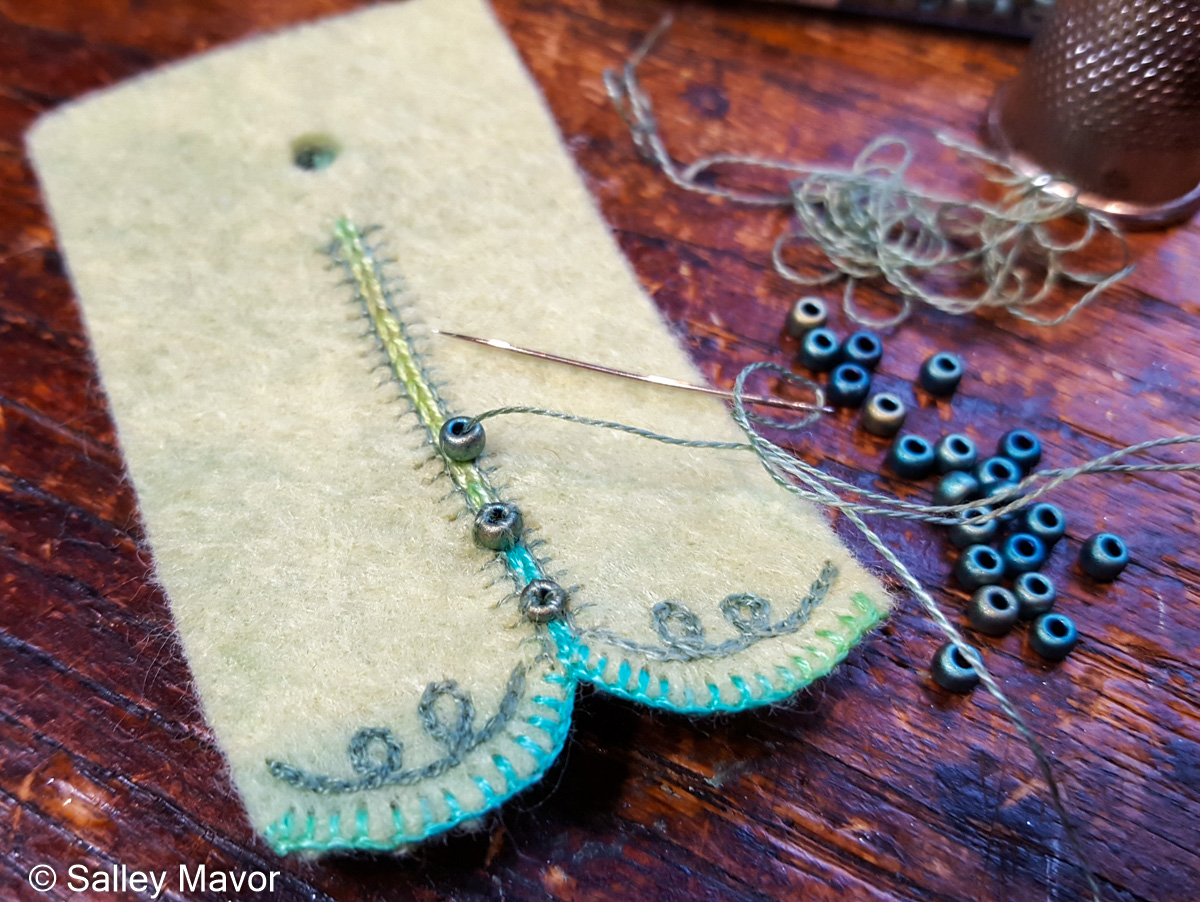
I made a peplum jacket pattern and cut it out of felt, which I embellished with a flower petal collar, beads, embroidery floss, and metallic thread.
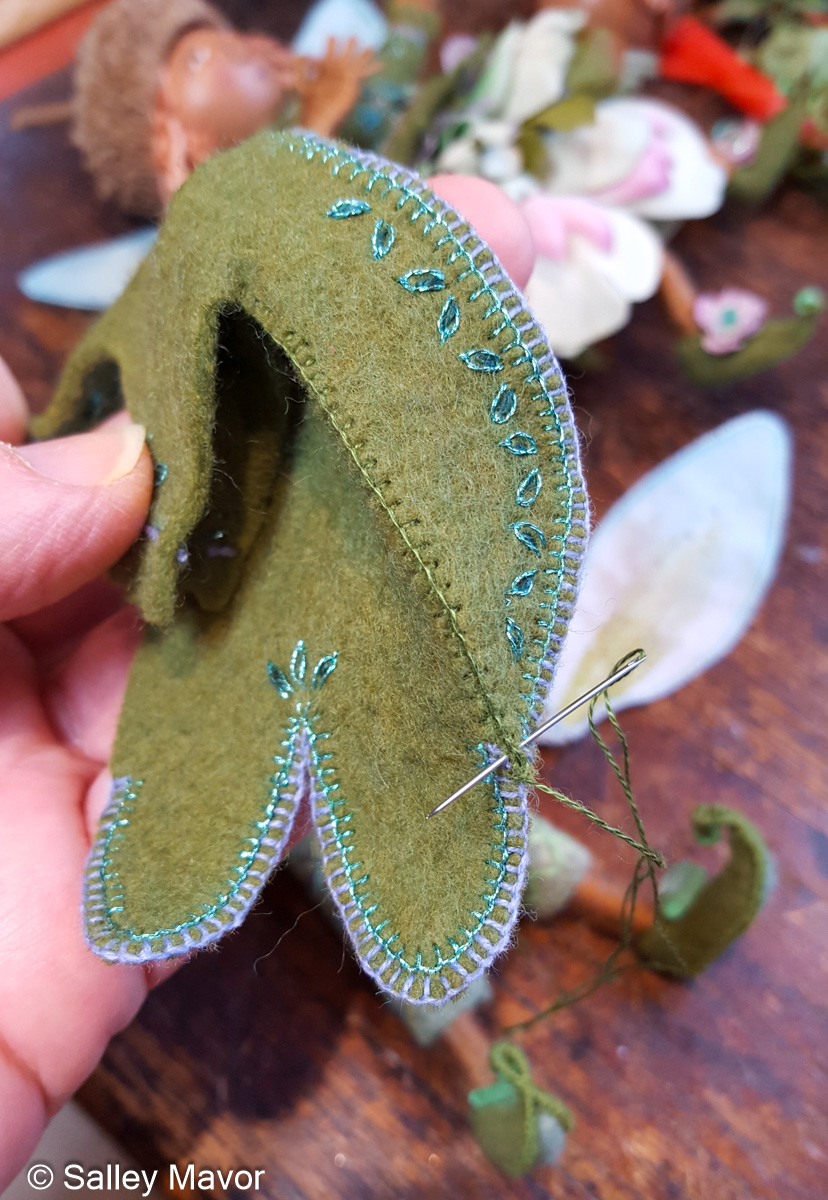
Because these fairies have nice big feet, I could more easily cobble shoes for them. This pair of slippers are made out of felt, with a bit of wire reinforcement to give them a pointy elfin look.
Here’s a video of my work table that I shared on Facebook and Instagram in 2020. The response to the video was mixed. Some people were uncomfortable with the disorderly jumble, while others were relieved to see another creative space that looked as messy as theirs.
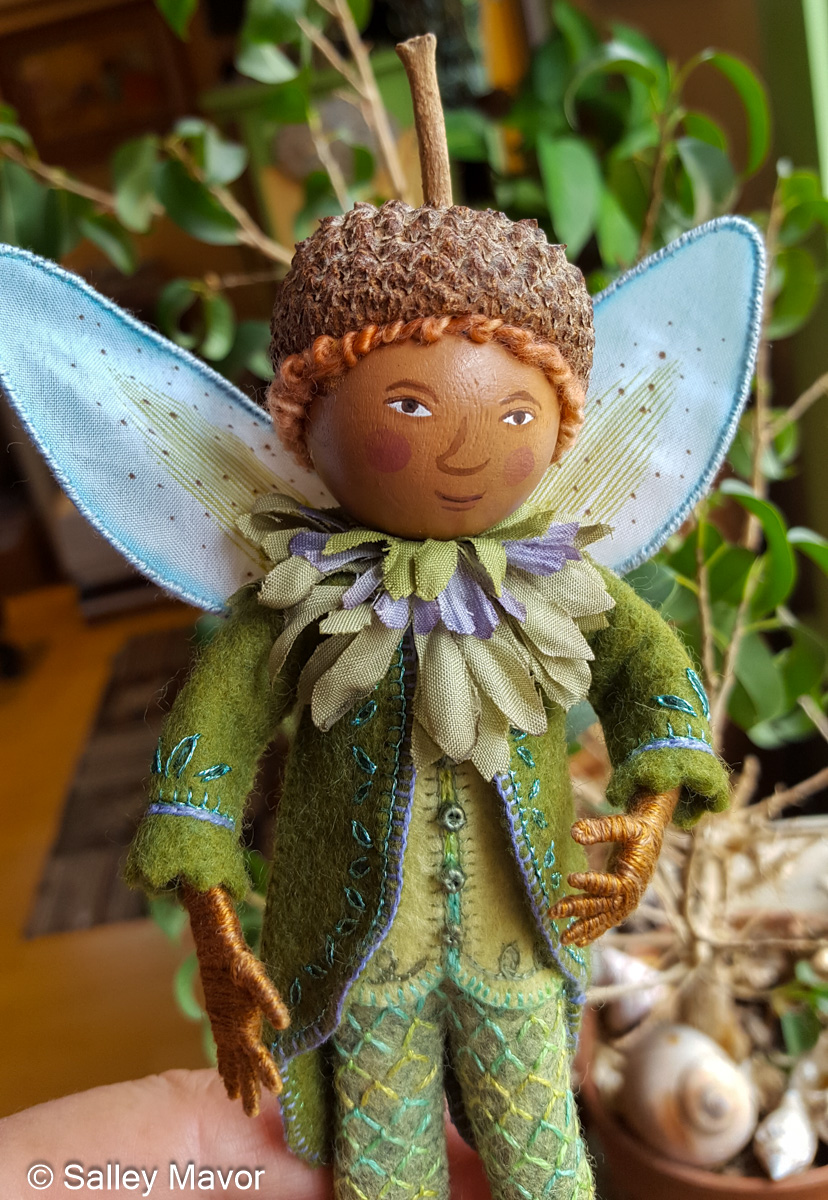
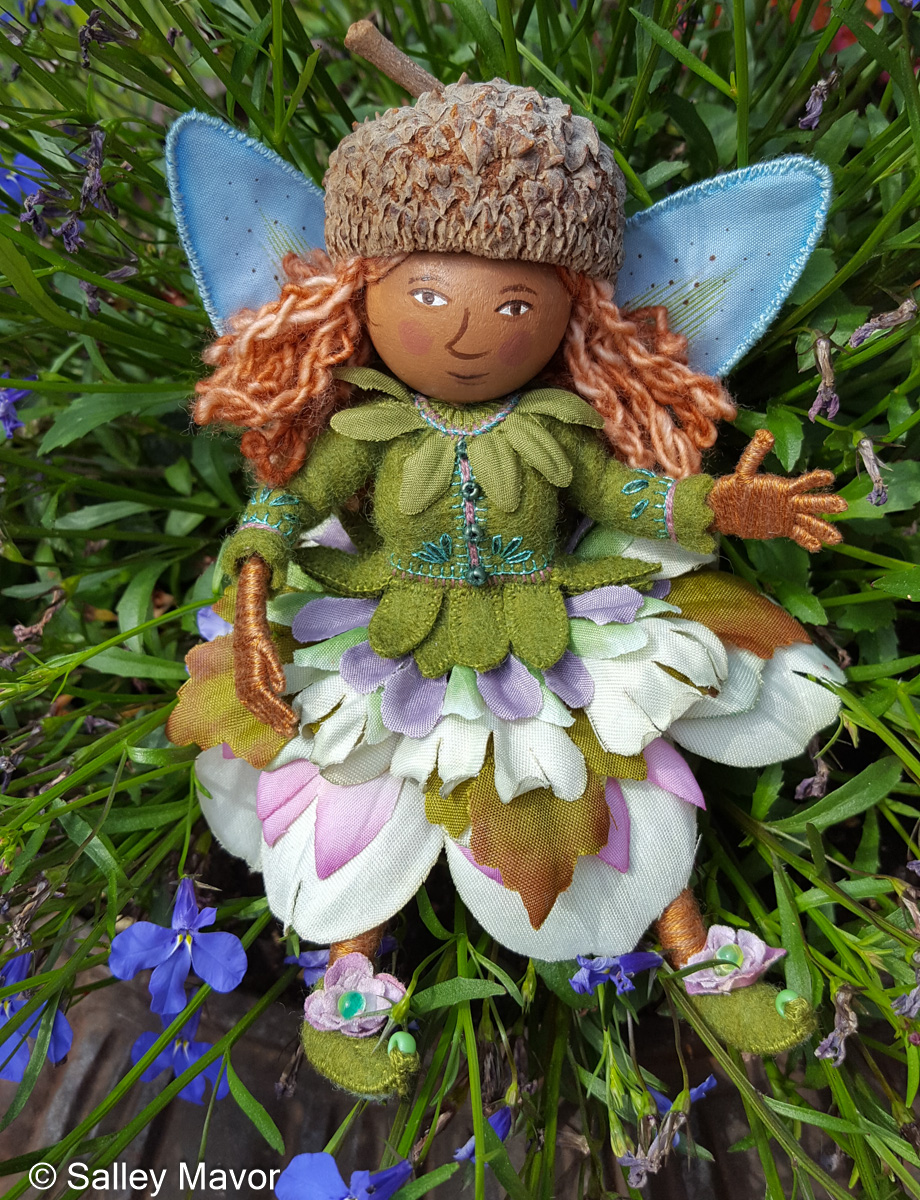
I attached felt wigs to the bead heads using the same techniques that I teach in my how-to book, Felt Wee Folk. This doll’s hair is made with variegated single ply Merino wool from Flying Finn Yarns. I created tangled ringlets by stitching yarn up an down the long tresses.
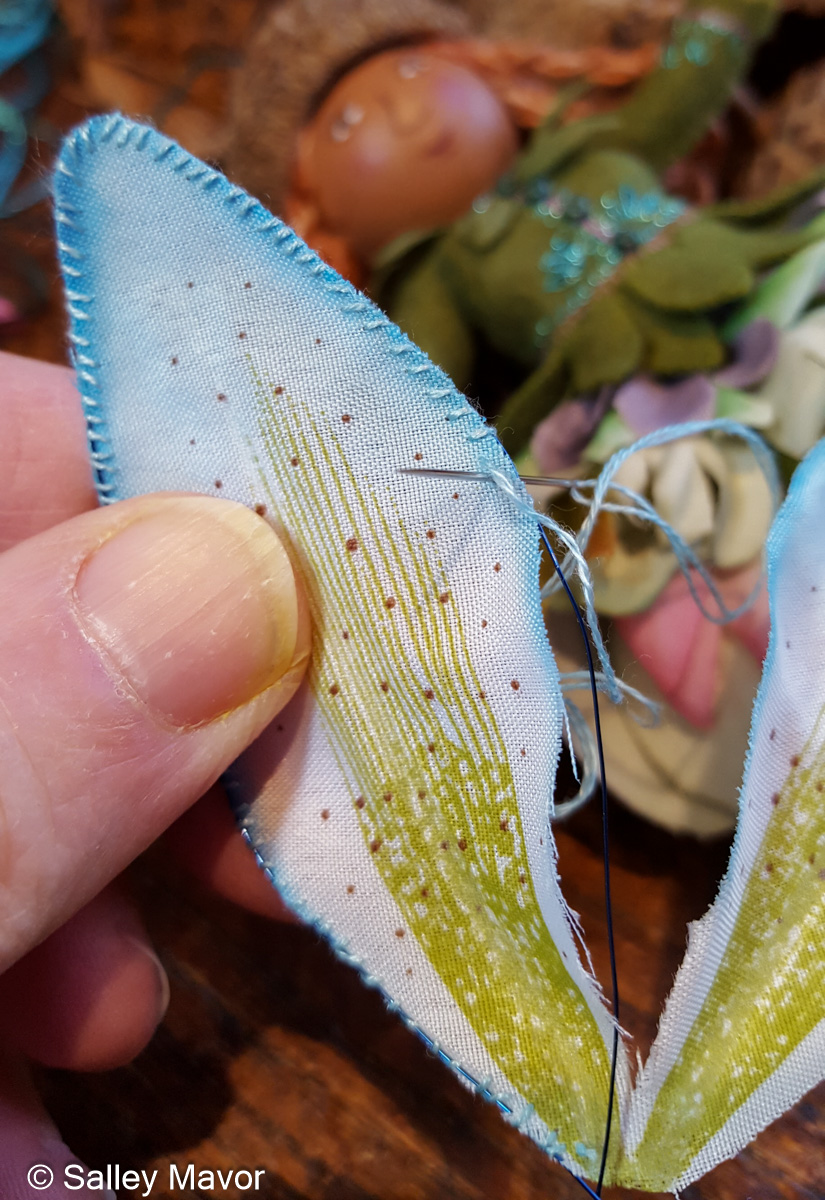
Just as with the smaller fairies, I made wings out of faux flower petals. But because of the increased scale, these wings were too floppy. I gave them extra support by sewing wire along the outside edge, going around a few times until the wire was completely hidden by thread.
In this video, you can watch over my shoulder while I stitch wire to the outside edge of a wing and embroider a felt tailcoat.
I dressed one of the fairies in an embroidered felt vest and leafy cravat…
and a green felt tailcoat embellished with metallic thread.
At 5 and 6 inches tall, they are the largest and best dressed fairies I’ve ever seen!
The Bur Oak Fairies’ permanent home is in the West Falmouth Library, downstairs in the Moira Shea children’s room. You can find them hovered over a fairy house made by Andrea Riggillo.
To keep up with new posts, subscribe to this blog. If you’d like to see more frequent photos tracking the projects in my studio, please follow me on Facebook and/or Instagram.
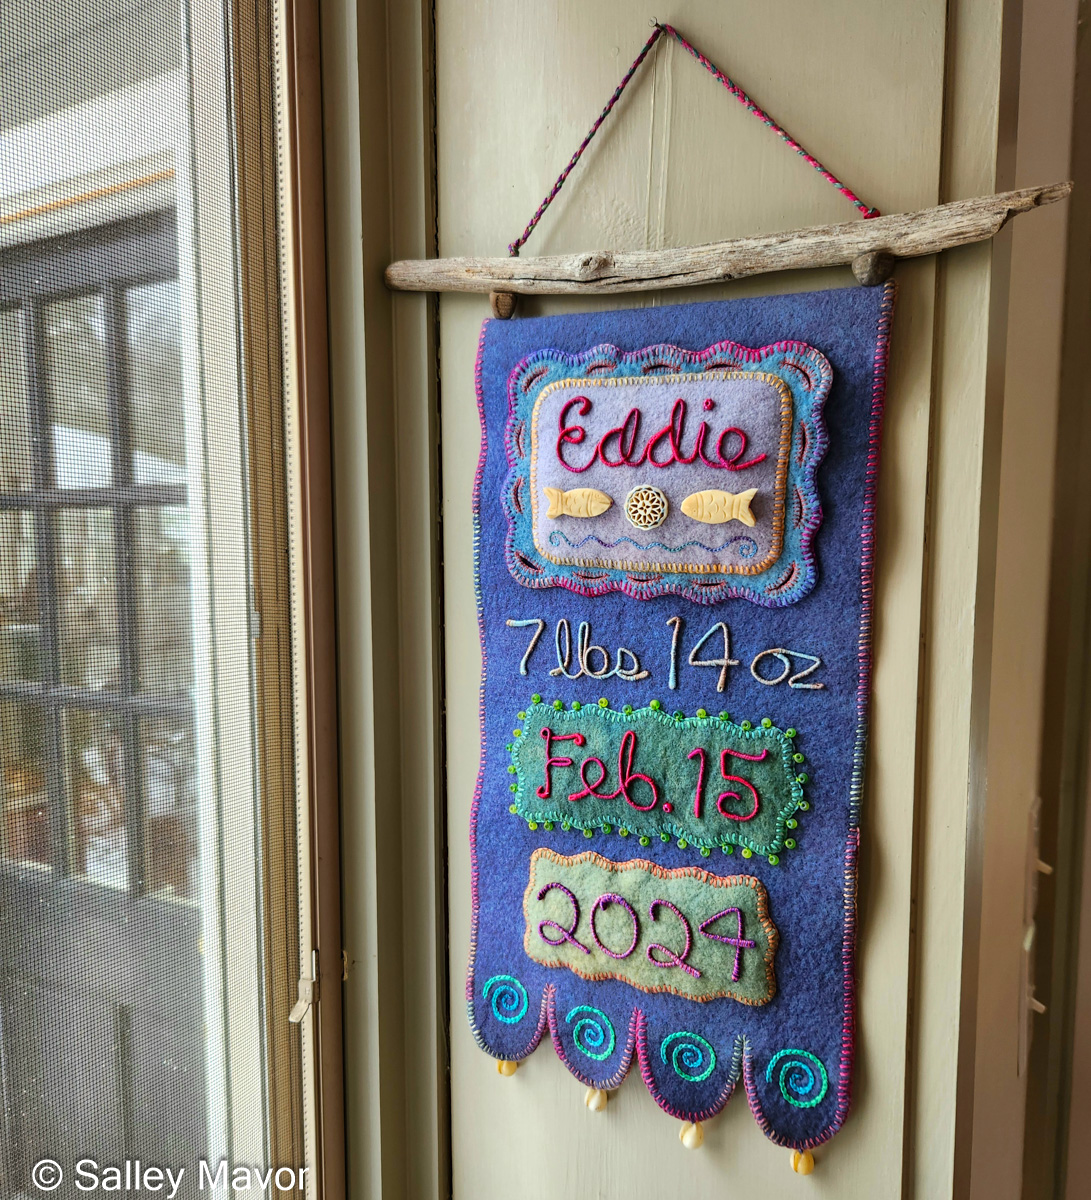
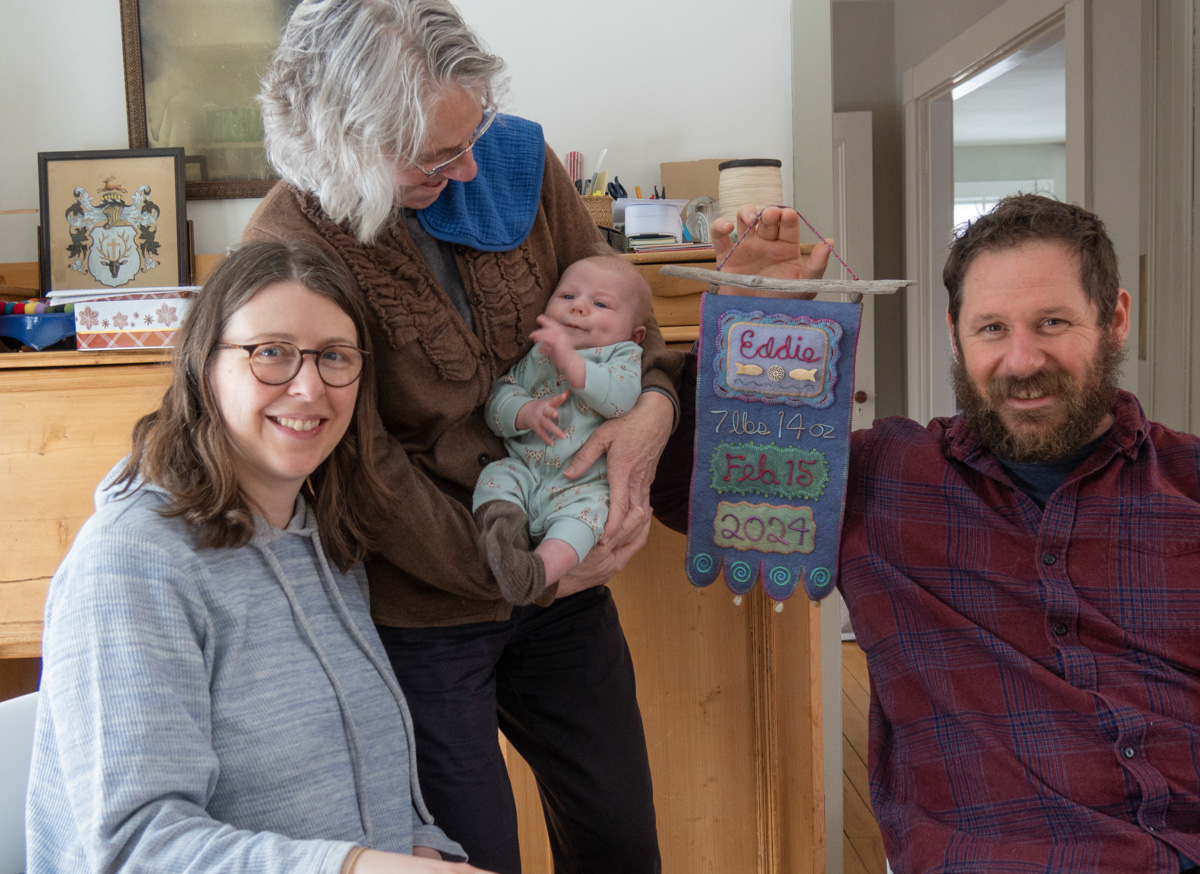
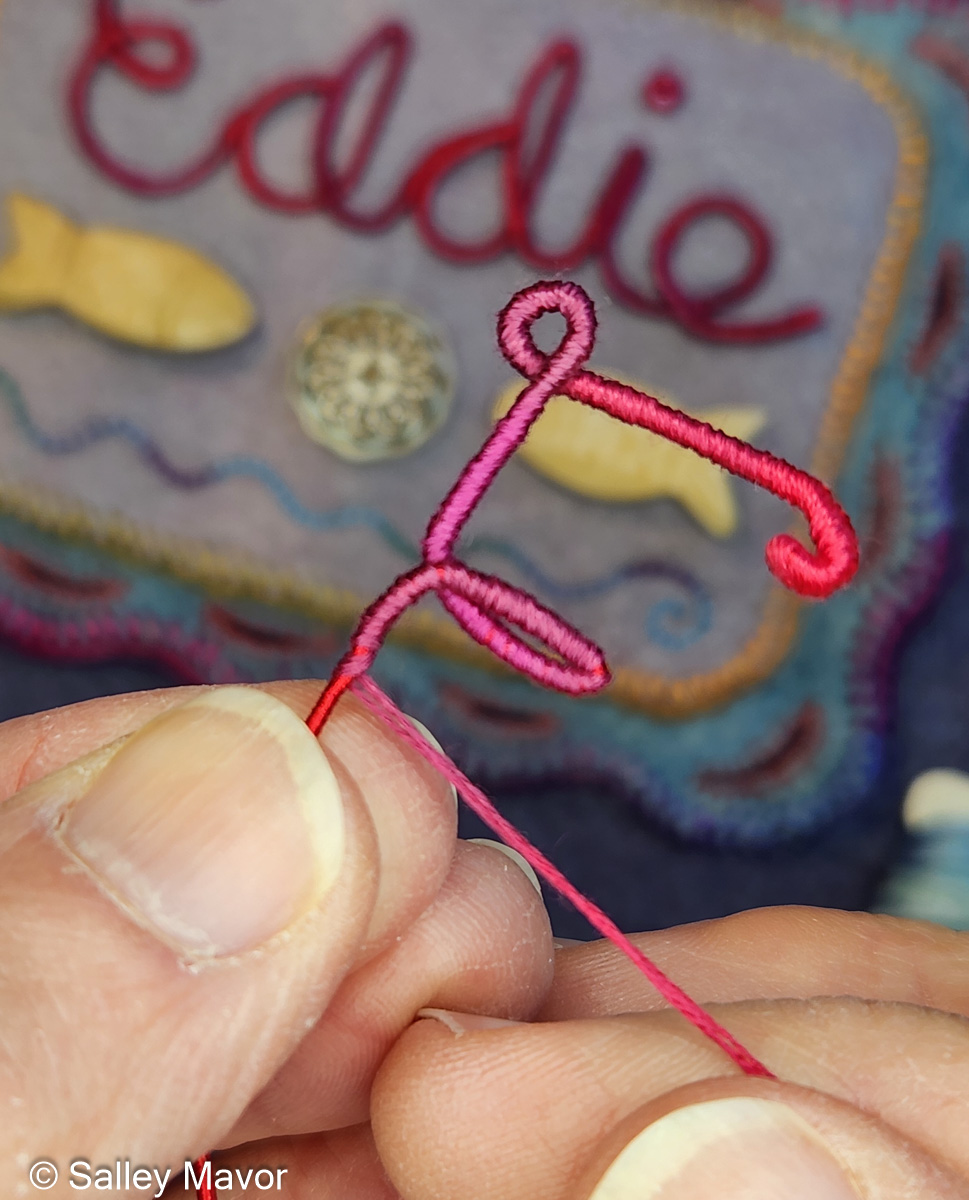
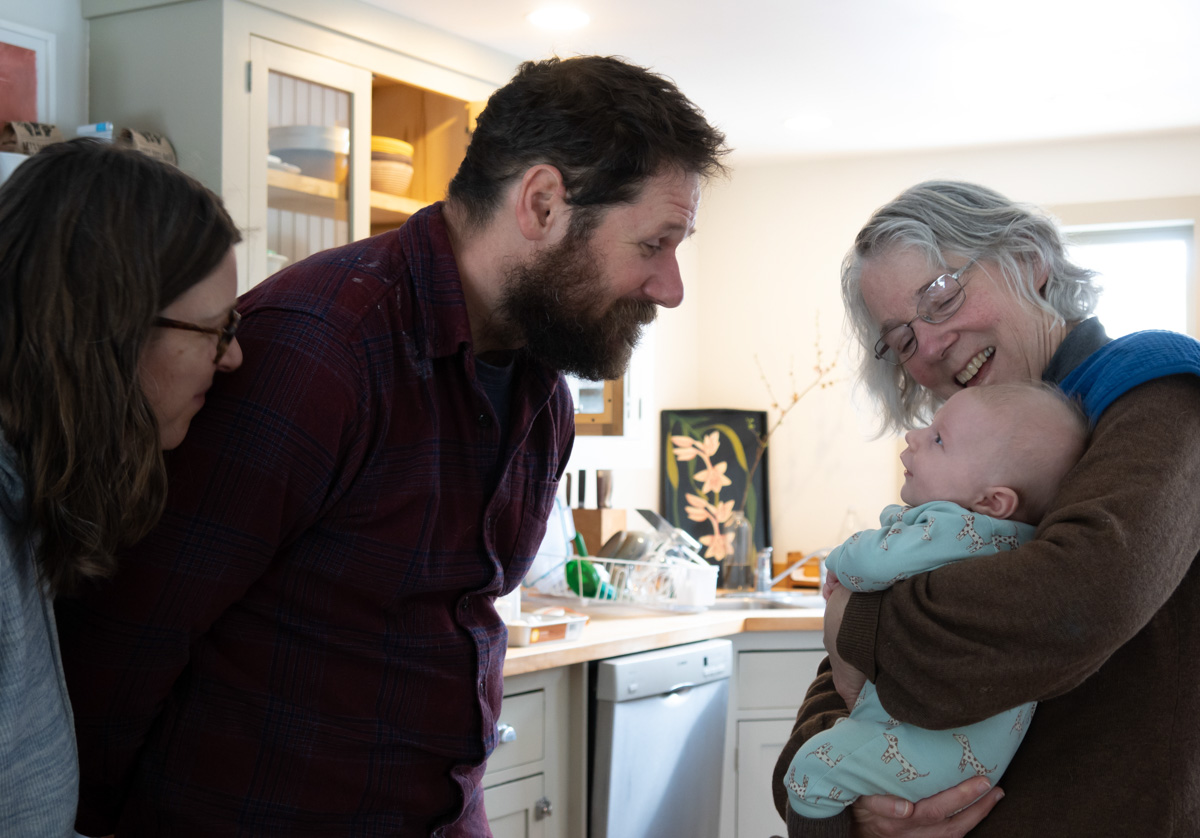
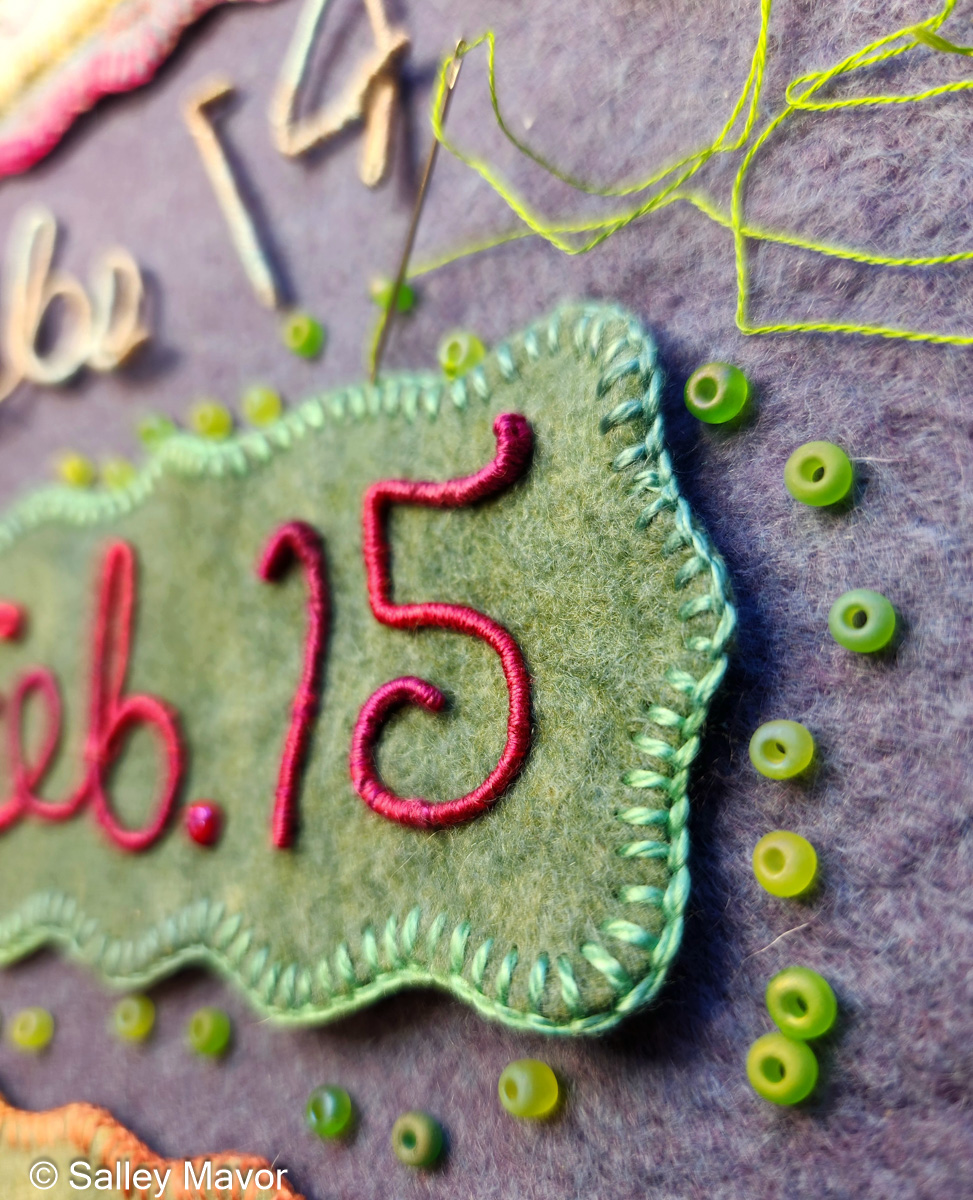
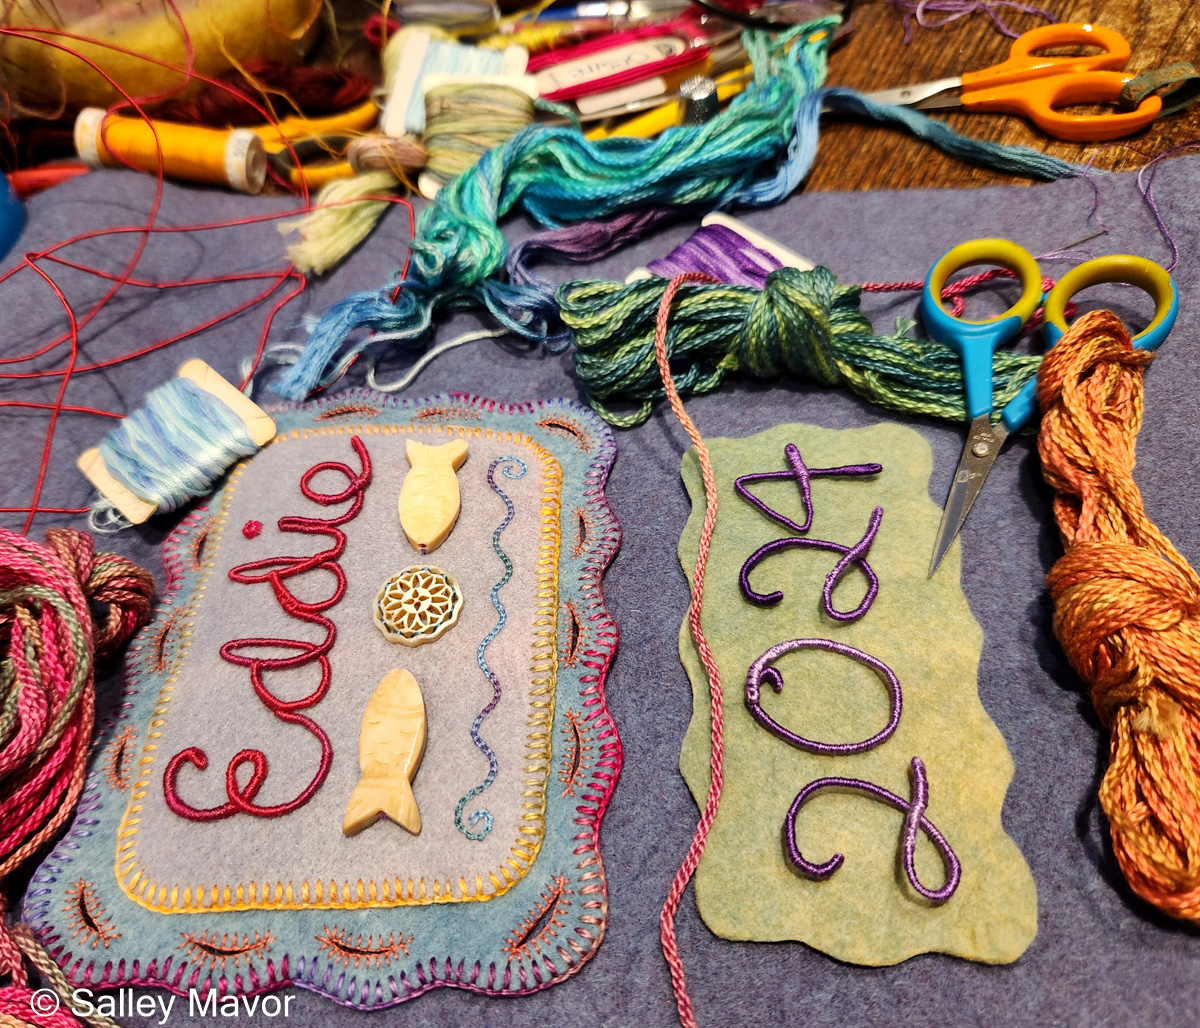
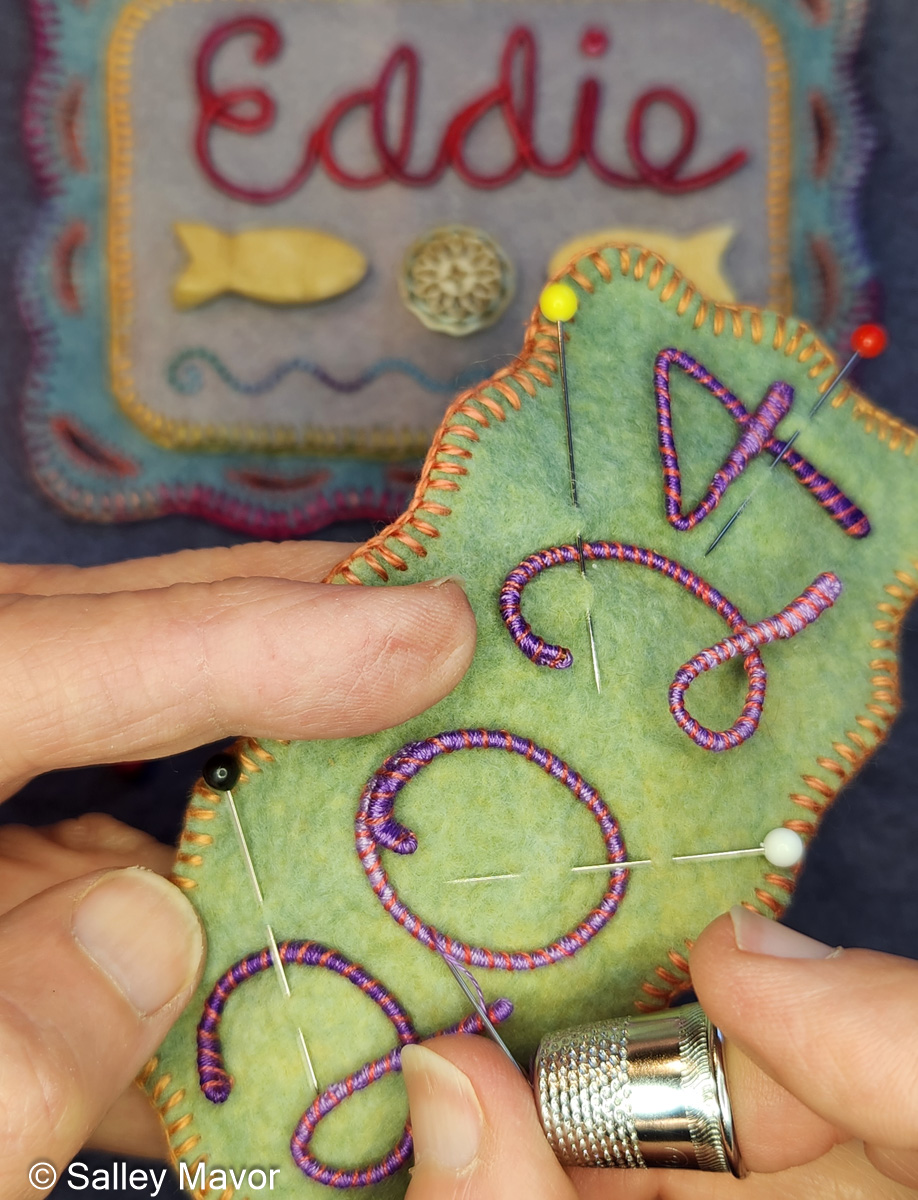
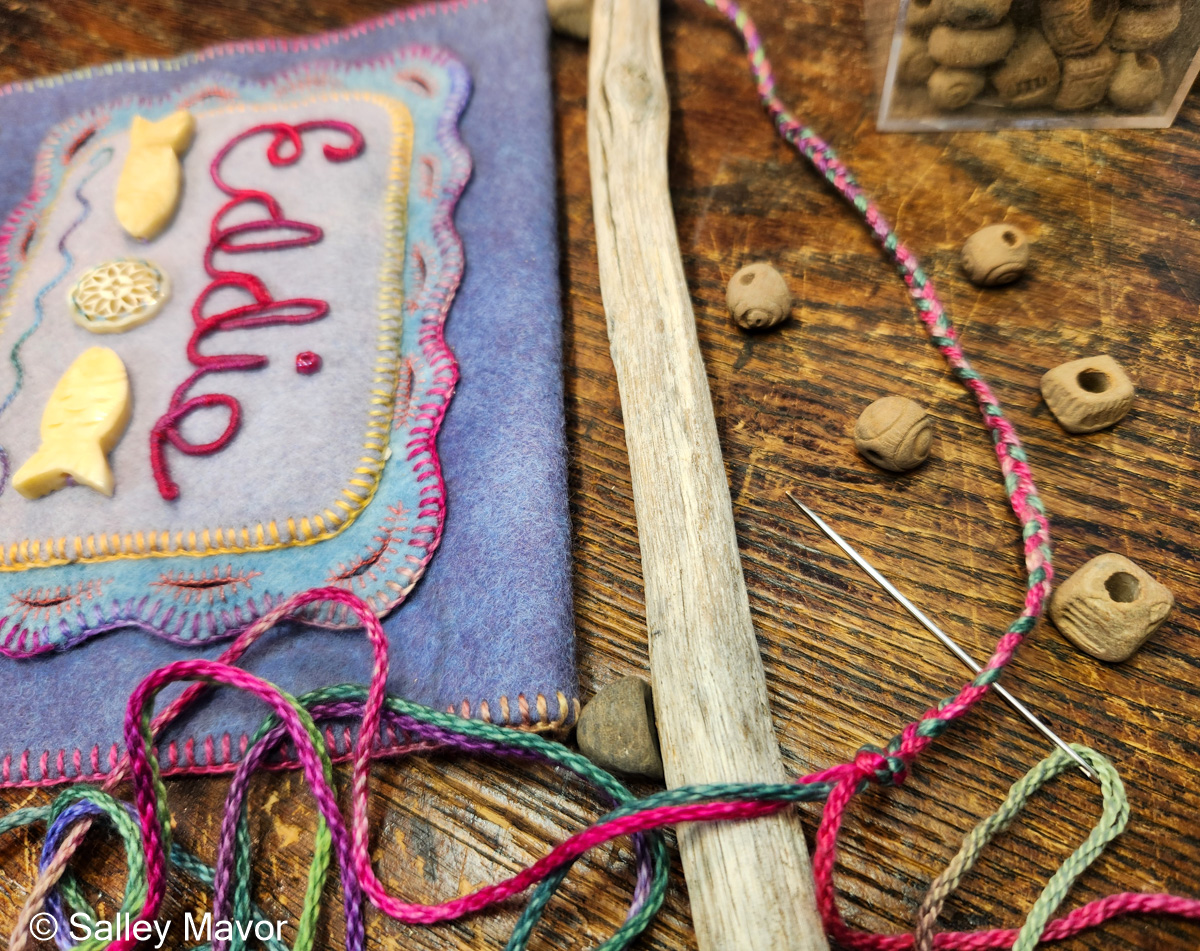
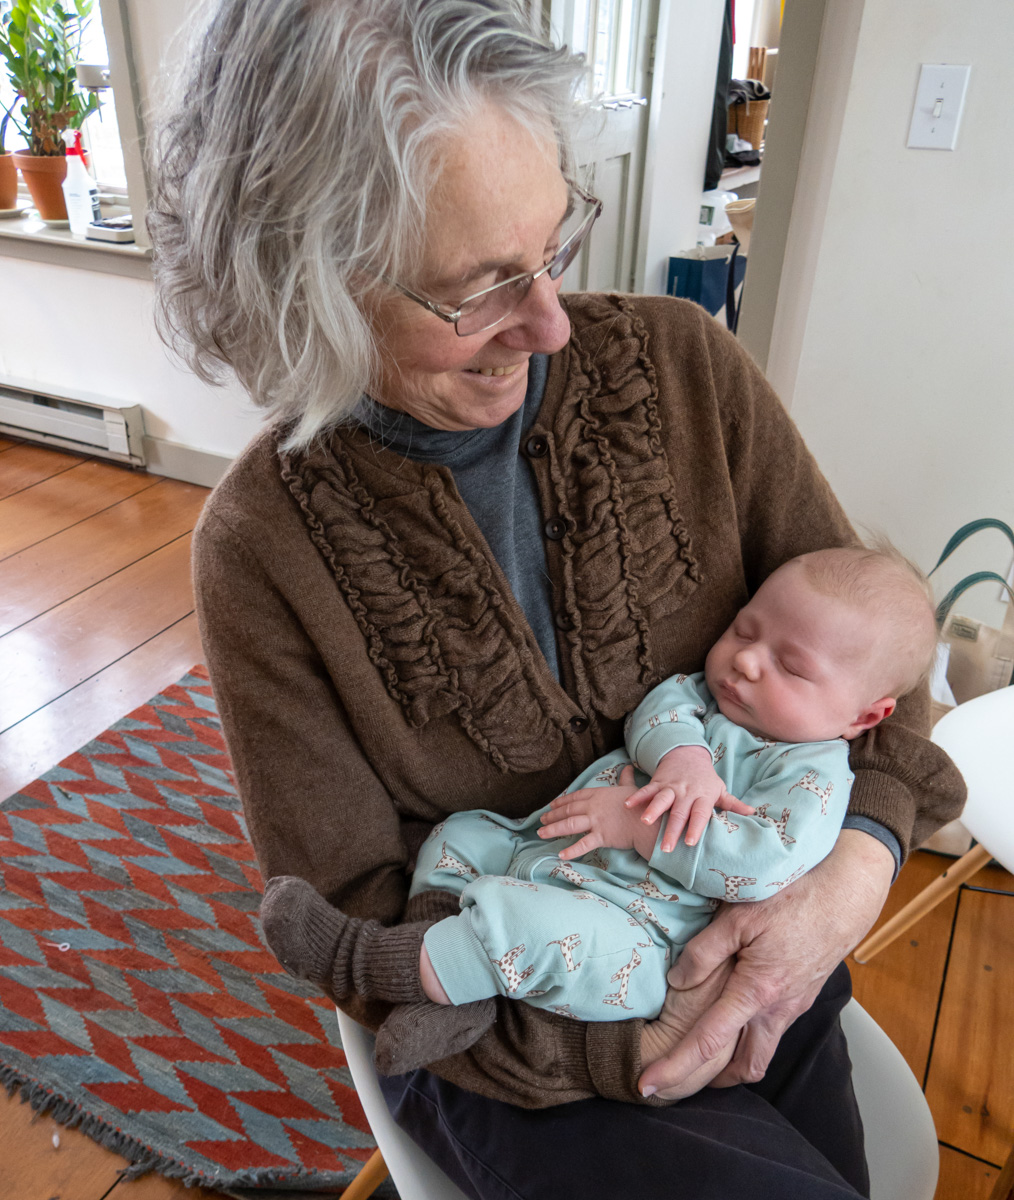
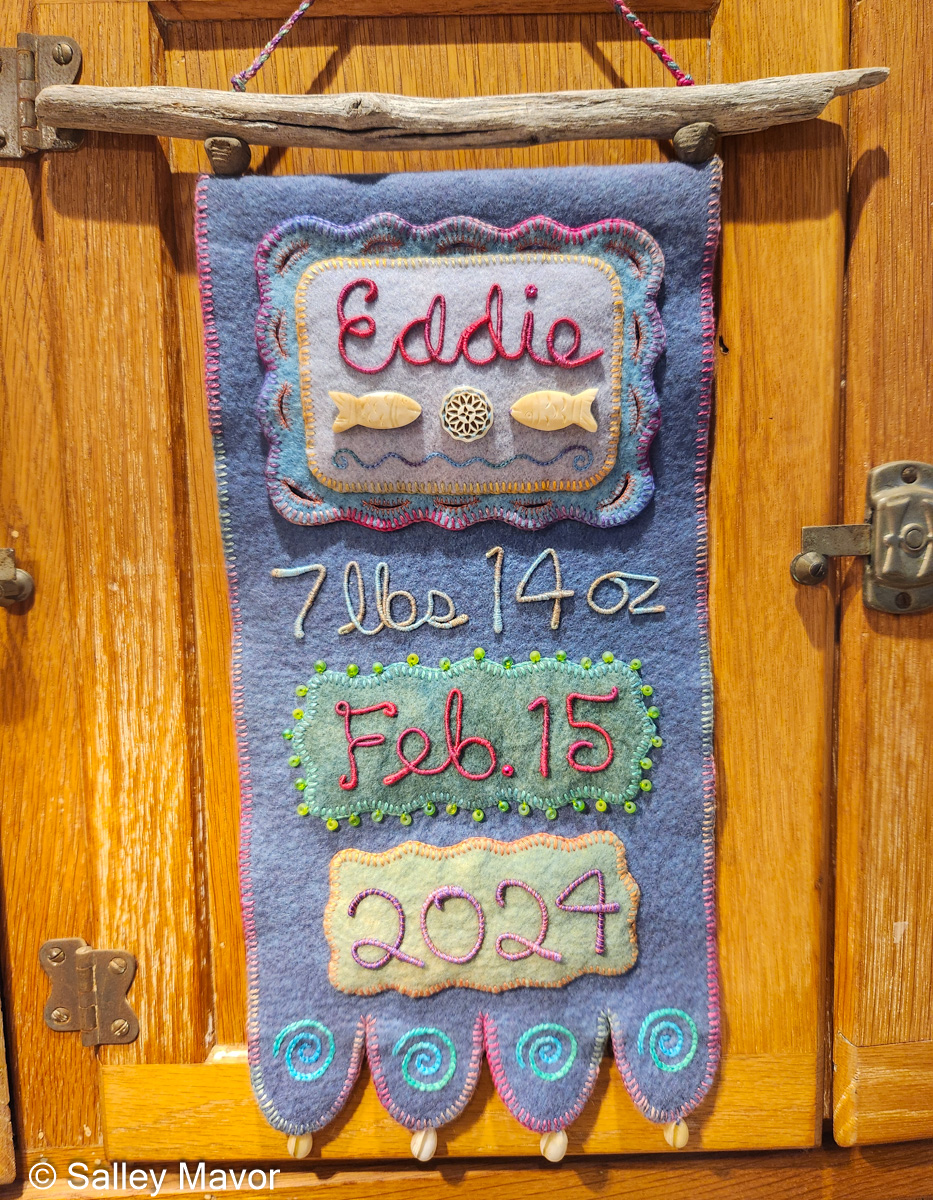
I’m happy to share the news that our new grandchild Eddie was born on Feb. 15th, 2024. He’s named Edward, after his maternal grandfather, but his parents, Mary and our son Peter, call him Eddie. So, that’s the name I put on his baby banner. Our family is growing so fast, I can hardly believe it! Little Eddie and his cousin Elias were born 13 months apart and we hope they become good buddies (see Elias’s banner here).
MAKING THE BANNER Read ahead to see photos, videos, and commentary about making Eddie’s baby banner. I’ve divided the post into different sections, including wrapping wire letters and embellishing felt borders, which are are some of the more distinguishable features of my banners. To see posts about this and other celebratory banners I’ve made over the years for family and friends, scroll through the archives here.
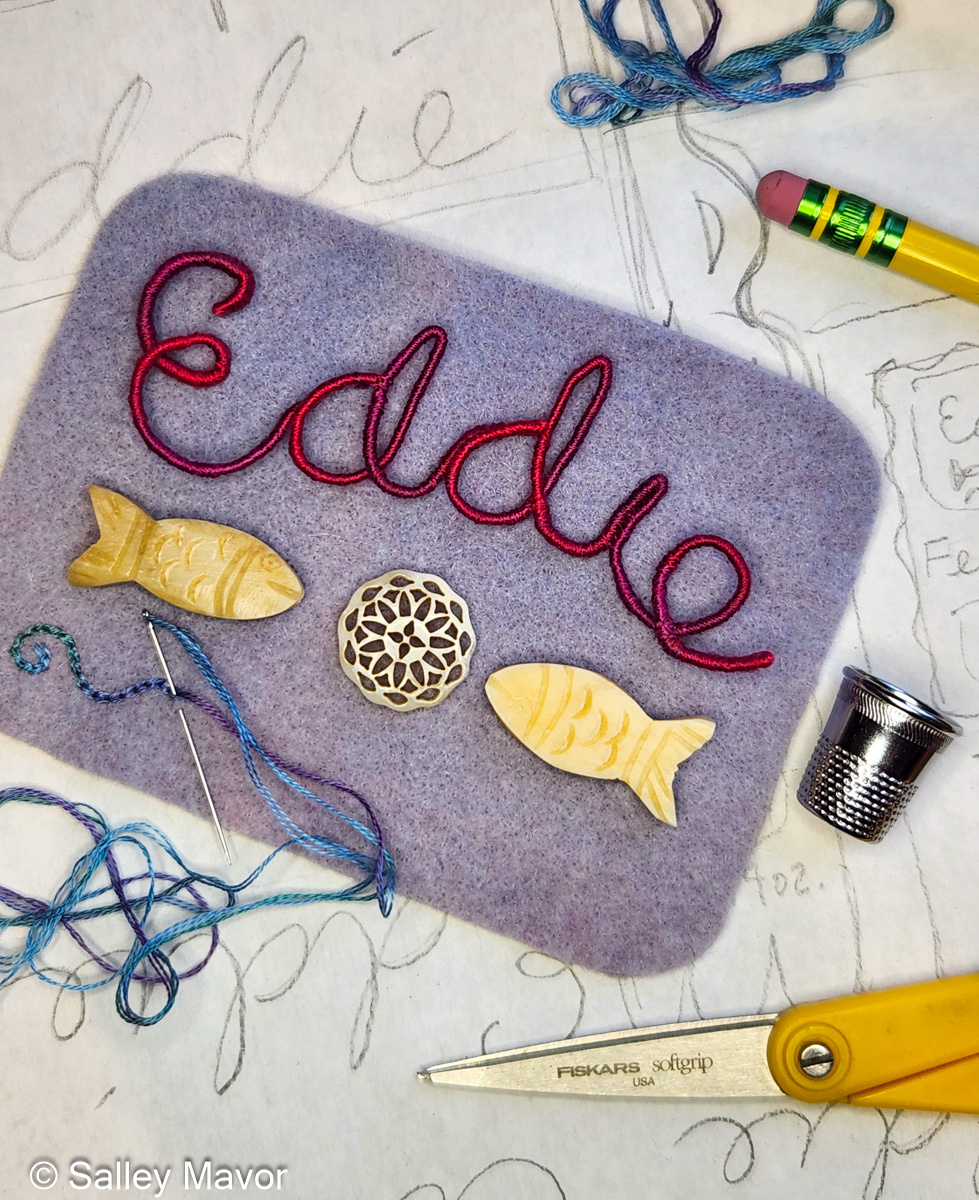
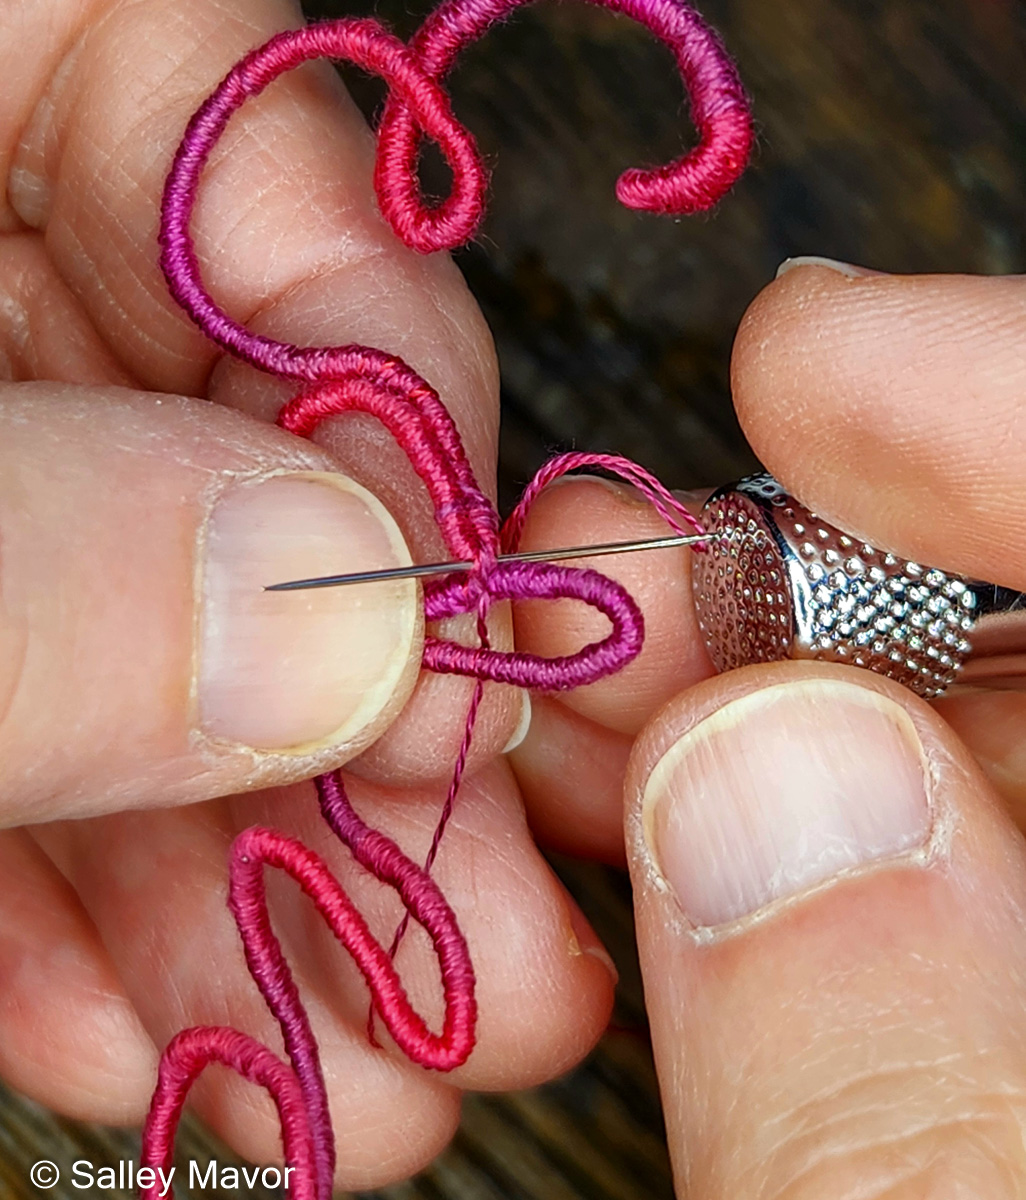
WRAPPING WIRE LETTERS After choosing a color scheme and picking out pieces of felt and thread, I wrote out Eddie’s name in cursive handwriting with a pencil on paper. Fortunately, his name could be written in one continuous line, which doesn’t always happen. I then wrapped a length of DMC memory thread (a kind of wire) with 3 strands of variegated embroidery floss (see video below). Using the drawing as a template, I bent the wire to form his name and stitched the letters together where they touched.
In this video, I demonstrate wrapping DMC memory thread with 3 strands of embroidery floss to create numbers and letters for Eddie’s birth weight. I thought it would be easier to see the process using contrasting wire and thread colors. Of course, using the same color wire and thread is better for hiding gaps and inconsistencies. It takes a lot of practice to get the hang of wrapping the wire. If you’ve learned to wrap arms and legs for the wee folk dolls in my how-to book, Felt Wee Folk, you’ve got a jump start on mastering this technique.
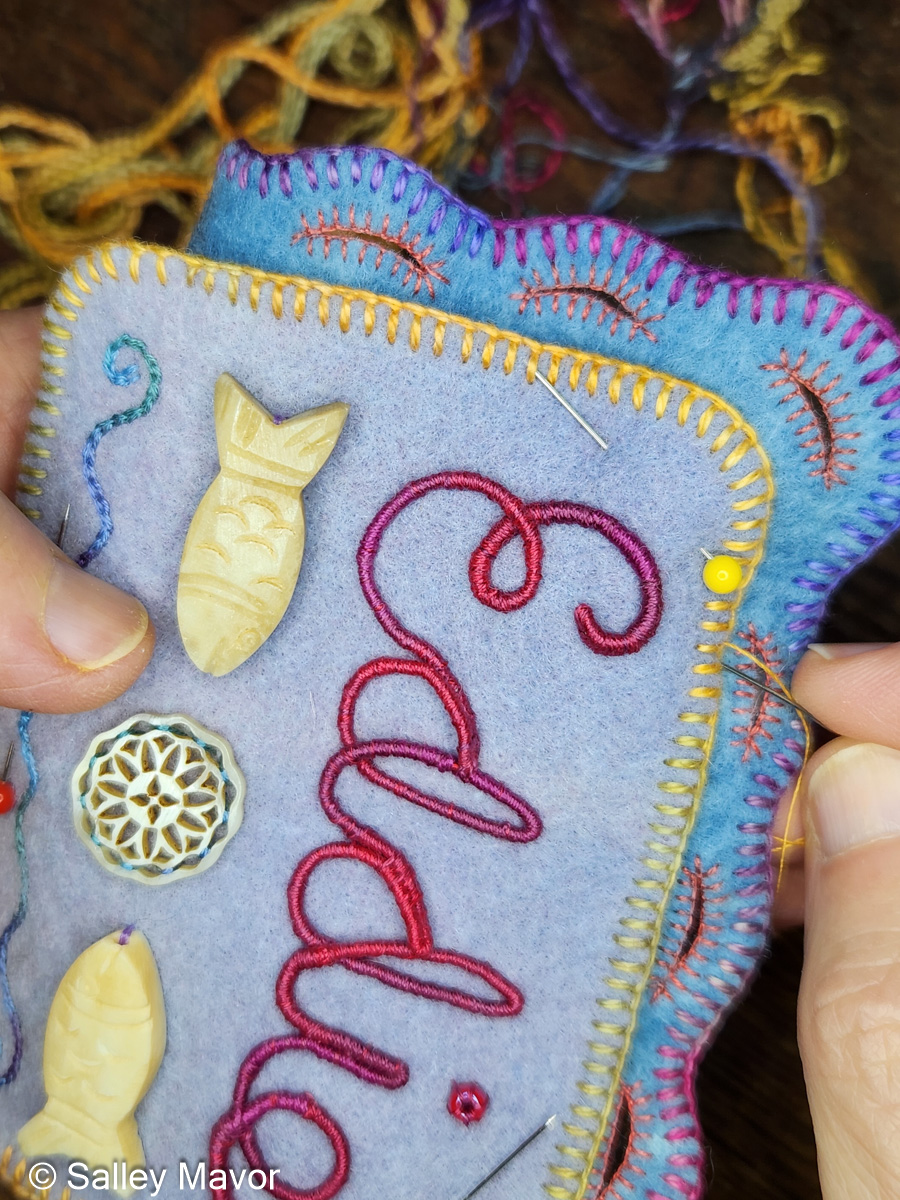
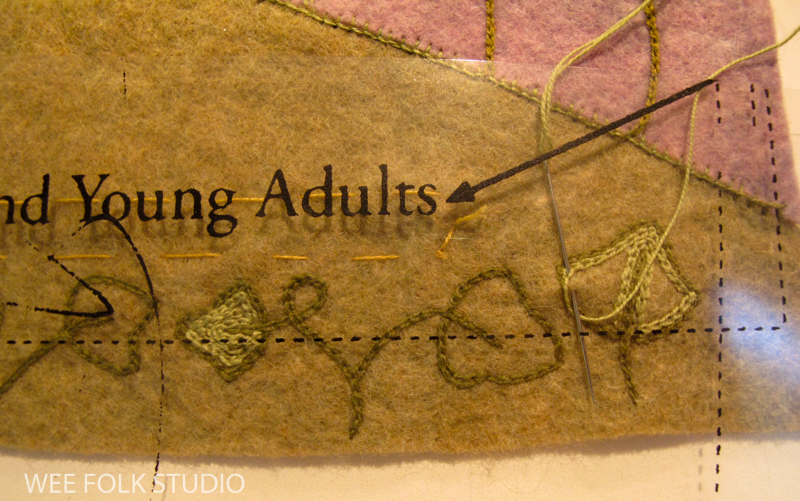
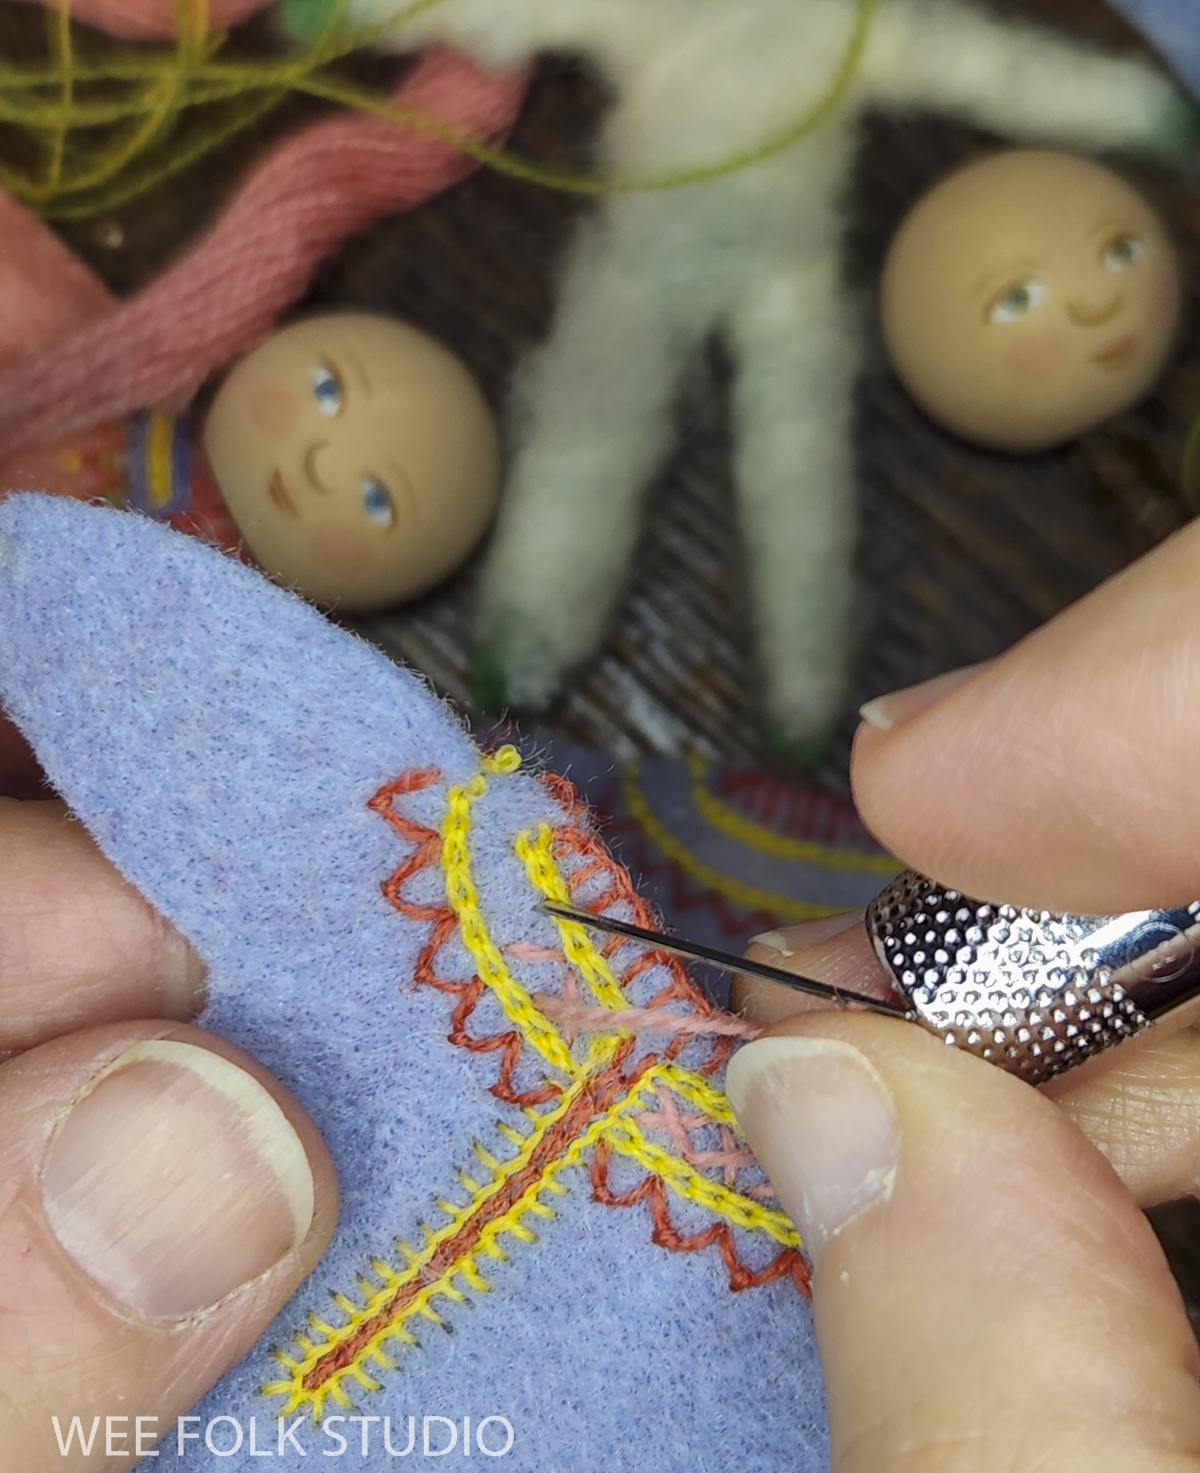
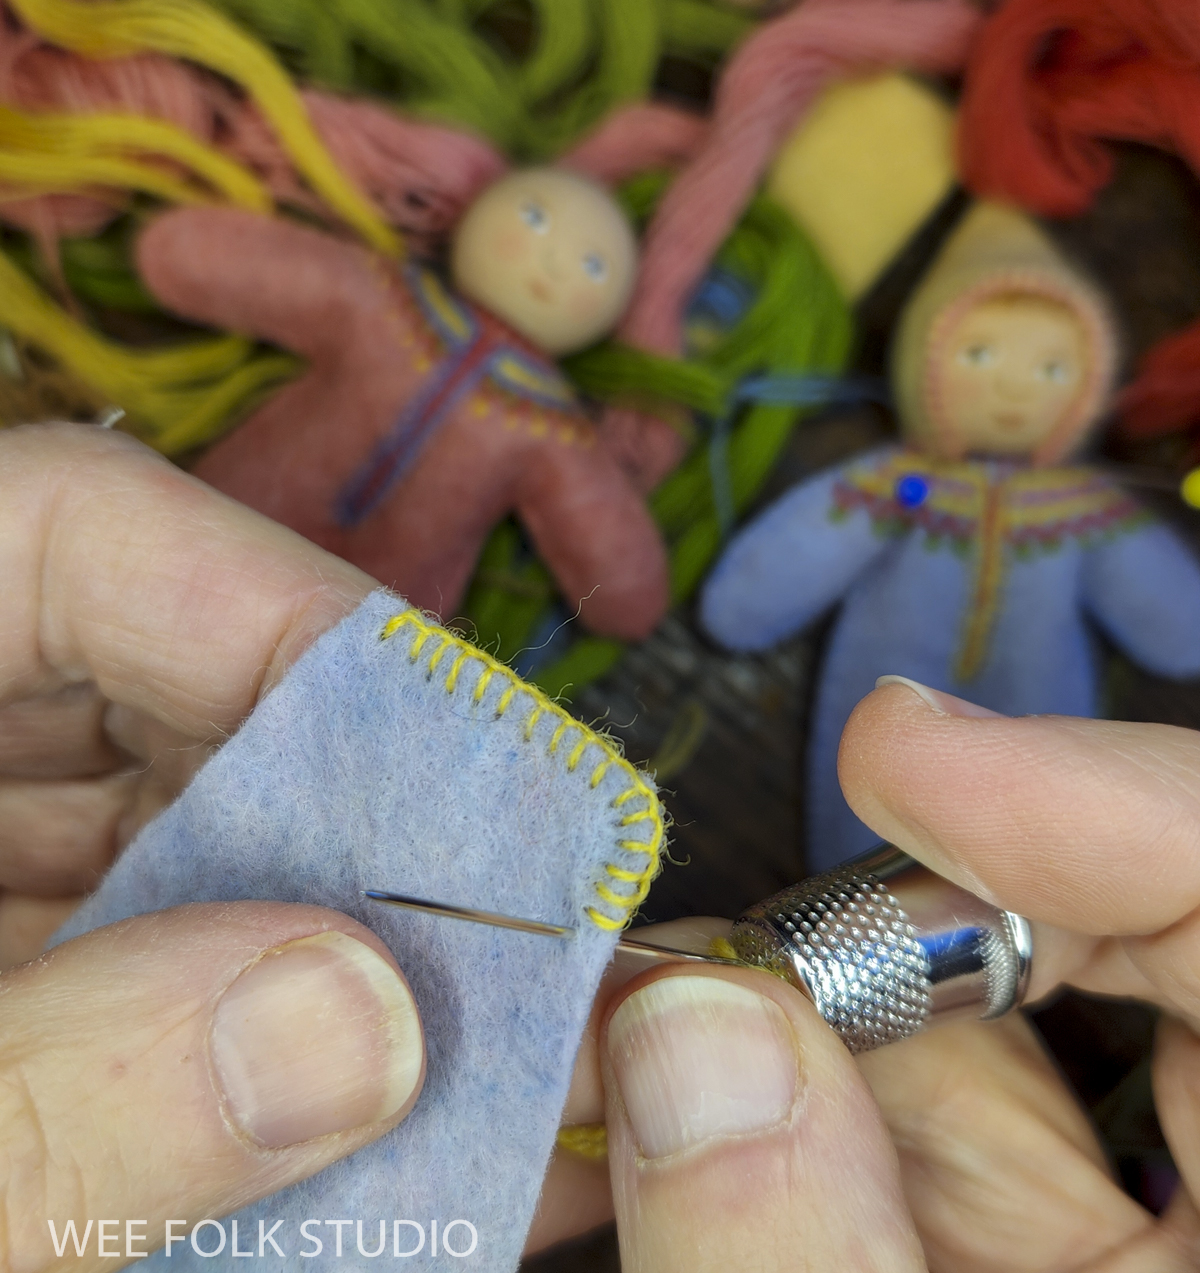
EMBELLISHING FELT BORDERS I love embellishing with blanket stitching, especially with variegated thread. It’s a simple, but effective way to create an edge that looks clean and assertive, while also displaying a handmade quality. For me, it’s important to show that a real person made it, not a machine. For this banner, I created layers of felt pieces, which I blanket stitched with pima cotton (Watercolours by Caron).
In this is a video, I demonstrate embellishing borders for the banner.
The border around Eddie’s birth date needed perking up, so I added beads.
CANDY CANE STRIPES When I finished making numbers for the year 2024 and laid them out, they looked kind of plain. So, I decided to wind a single strand of orange embroidery floss around the wire numbers (see video below).
I looked through my driftwood collection and found the right sized stick that would work as a hanging bar. I braided cord to make a strap and drilled holes in the stick big enough to thread cord through.
This video shows how I chain stitched spirals on the scalloped flaps at the bottom of the banner.
We’re pleased as punch with little Eddie and look forward to getting to know him as he grows!
To keep up with new posts, please subscribe to this blog. Your contact info will not be sold or shared. If you’d like to see more frequent photos tracking the projects in my studio, please follow me on Facebook and/or Instagram.
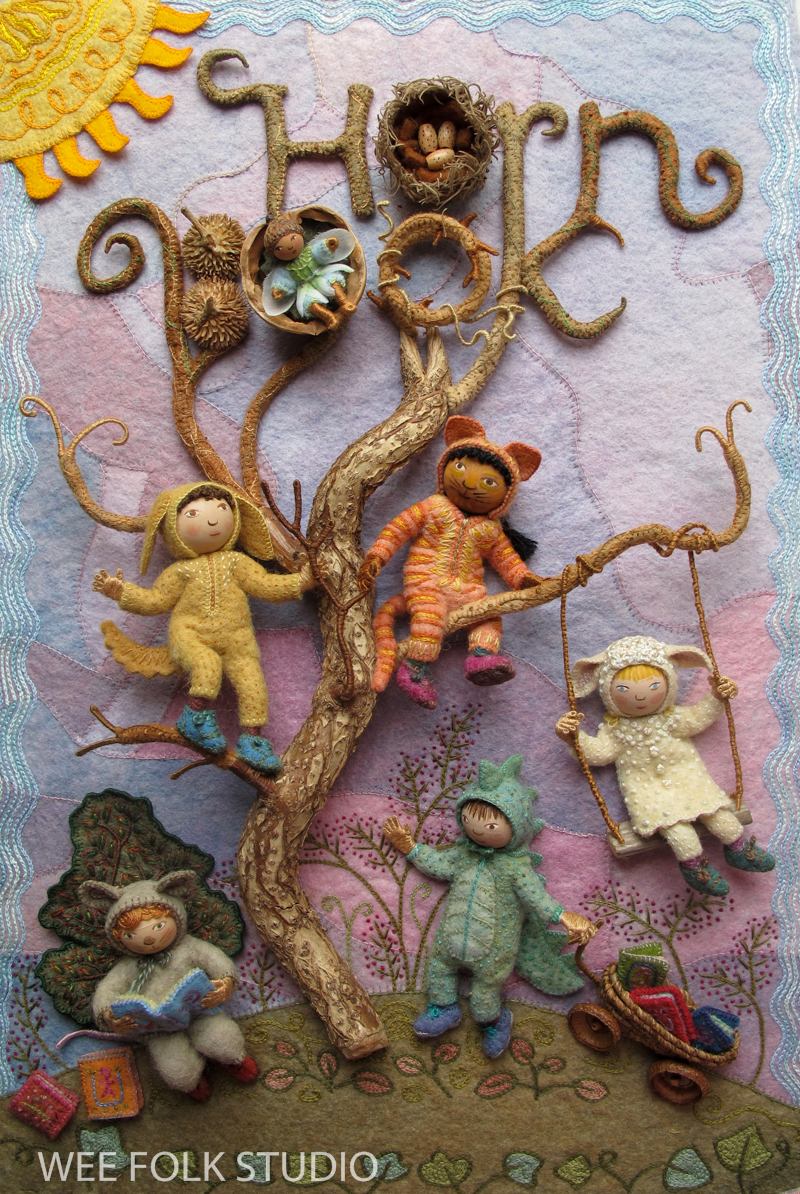
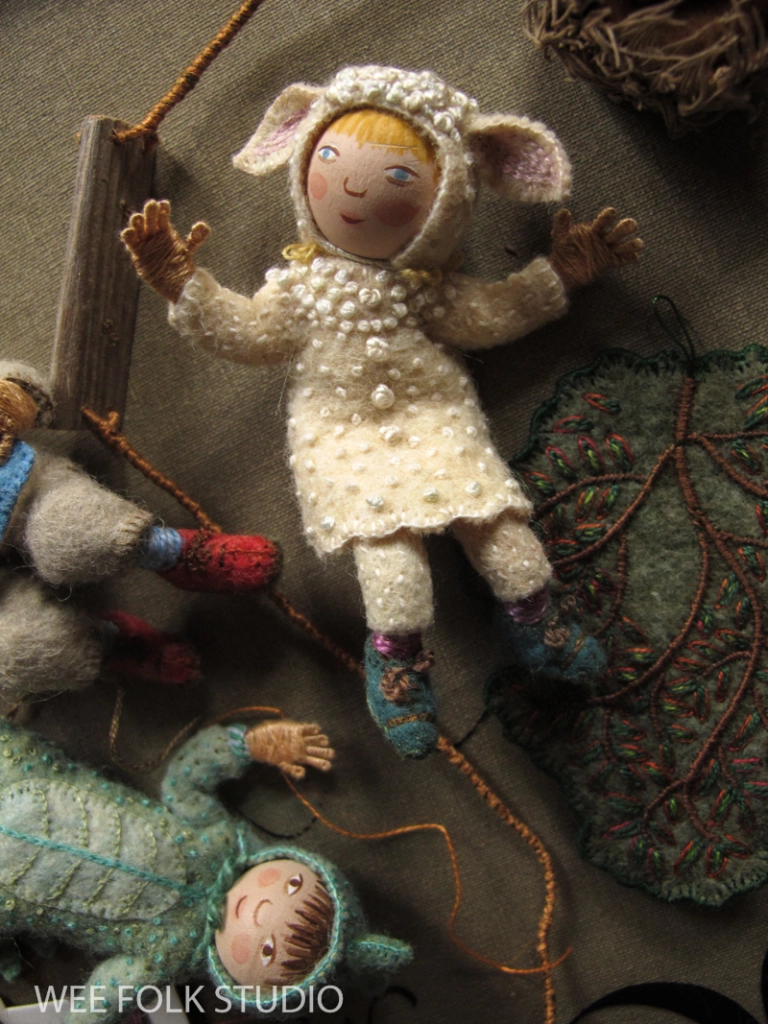
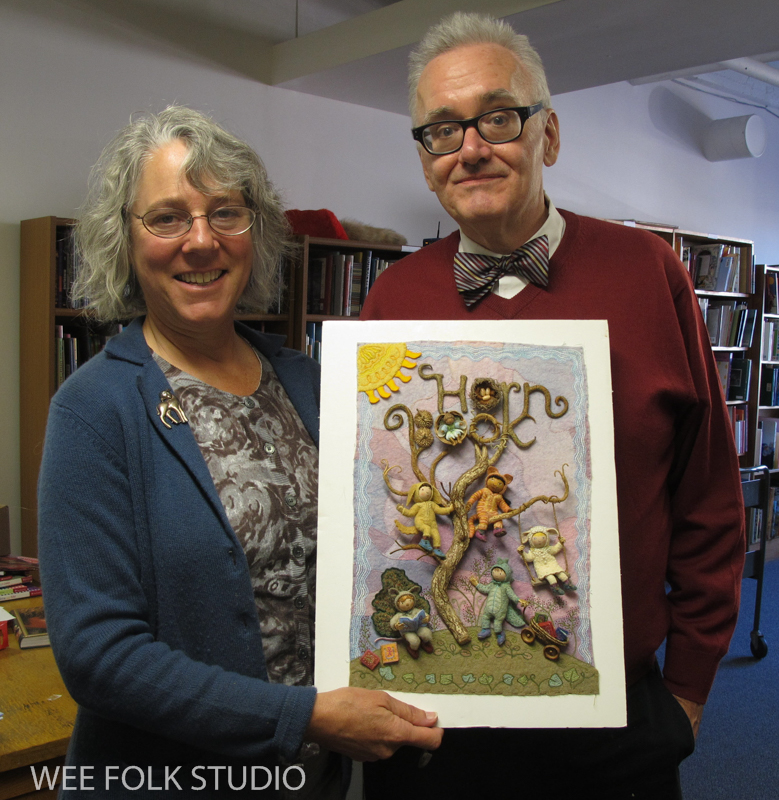
UPDATE: I just received word that my 2012 cover was voted the winner of The Horn Book Magazine’s Cover Madness contest in the January/February category! As part of this year’s centennial celebration of the magazine’s founding, this “very-subjective, not-serious event” will continue with more contests to pick covers from previous issues published in March/Aril, May/June, etc. By the end of Cover Madness, 6 different covers will “emerge as winners”.
What a wonderful surprise this is! Even though the children’s book community has always been very supportive, I sometimes feel like an imposter because of my singular vision and nontraditional illustration medium. So, I’m especially honored to have my work recognized this way. Of all the groups my work is lumped into, from embroidery to doll making, the storytelling genre of children’s books is where I feel most at home. I hope that you enjoy this account from 2012 about how I made the cover!
This is an edited and republished version of a post that was first written in 2012.
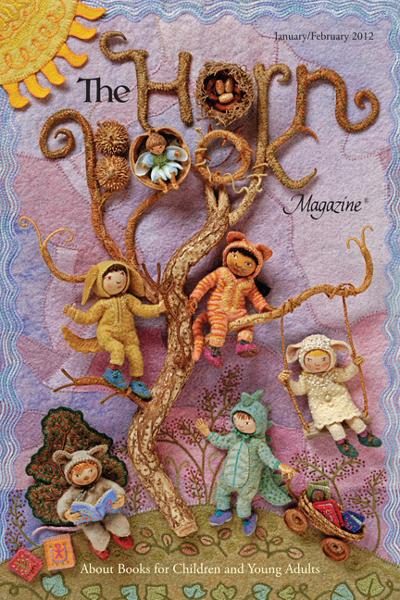
The Jan/Feb 2012 issue of The Horn Book Magazine is out, with my illustration on the cover. This issue has many wonderful articles and book reviews, including the 2011 Boston Globe-Horn Book Award speeches, which were delivered at the colloquium on Sept. 30th, 2011.
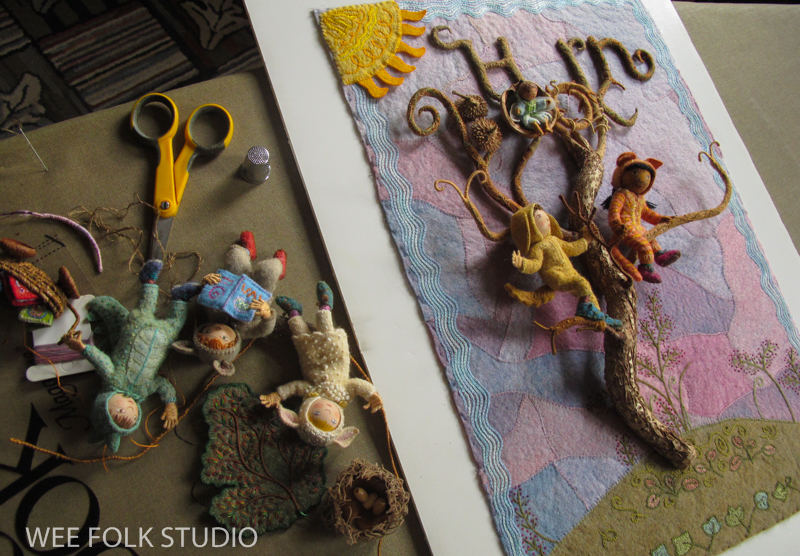
In this post, I share the process of making The Horn Book cover illustration, which I worked on for about 6 weeks this past summer. The original size of the scene is about 12″ wide and 18″ high. The original piece was purchased by an art collector who is connected to the children’s book world.
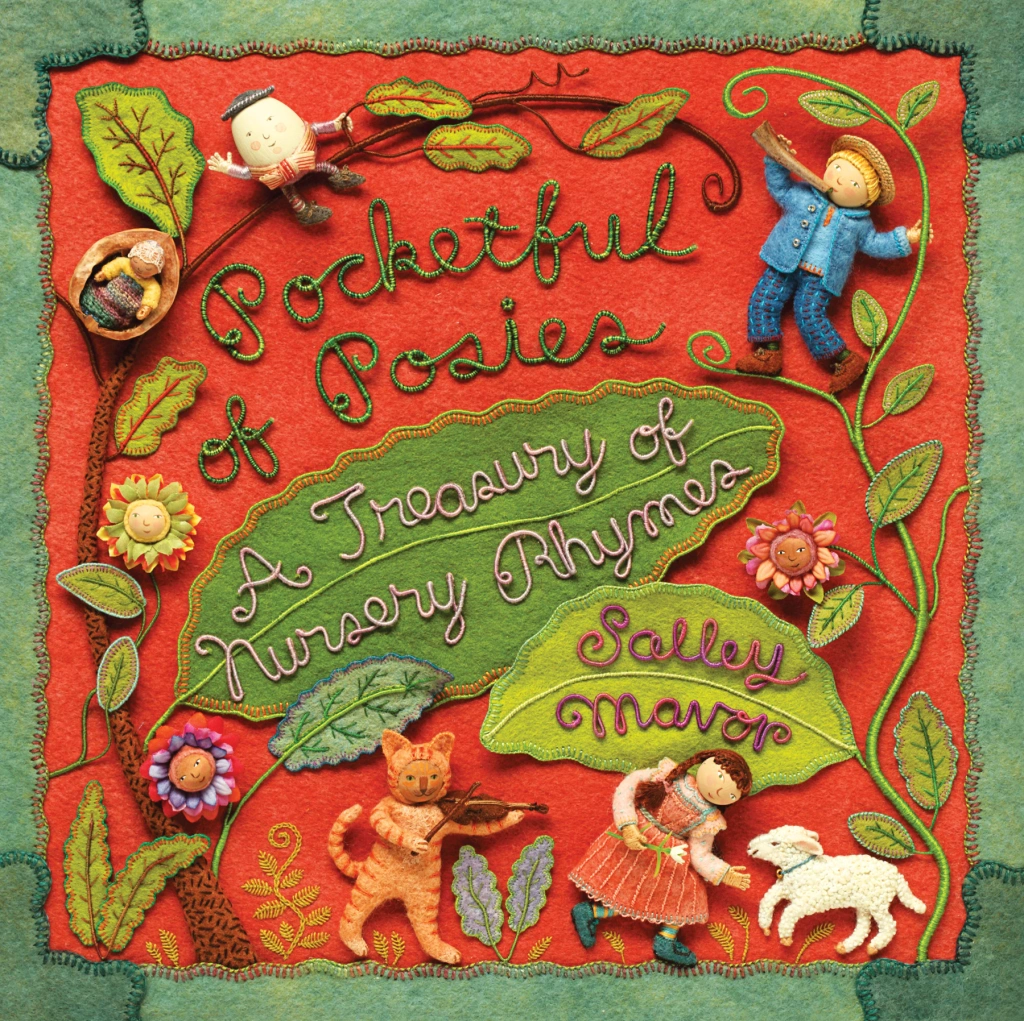
As the Horn Book Award recipient for Pocketful of Posies in 2011, I had the honor of illustrating a cover for the magazine. You can find out more about my award here. Signed copies of the book are available in my Etsy Shop.
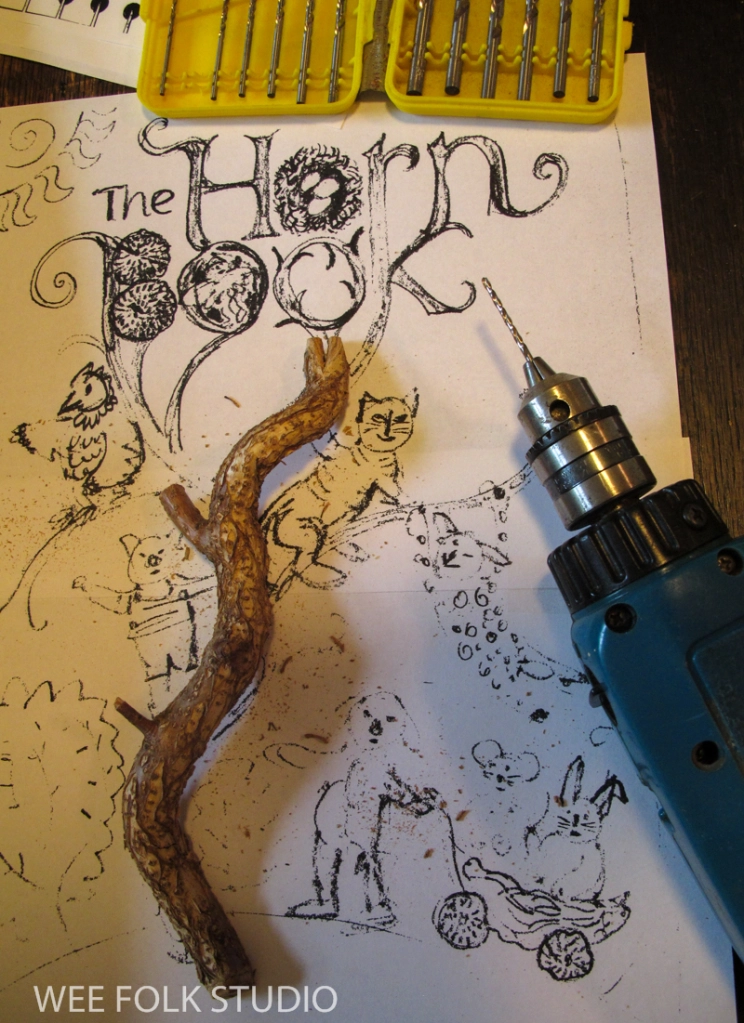
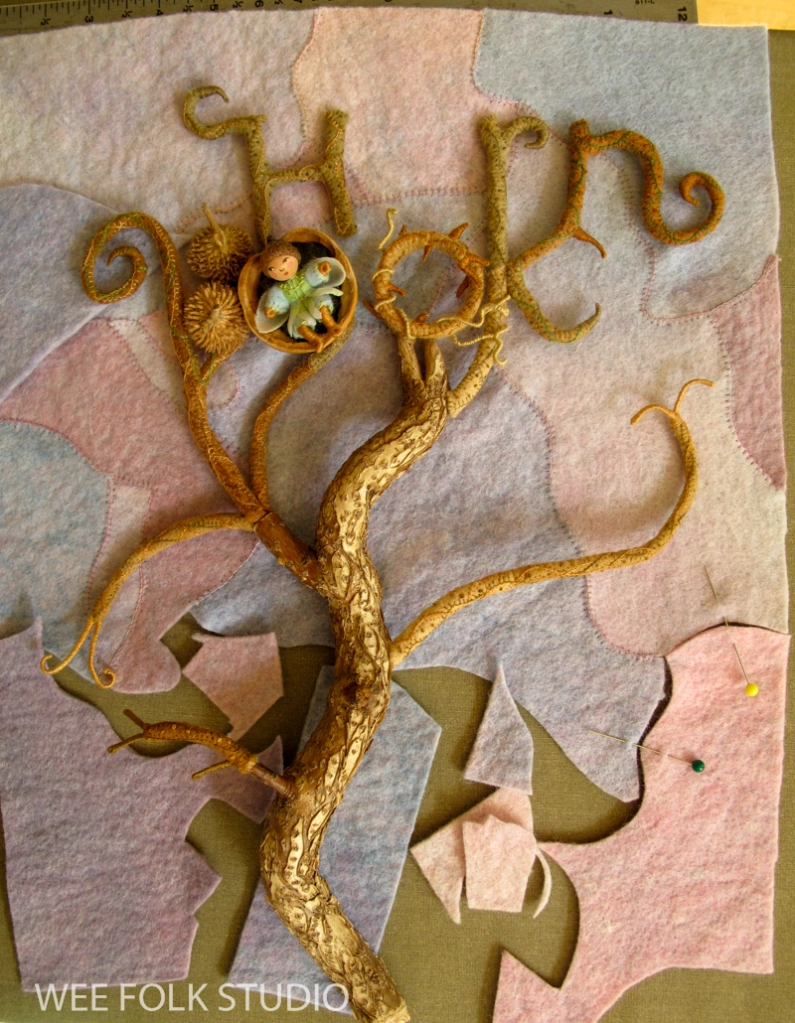
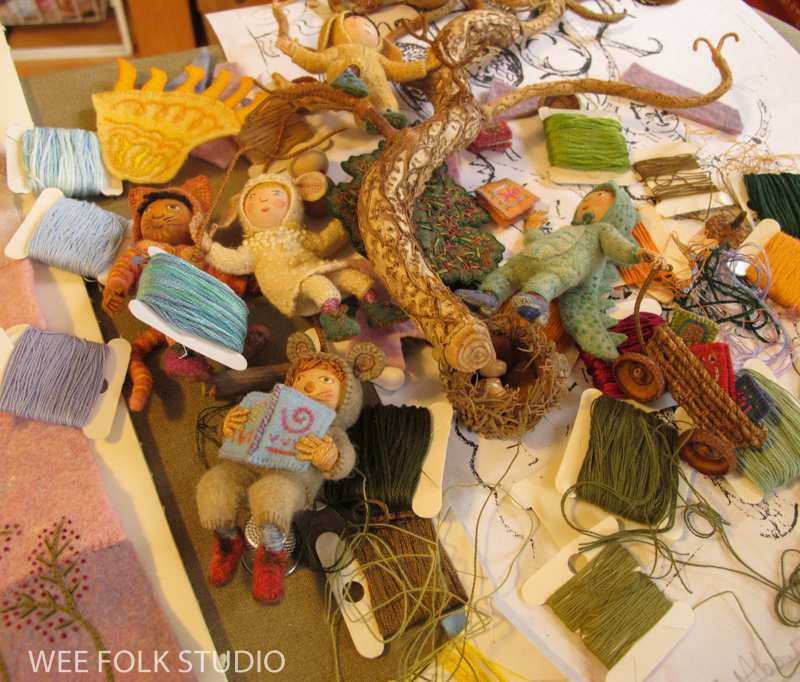
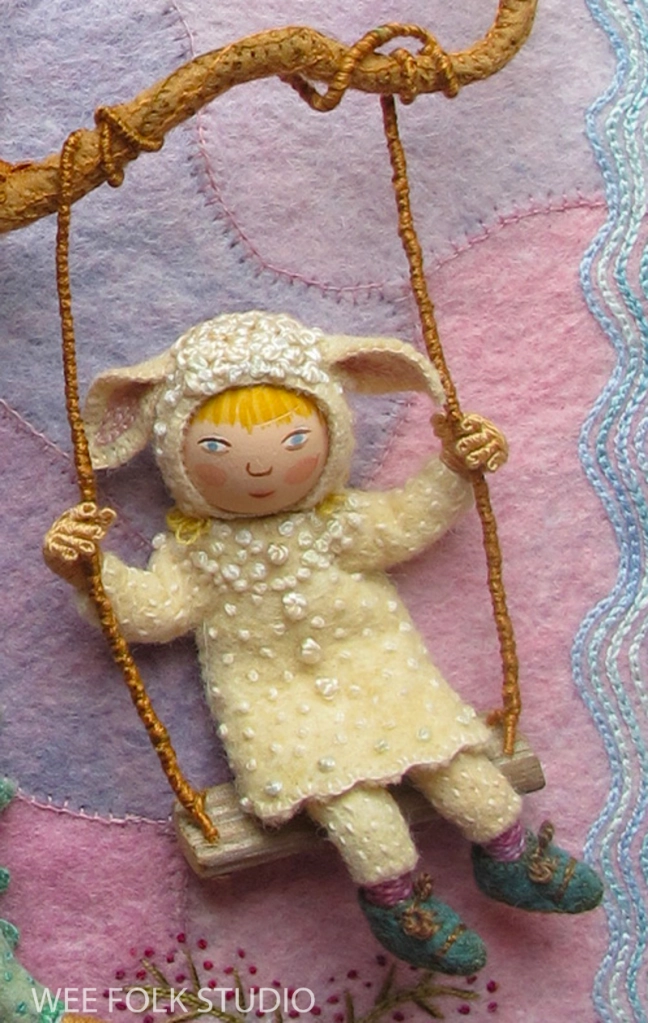
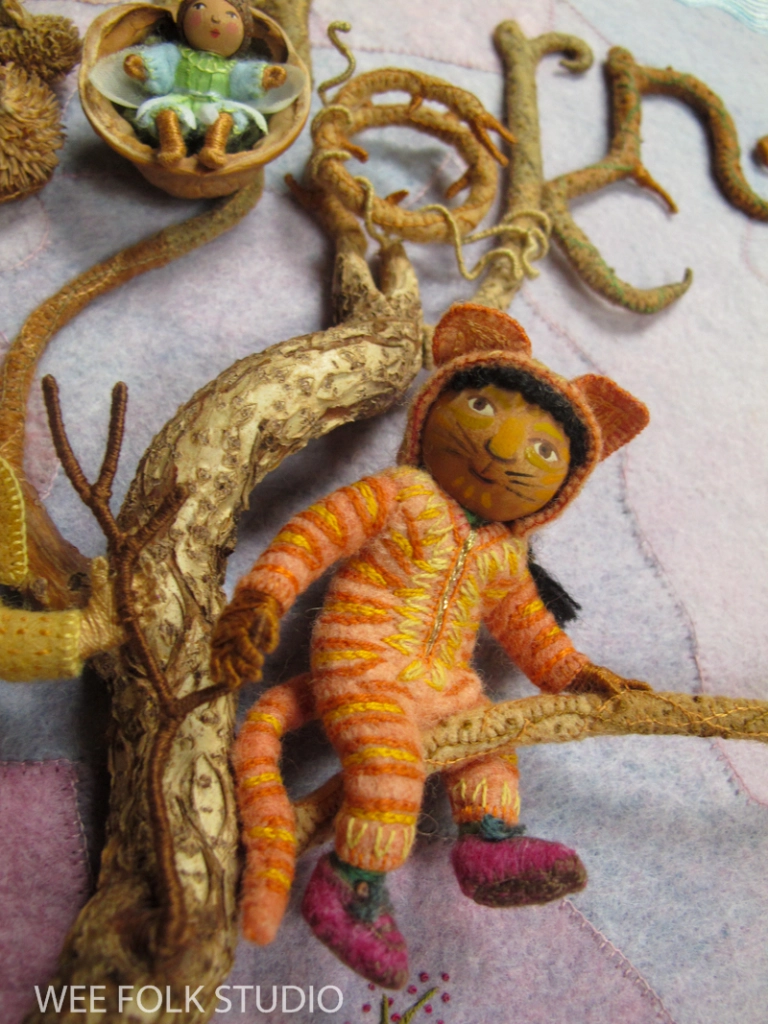
THE TREE I first found a twisted vine to use as the central tree and made a sketch with the Horn Book logo and child characters. I then drilled holes on the vine where wire branches would go.
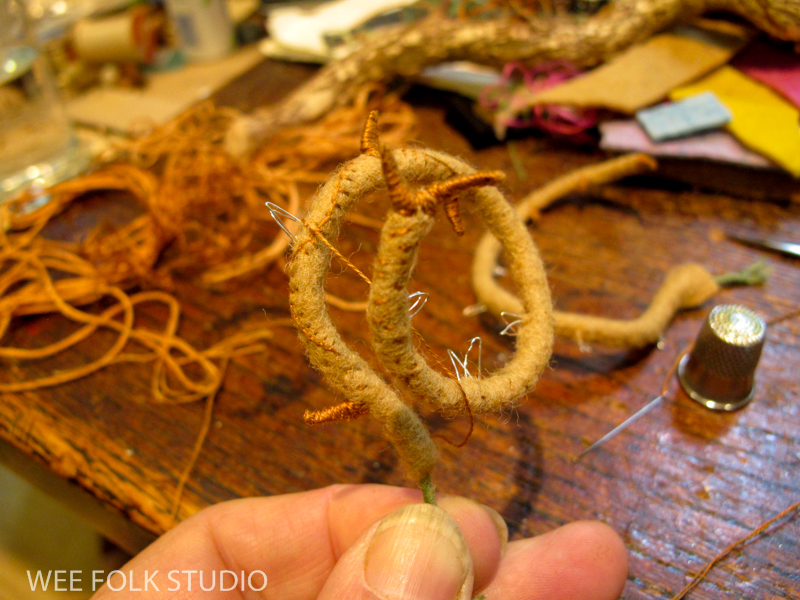
To form the branches, I covered wire with felt and embroidered them to match the real vine/tree trunk. This coiled branch has thread-wrapped wire thorns attached.
The Horn Book logo was rendered in wire branches and found objects. For one of the O’s, I sawed the back of a walnut-shell, so that it would lay flat and not stick out too much. The O in the word Horn is a nest-like acorn cap from an oak tree in Iowa and the B’s spiky acorn caps are from northern California.
THE FELT BACKGROUND I thought that a solid color background would looked too plain, so I stitched together scraps of naturally dyed wool felt to make a more interesting field for the action.
I made a little fairy to fit in the walnut-shell.
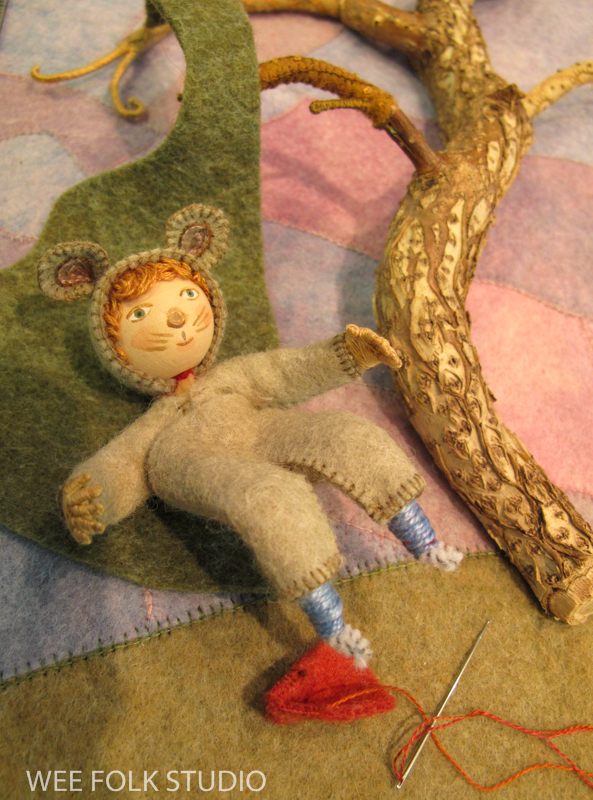
THE CHILDREN I didn’t want the characters to be animals, but children dressed in animal costumes. So, I made every effort to make them look like children by giving them bangs, ponytails, hands and shoes. These figures are made with similar techniques found in my how-to book, Felt Wee Folk.
During the process, I changed some of the characters in the original sketch and substituted a boy in a dinosaur costume pulling an acorn cap wheeled wagon full of books.
I printed out the words on acetate, so that I’d be sure to leave enough room at the bottom edge. I then embroidered plants and leaves to the felt background.
This little child/mouse is getting red shoes.
The Horn Book staff suggested I include a reading child, so I made a felt book for the face-painted mouse.
All of the parts piled up as I worked. It’s a miracle nothing got lost!
It was really fun thinking up costumes to make for these kids. I wanted to create a scene of children immersed in imaginary play and story.
I added a sun to the upper left corner and embroidered a wavy chain-stitched border. Then, I sewed the felt background to a sheet of foam core board, pulling it flat and straight.
Then, I stitched the tree, characters and other props in place, right through the foam core board. After everything was in place, I took it to the photographer, so he could take its picture. After that, I removed it from the foam core board and remounted the felt background and all of the parts on a cloth-covered stretcher. It is now framed behind glass and was recently bought by a collector. It was a joy to work on this project with Lolly Robinson at the Horn Book Magazine! Having my illustration on the cover will be a great opportunity for many people to discover my work for the first time.
Here I am with Roger Sutton, editor in chief of The Horn Book.
To keep up with new posts, please subscribe to this blog. Your contact info will not be sold or shared. If you’d like to see more frequent photos tracking the projects in my studio, please follow me on Facebook and/or Instagram.
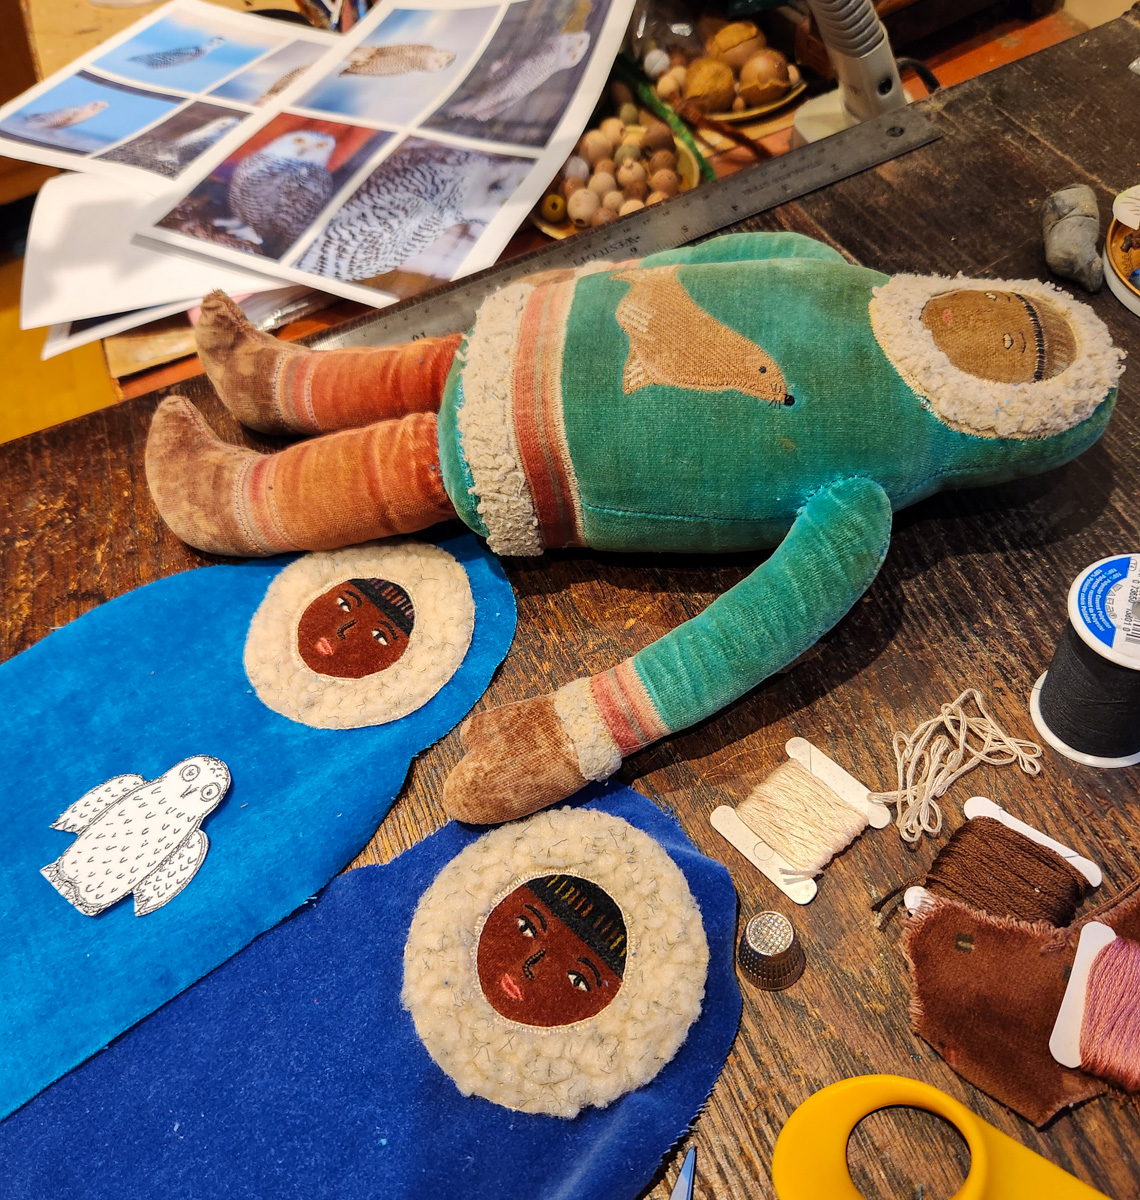
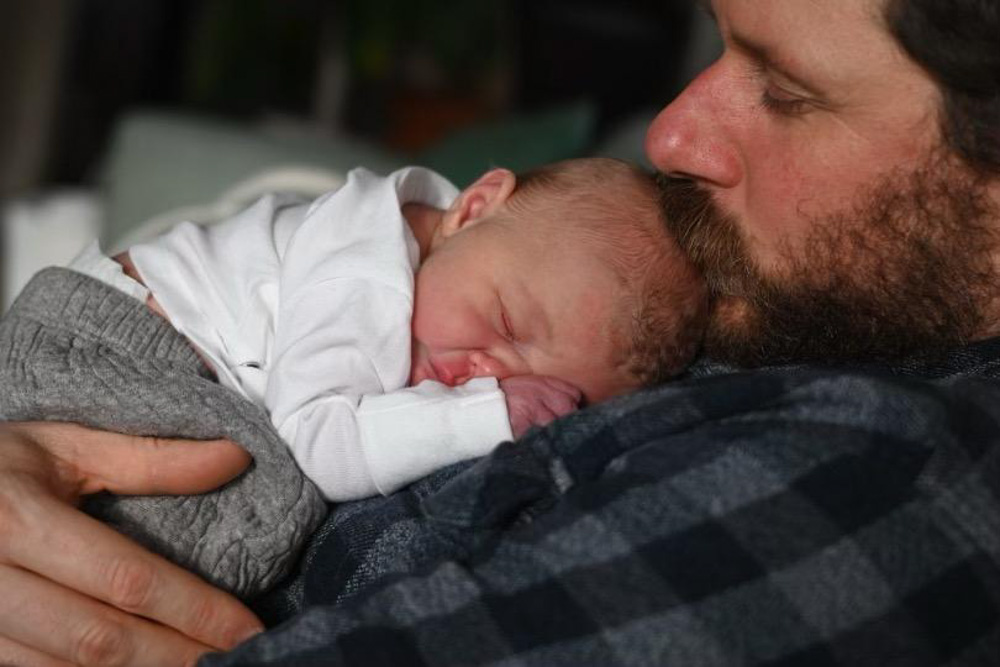
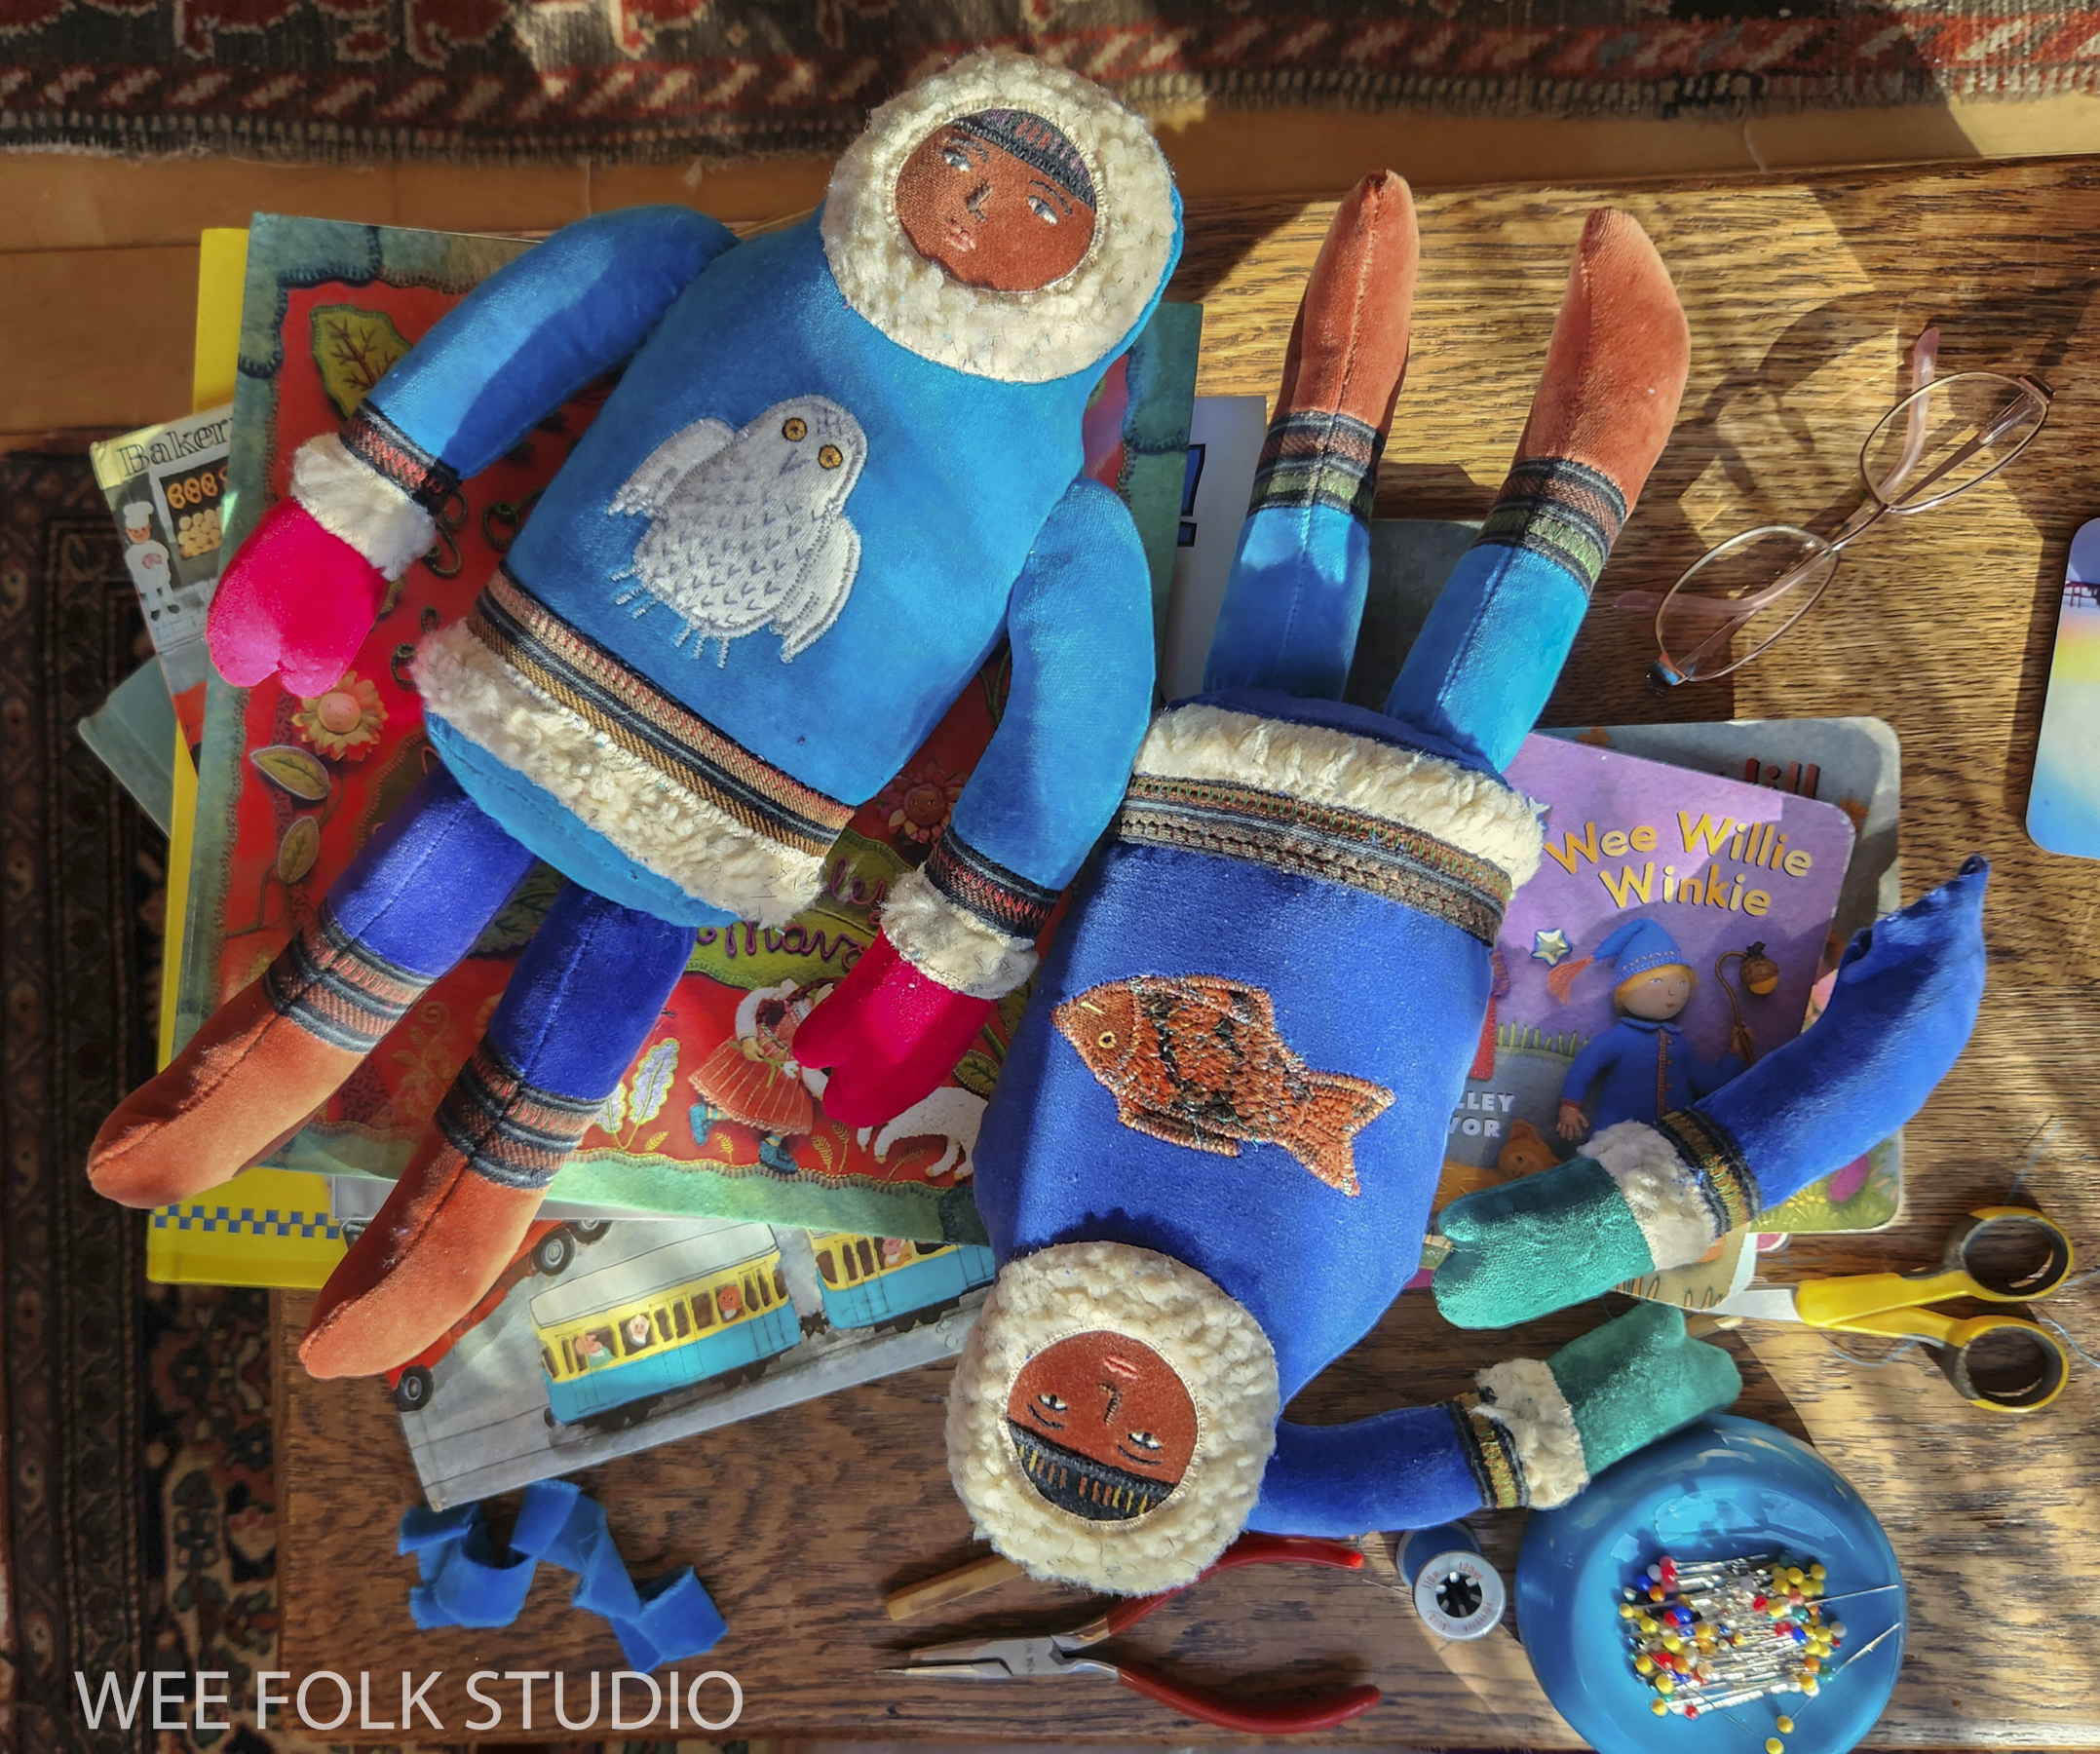
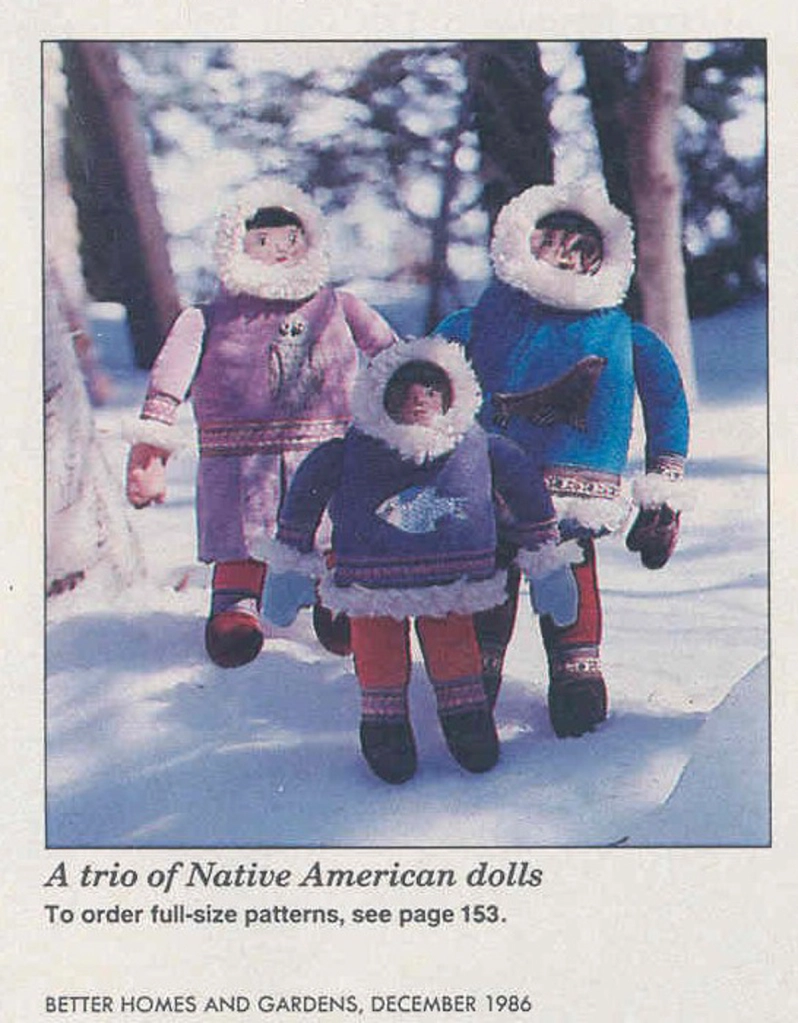
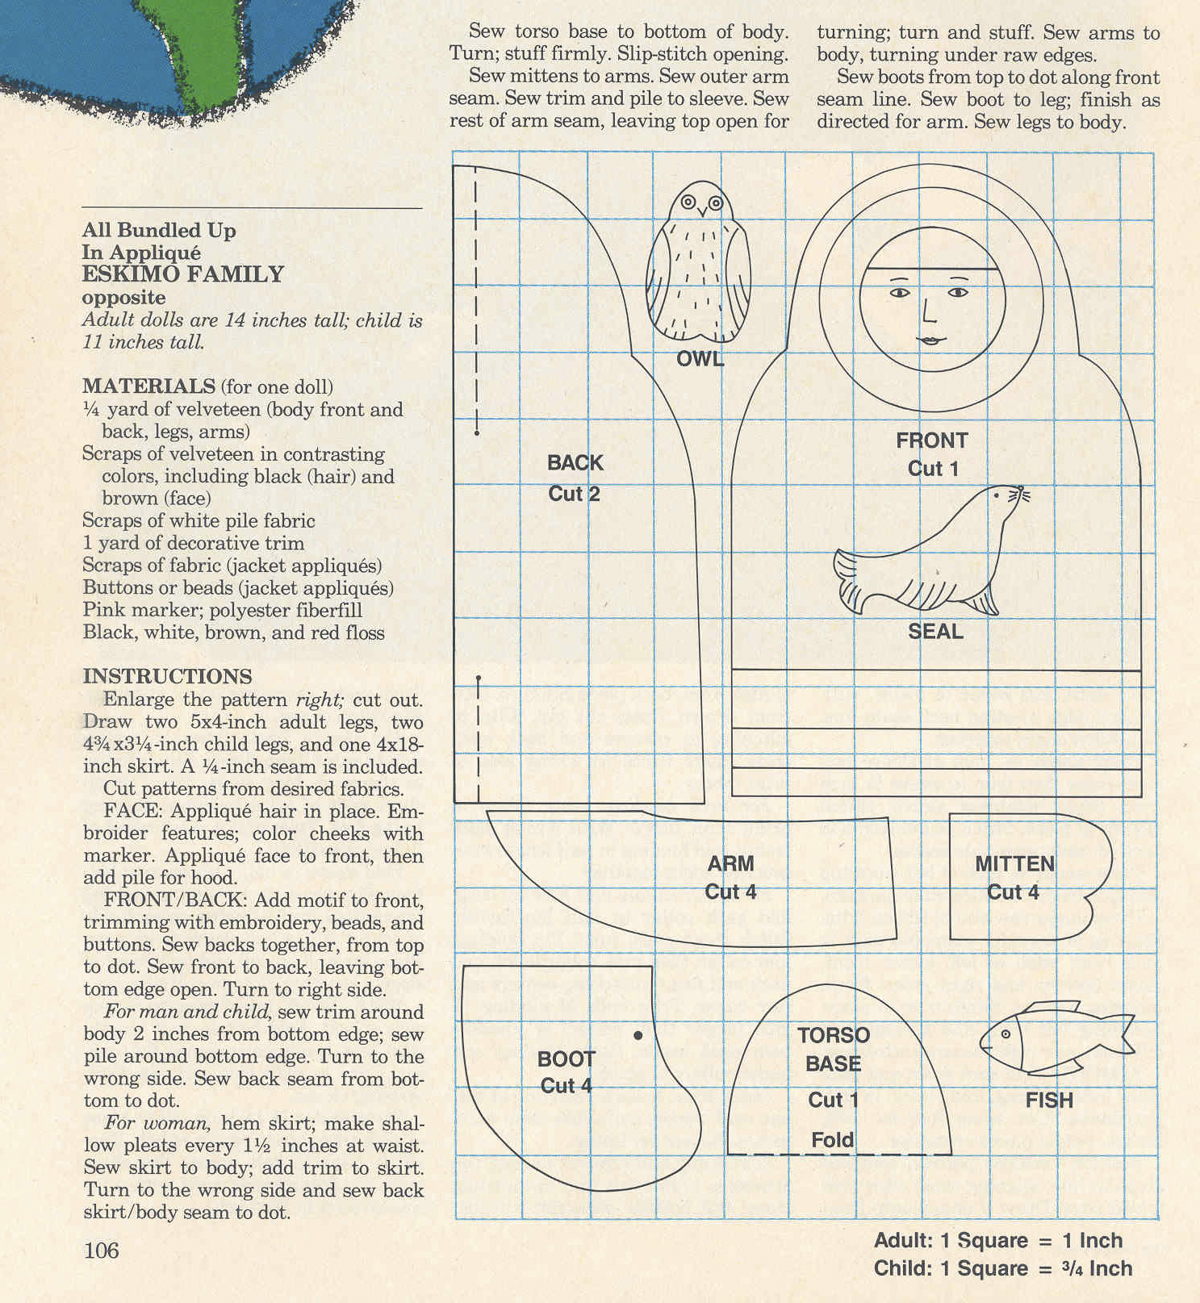
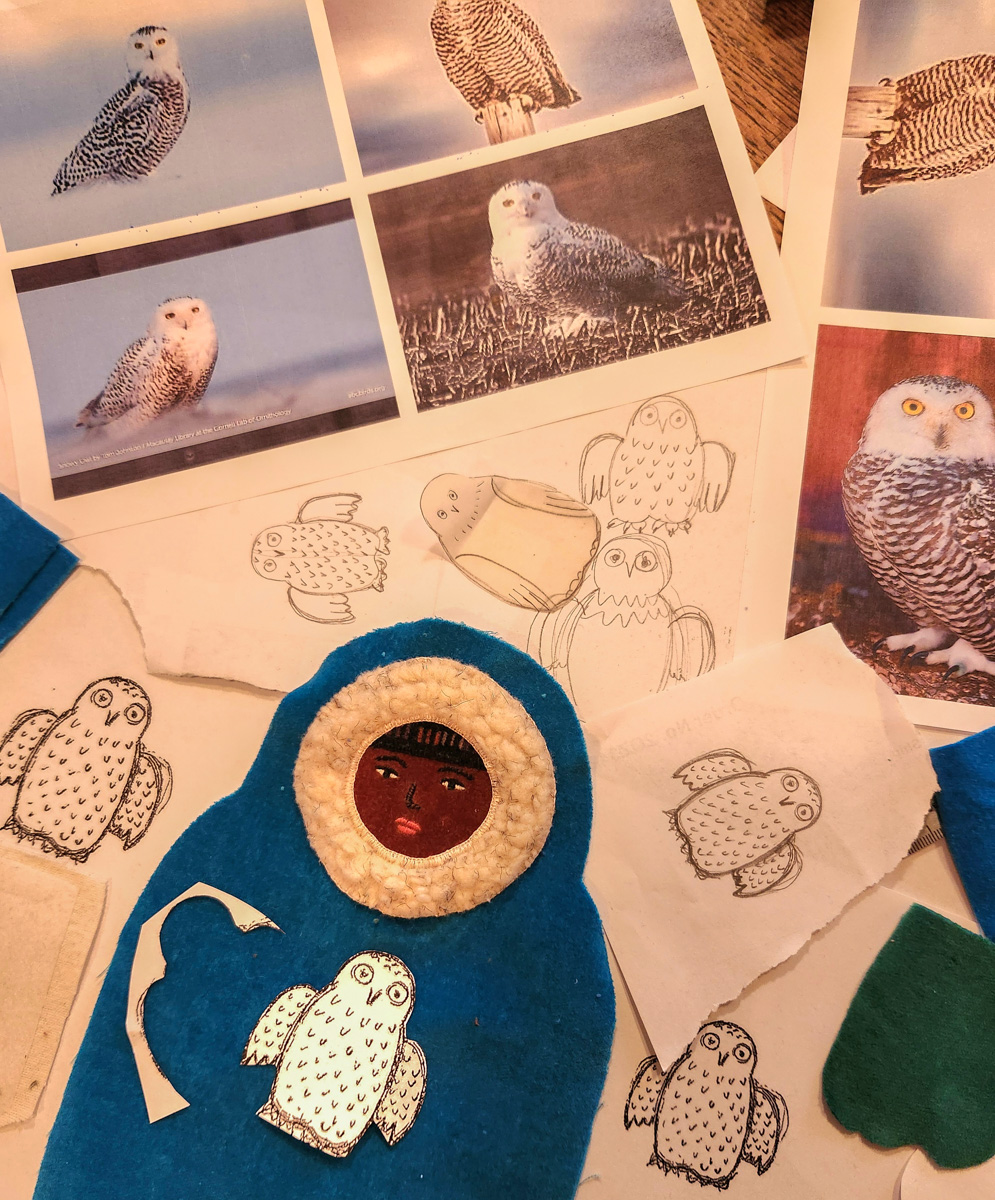
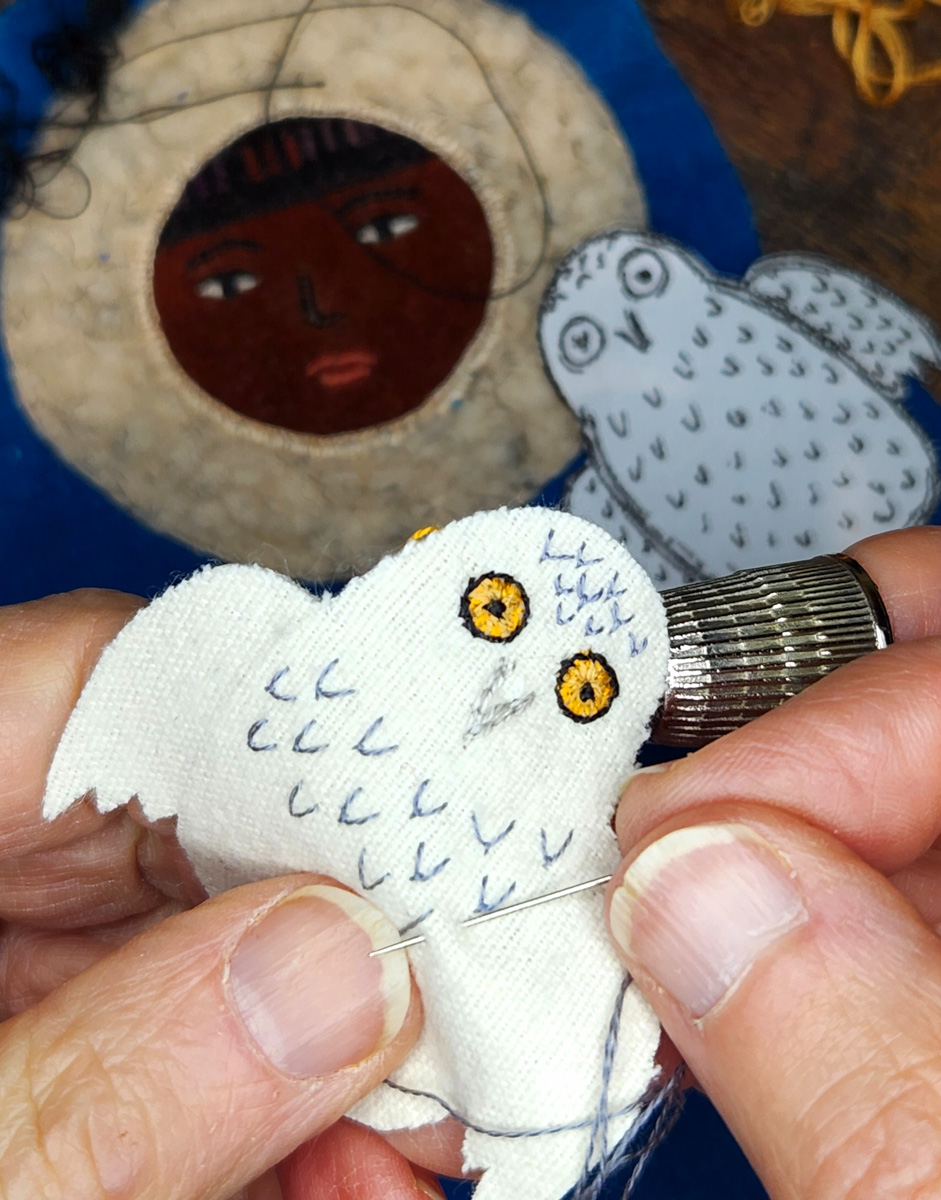
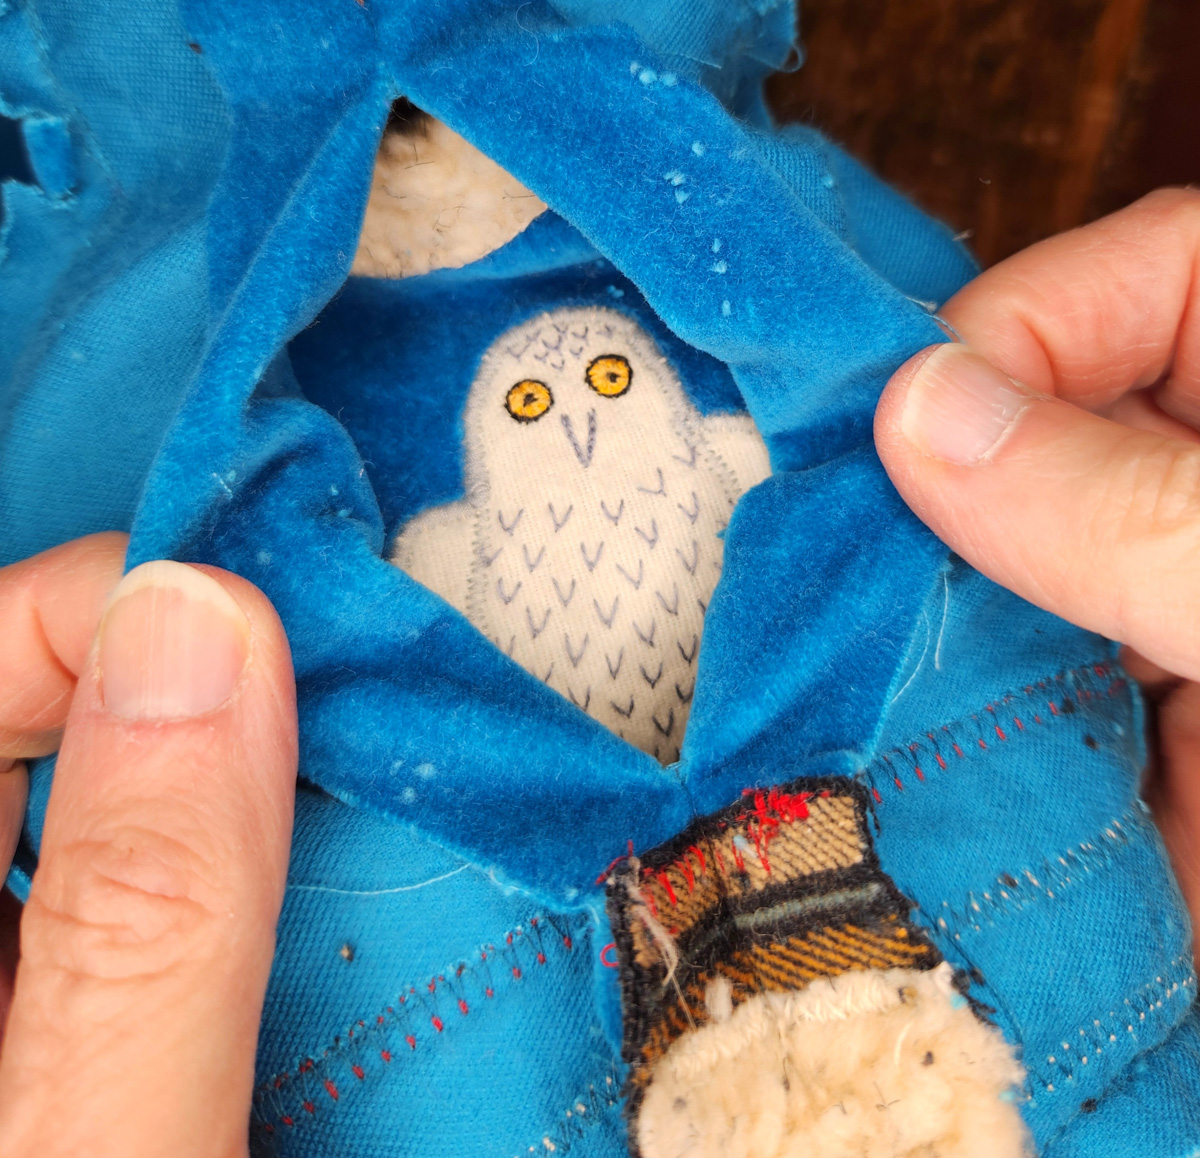
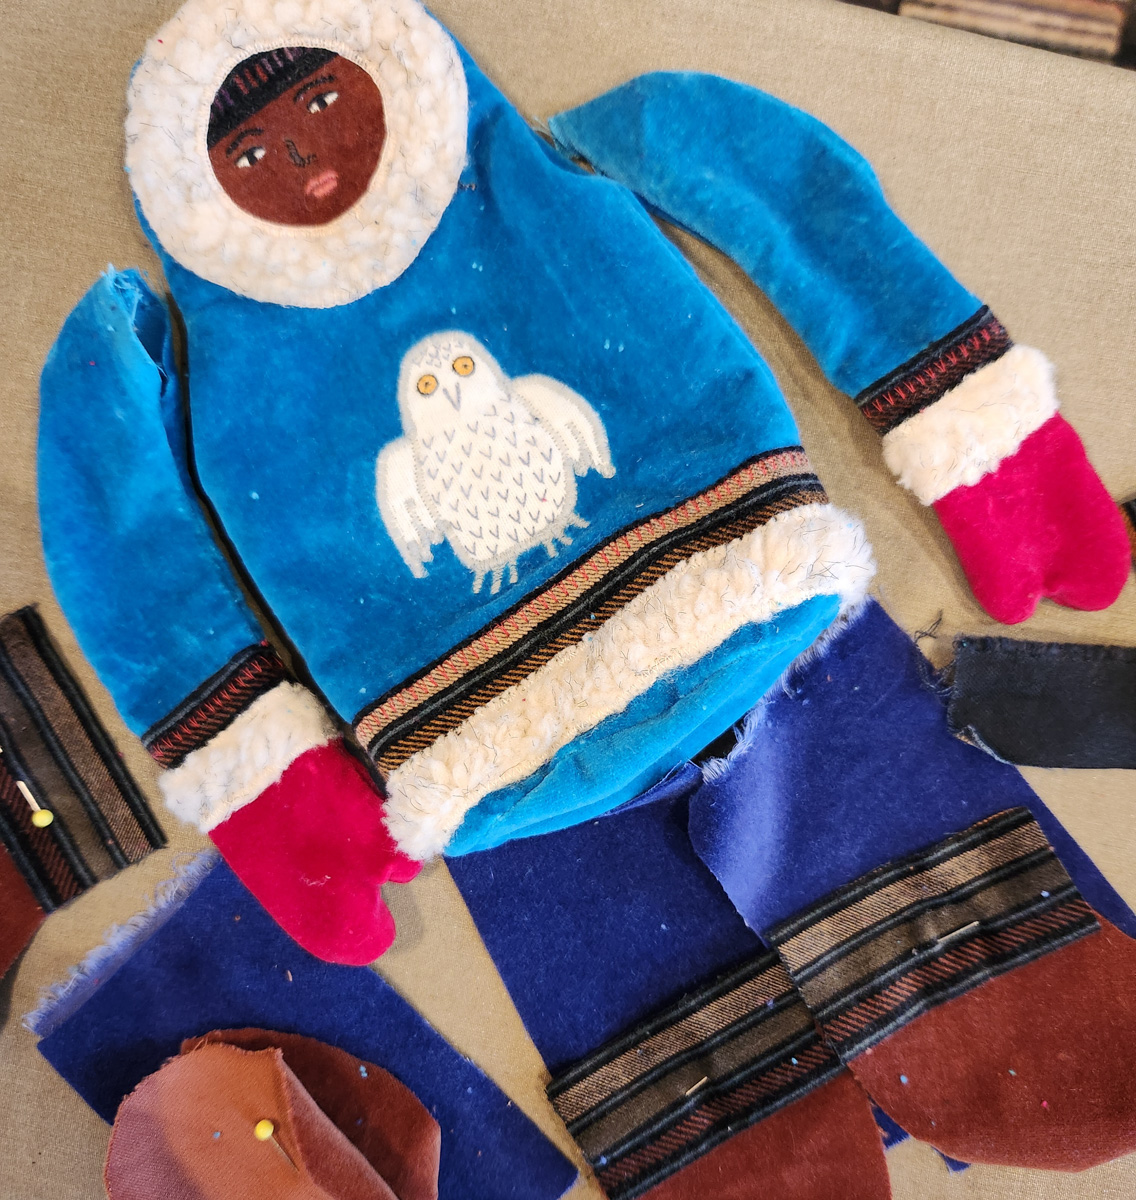
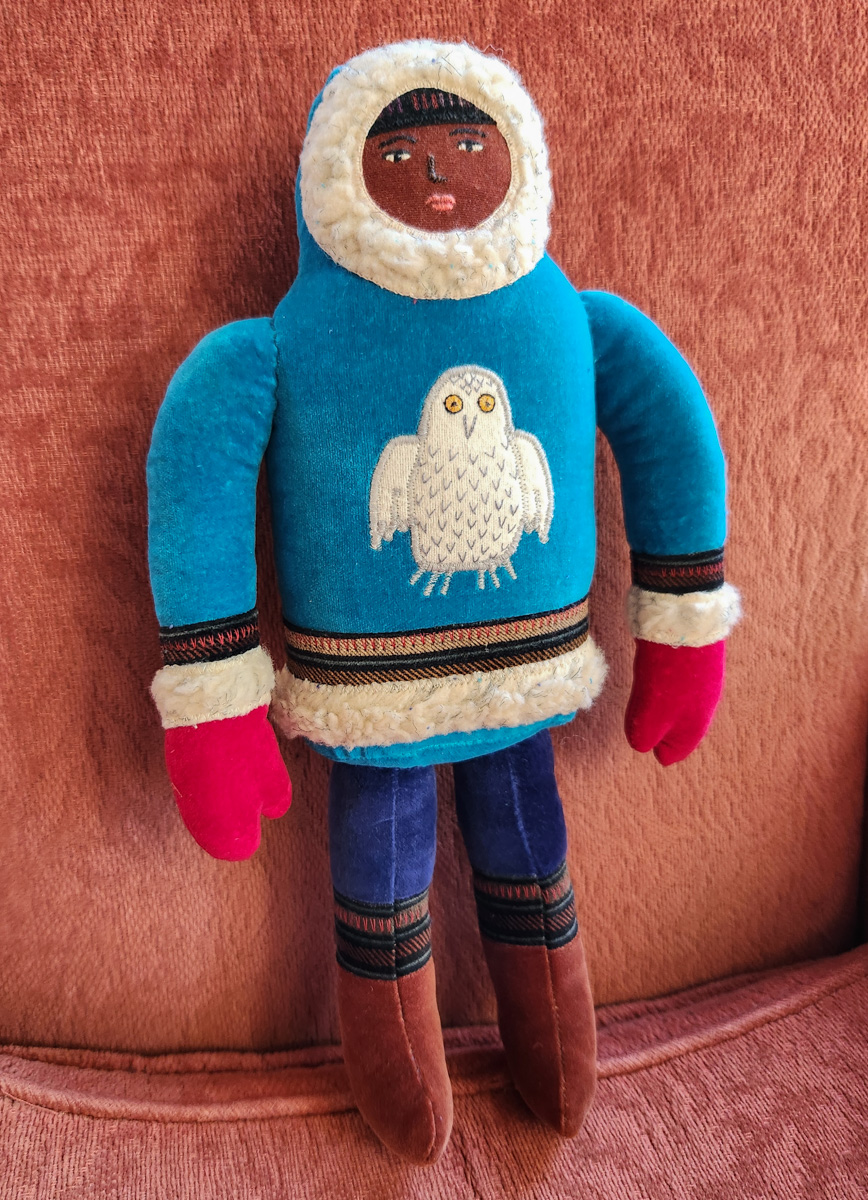
In 1985, I made a velveteen Inuit doll with a seal appliqued on its parka for my son, Peter. When you make something for a toddler, or anyone for that matter, you never know how it will be received. Will they actually play with it or leave it in the corner? I needn’t have worried, because Peter loved this doll to the point where its arms and legs had to be sewn back on several times. All these years later, I have 2 really good reasons to make dolls for a new generation, because a few weeks ago Peter became a father! So, it seemed right that little Eddie and his 1 yr. old cousin, Elias would each have their own Inuit doll to love.
Little Eddie and his father Peter
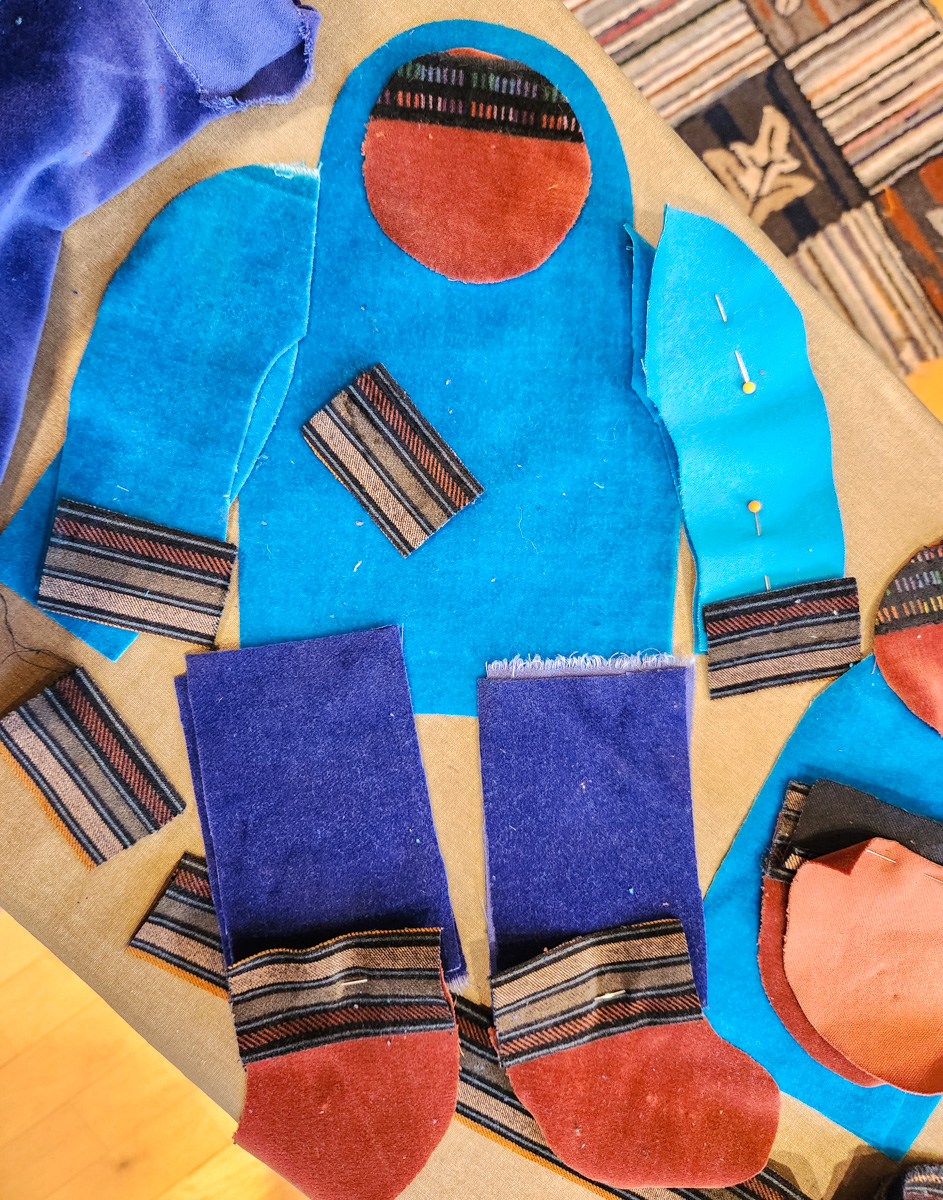
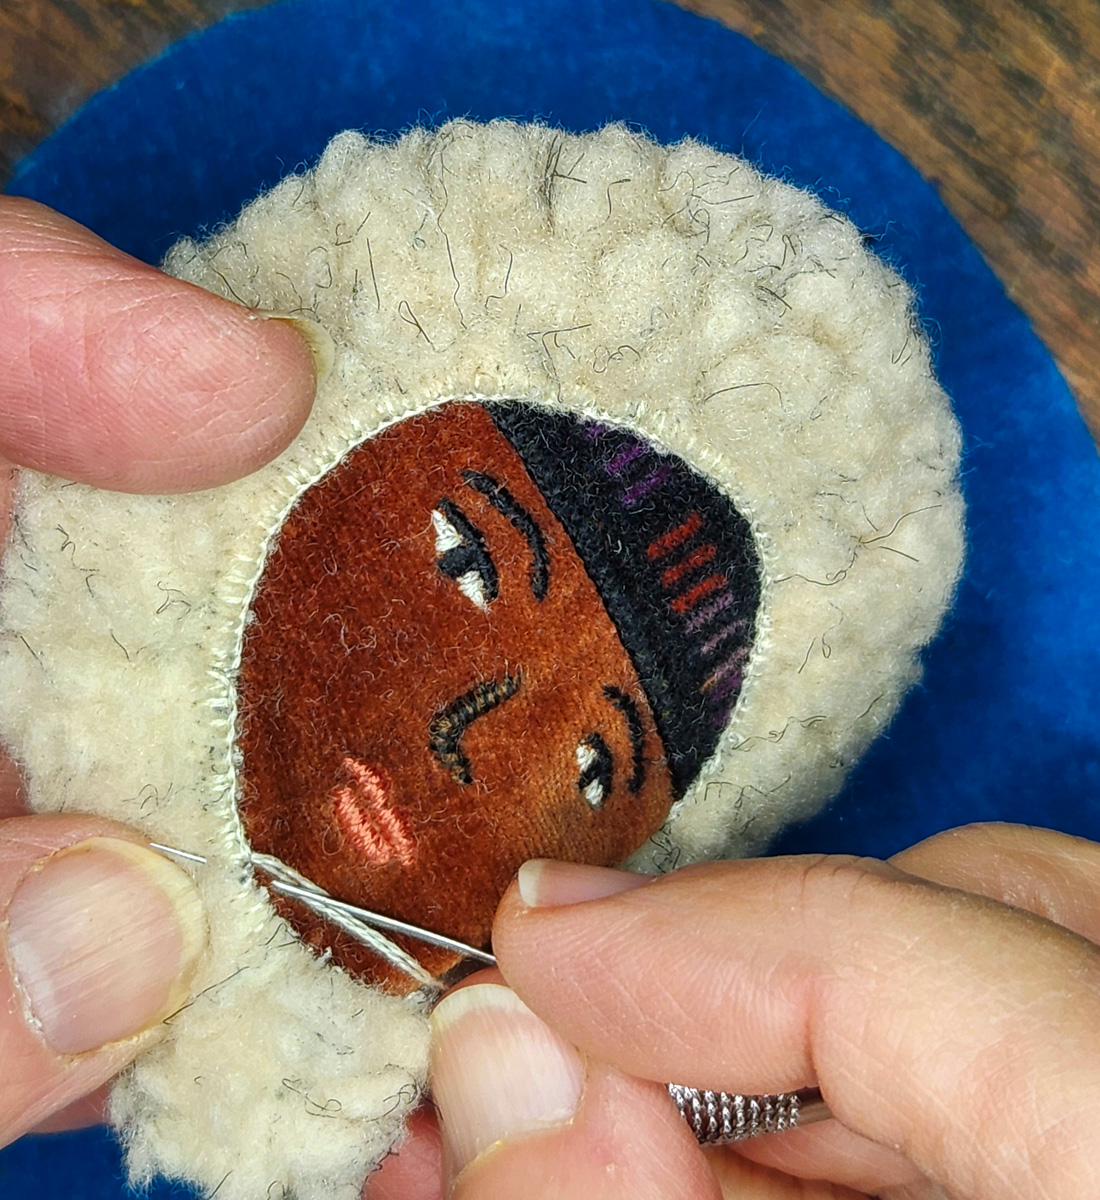
I found the original sketches and patterns for Peter’s doll in my files and unearthed pieces of cotton velveteen left over from my doll-making days. The only material I needed to buy was some sherpa fabric for the fur trim. This post includes photos and videos that show the process of making the 2 new dolls for my grandsons, one decorated with a snowy owl and the other with a fish.
Back in the 80s, when practically every checkout line at the supermarket had a rack full of homey women’s magazines, I designed sewing projects for Better Homes and Gardens. Sewing projects are conspicuously absent from today’s version of the magazine, which is limited to home decor ideas, gardening, and recipes.
I mostly designed cloth dolls, including one with a prairie bonnet that they styled on the cover of their December 1982 issue. You can also see a crèche that Better Homes and Gardens published in 1981 here. When I submitted a photo of Peter’s Inuit doll to the magazine’s crafts editor, they asked me to design 3 dolls, which were included in the December 1986 issue.
During this early phase of my career, I enjoyed coming up with project ideas and making prototypes, even though the pay was dismal and I signed away my design rights (I was young and inexperienced). By the end of the 1980s, I was ready to move on to children’s book illustration, which came with its own suite of challenges.
When I was designing projects for the magazine, writing out step-by-step instructions was my least favorite part of the job. Describing what I’d done in words felt overly analytical and thoroughly anal! It took years to learn to show and tell how to make something in a way that intuitive and visual learners like me could understand. Then, I was ready to write my how-to book, Felt Wee Folk, which combines visual diagrams and step-by-step instructions for making little dolls. To find out more about my philosophy of sharing knowledge, please read this post.
Nowadays, I’m relieved to not have to explain in detail how I make something. Demonstrating my process through photos and videos is much more natural than describing every step in words.
I hope that you enjoy the following photos and videos that show how I embroidered the doll’s face, stitched and appliquéd the snowy owl, and sewed on the arm.
To keep up with new posts, subscribe to this blog. Your contact info will not be shared. If you’d like to see more frequent photos tracking the projects in my studio, please follow me on Facebook and/or Instagram.
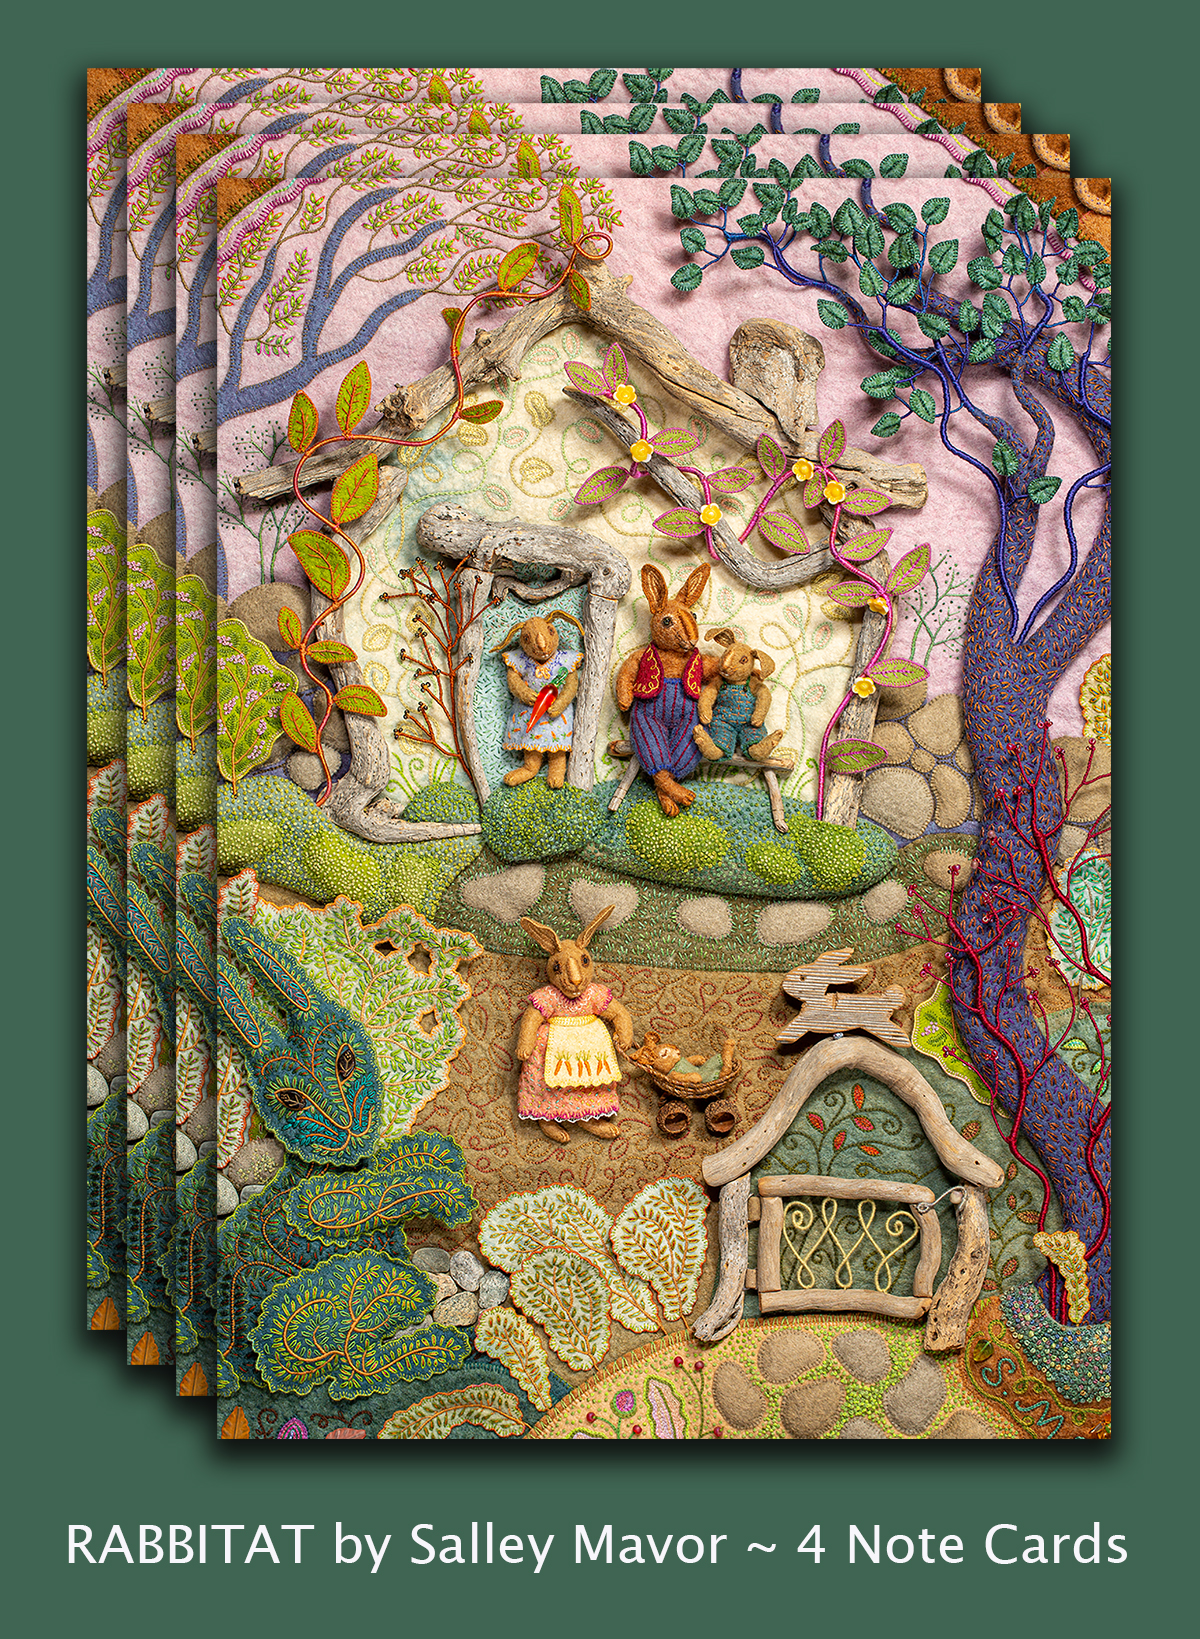
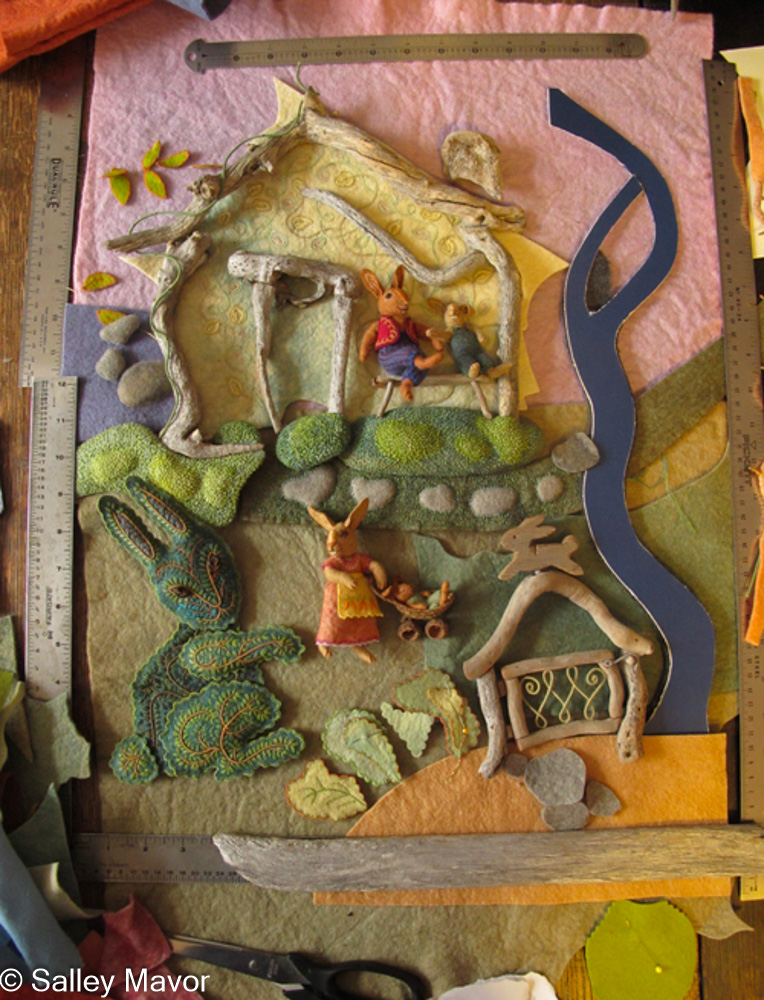
With the coming of spring and Easter, I think it’s a good time to revisit Rabbitat, which I completed 13 years ago. The piece was an experiment of sorts, for the purpose of reintroducing a sense of play into my working process. At the time, I was transitioning from the all-consuming 4-year job of researching, illustrating, and launching Pocketful of Posies and I felt the need to make something that wasn’t restricted by size and type placement specifications. I also wanted to be free to change things around as I went along.
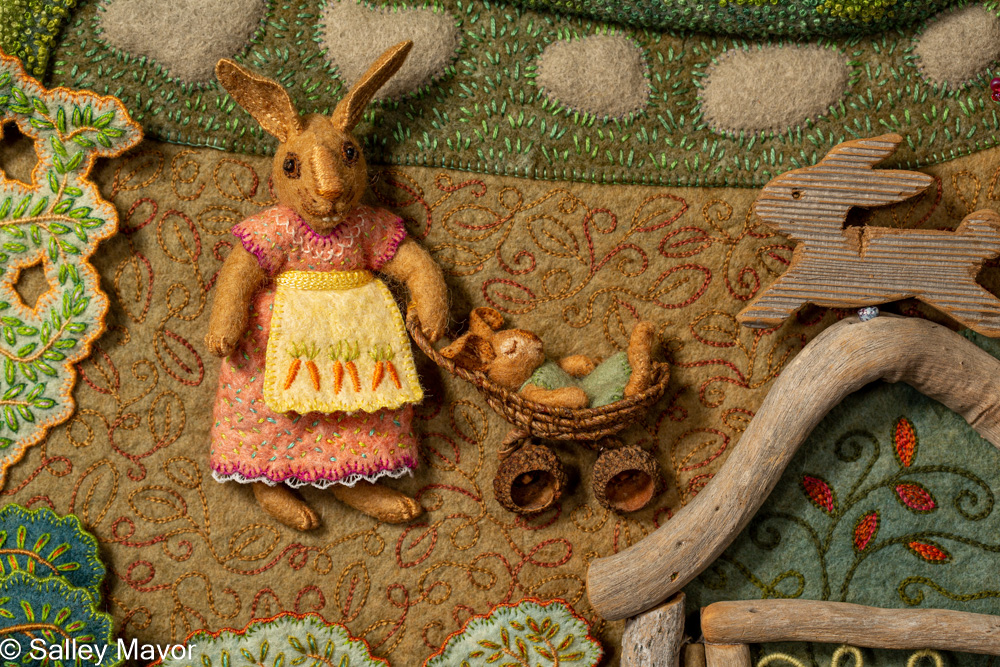
When I set out to make Rabbitat, I had just 2 elements in mind — a driftwood house and a rabbit topiary. I let the landscape evolve as I worked on it, adding rabbit characters and a garden details as the imagined scenario unfolded. I told my husband Rob that I was making a habitat for rabbits and he immediately said, “Oh, it’s a Rabbitat!” The scene is available as a note card and a children’s jigsaw puzzle in my Etsy Shop.
RABBITAT note cards and a children’s jigsaw puzzle are now available in my Etsy Shop.
Homespun Note Card Sampler
TOPIARY I frequently draw thumbnails sketches of visual impressions that pop into my head. For years, ideas for animal shaped topiaries kept showing up in my notebooks.
In Rabbitat, I wanted to expand the topiary concept that was introduced with the cat and bird in the “Molly, my sister and I” rhyme from Pocketful of Posies.
RABBITS To make the rabbit figures, I used the same methods taught in my how-to book, Felt Wee Folk, with furry adaptations, including long pointy ears sewn on top.
RABBITAT FILM Before the piece was finished and all of the parts sewn to the background, I asked local cinematographer (and friend of my son Peter), Daniel Cojanu to make a short documentary about how I work (see the Rabbitat film below). We had such fun coming up with different ways of showing my art, from stitching closeups to gathering driftwood to stop-motion animation. In the years since then, Daniel has gone on to build an impressive career producing science and environmental documentary films.
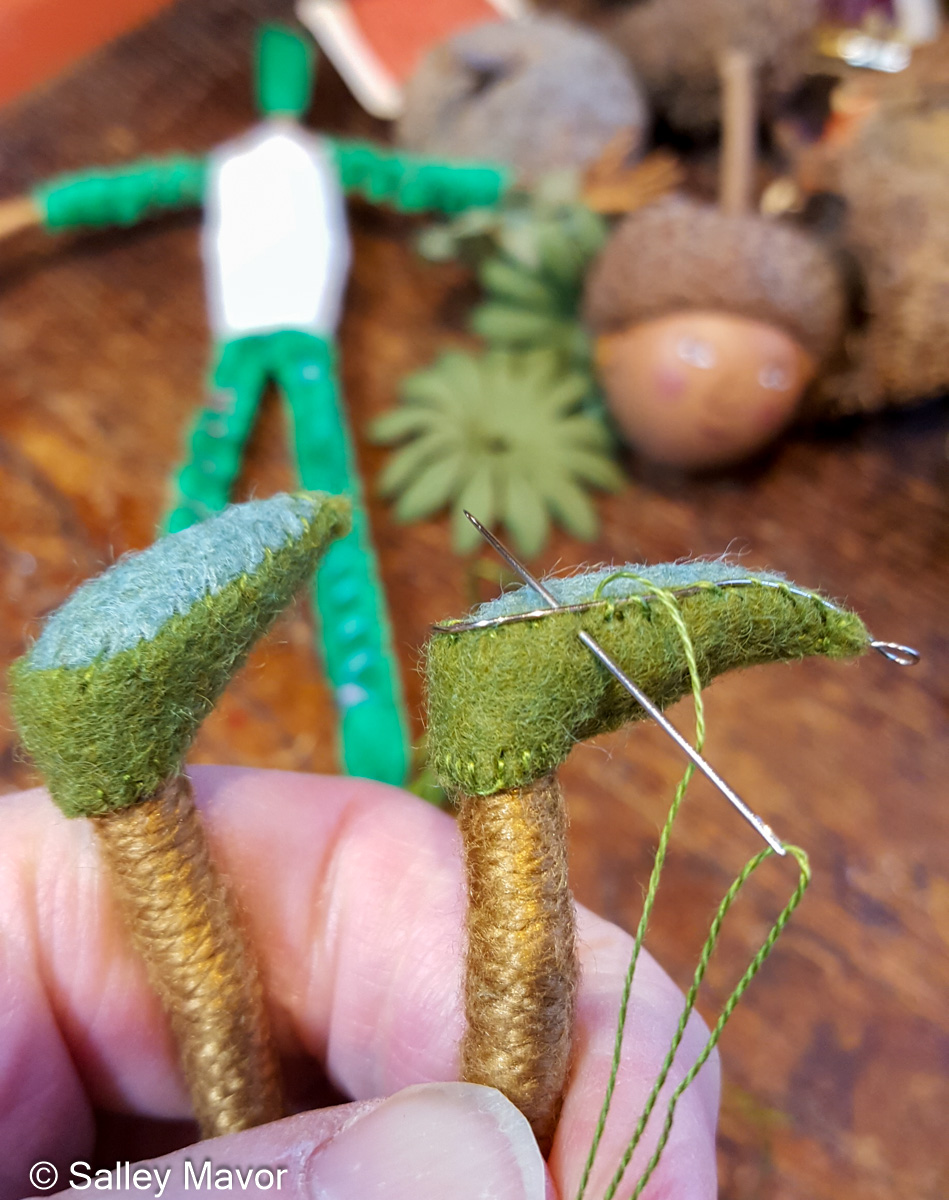
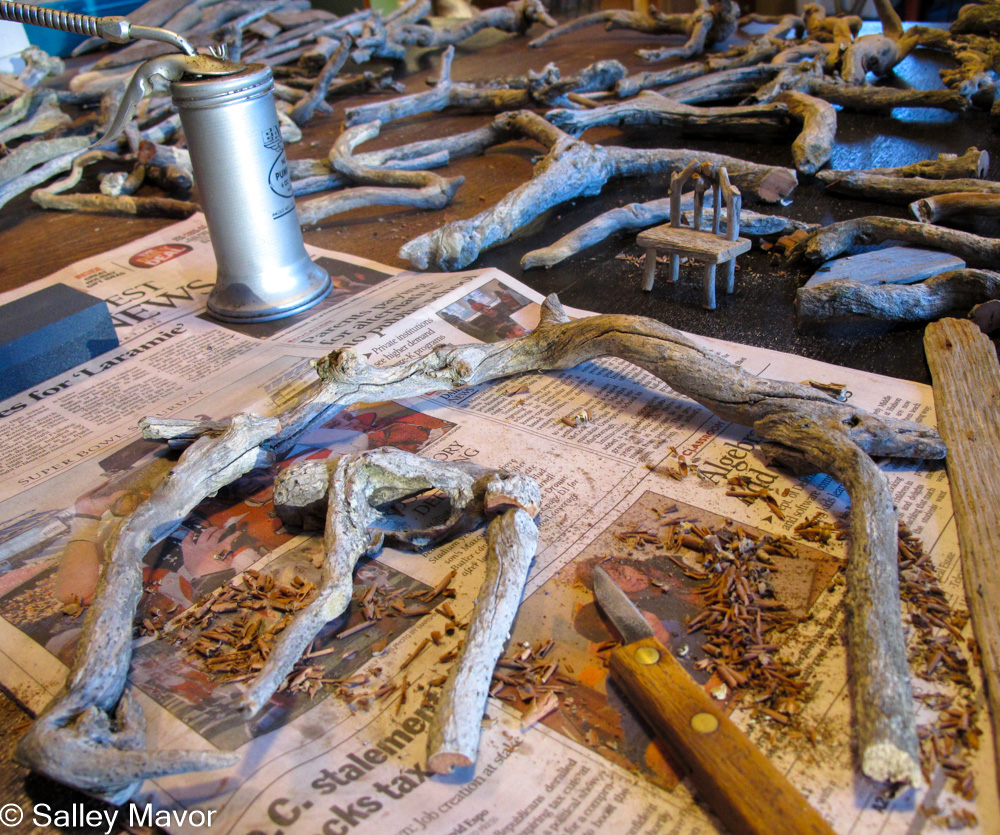
DRIFTWOOD HOUSE To make the house, I combed through all of my driftwood and selected pieces which I could see as a roof, side beams, and a doorway. I carved them in spots, so that they fit together and lay down as flat as possible.
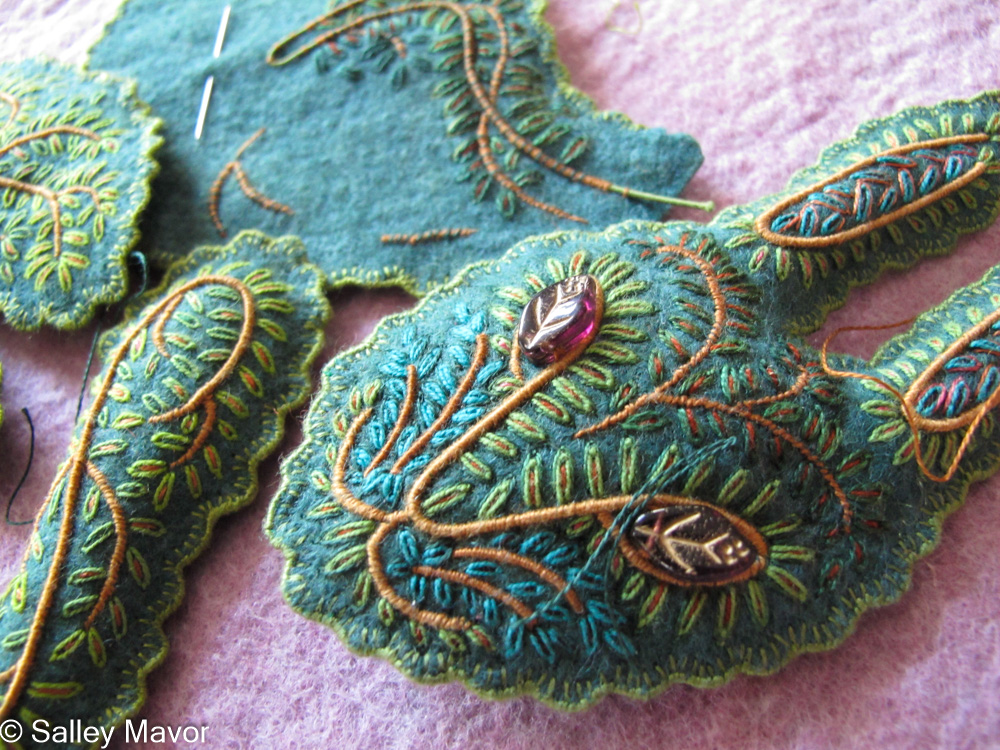
I decorated the house walls with an embroidered chain-stitched vine pattern on felt. This was the first time that I made mossy patches using lots and lots of French knots.
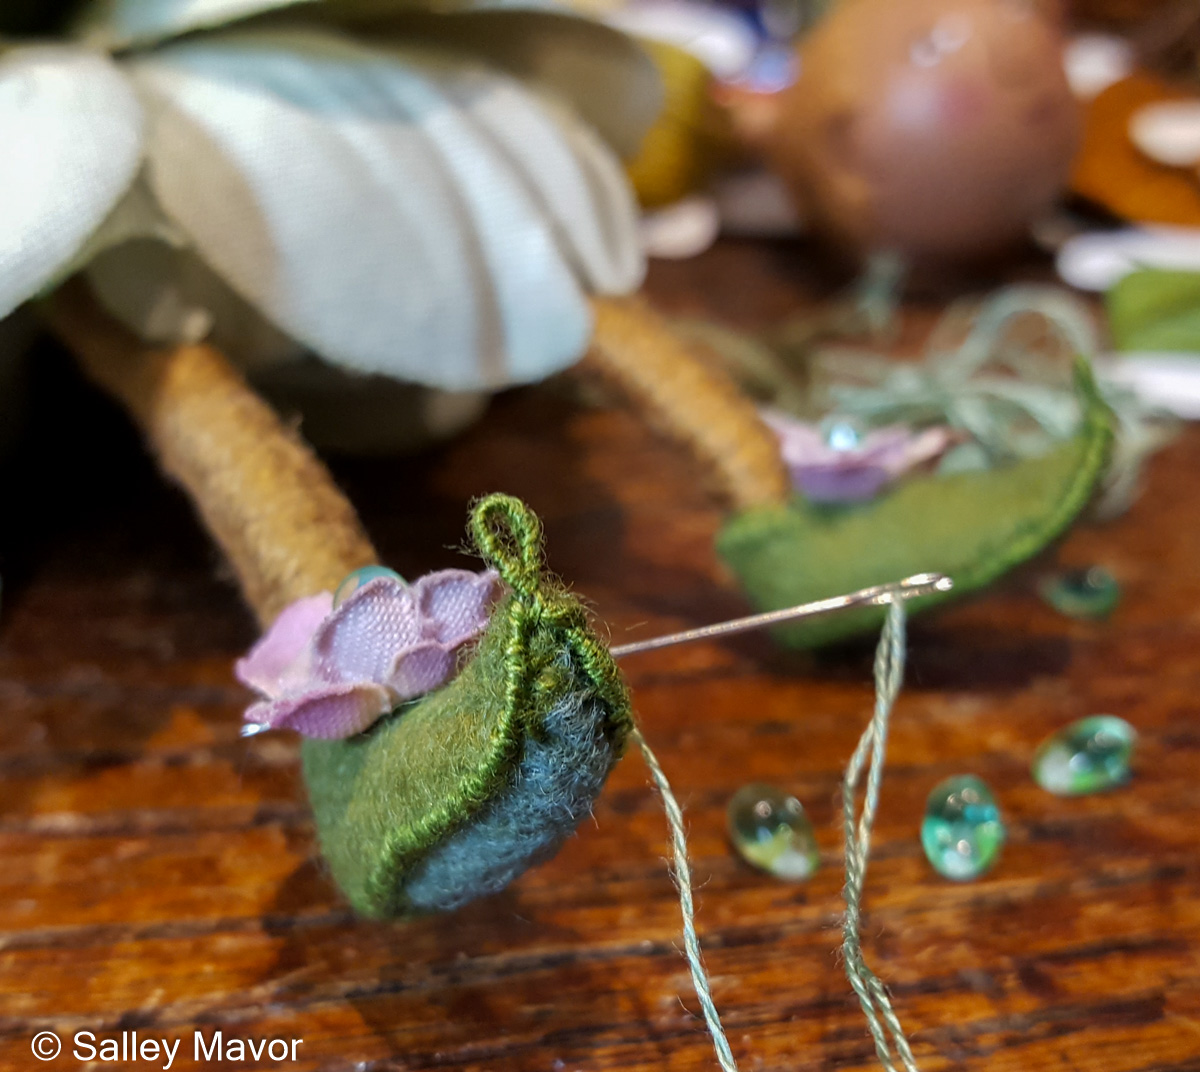
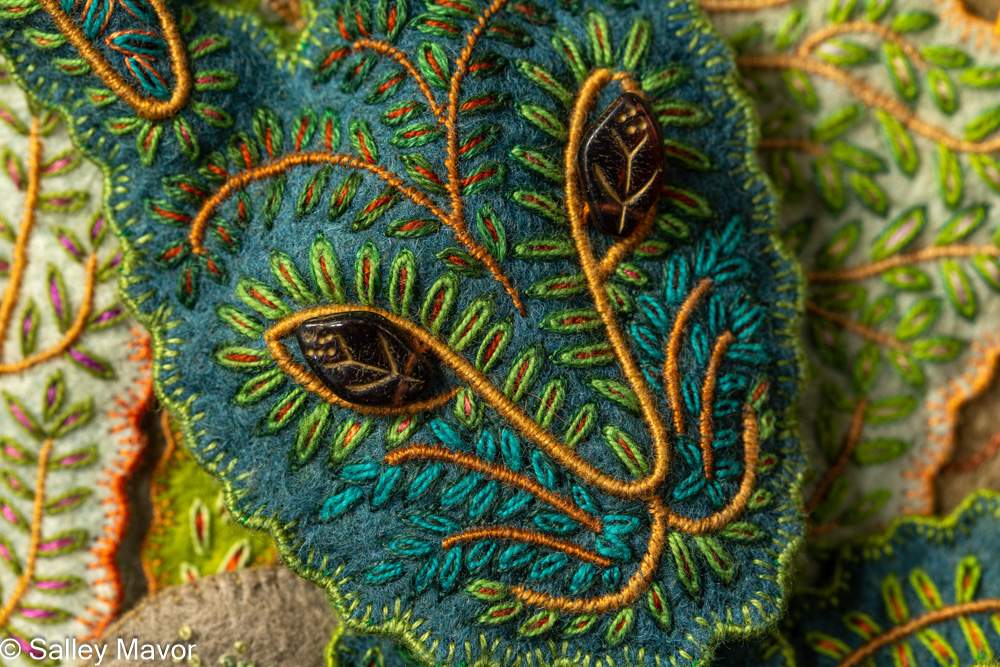
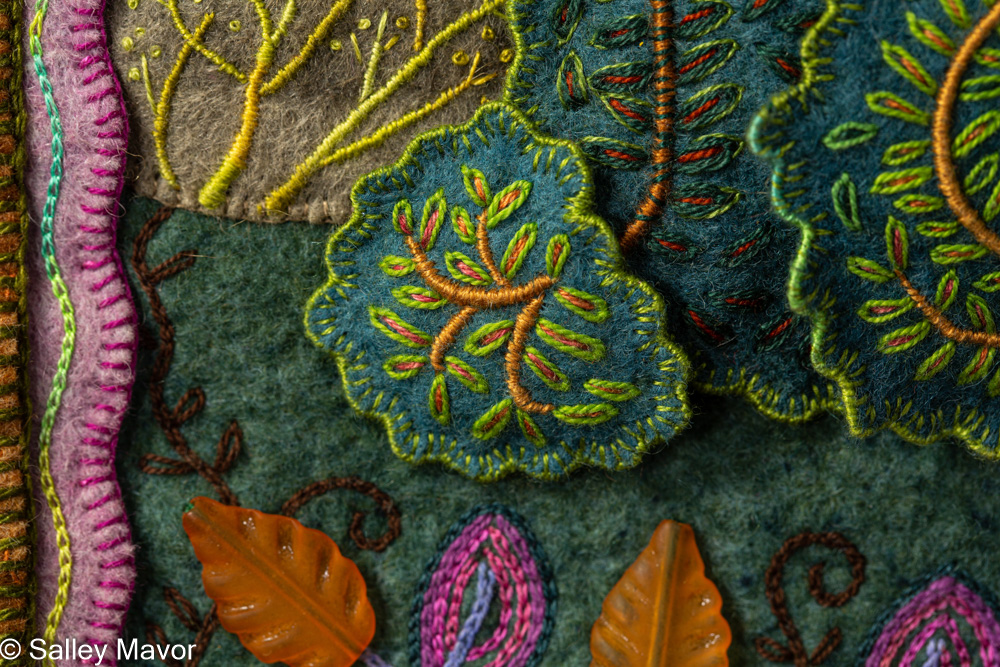
RABBIT TOPIARY For the rabbit topiary, I cut separate parts out of dark green felt and embroidered branches and leaves. The eyes, nose, mouth and whiskers are wire wrapped with embroidery floss. I also sewed wire along the scalloped outside edge, so that the pieces could be bent and shaped. Two glass leaf beads make the eyes.
The piece is large compared to my book illustrations, measuring 24″ x 30″ , with a depth of 1 1/2″.
SLIDE SHOW I hope that you enjoy this slide show of details from the piece.
BRIAR BORDER At some point, I decided to add an arched border with a curved and thorny briar made of felt covered wire.
EXHIBITION The next opportunity to see the original Rabbitat will be July 27, 2024 – mid-Feb. 2025 at the Albany Institute of History and Art, Albany, NY. Bedtime Stitches and Social Fabric will be displayed together.
To keep up with new posts, please subscribe to this blog. Your contact info will not be sold or shared. If you’d like to see more frequent photos tracking the projects in my studio, please follow me on Facebook and/or Instagram.
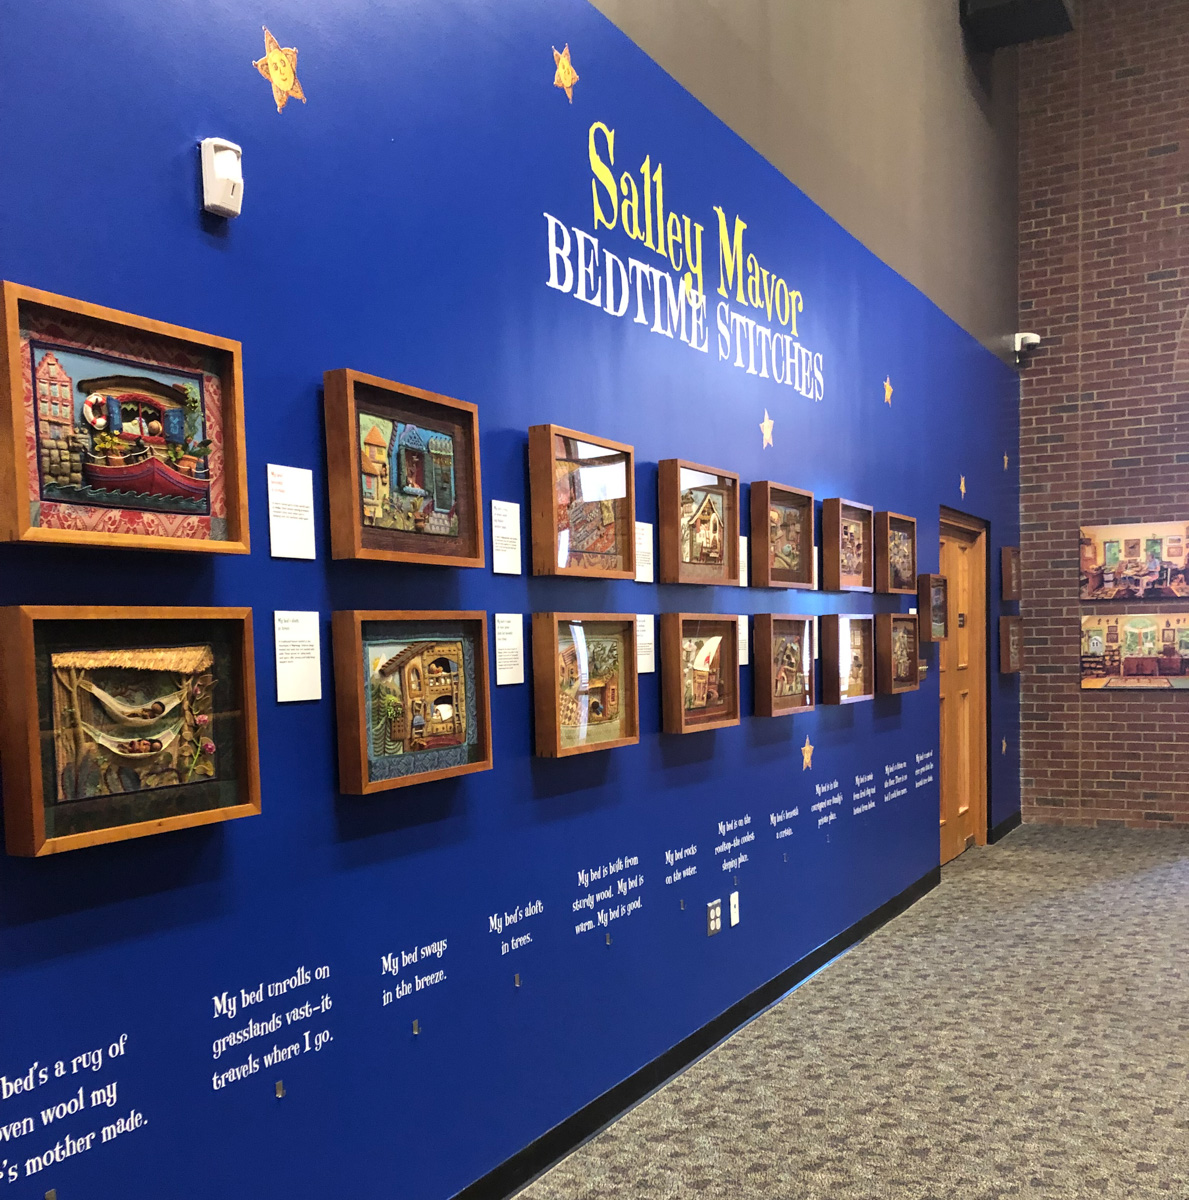
Good news! There will soon be 2 opportunities in different parts of the country to see my original artwork. The Bedtime Stitches touring exhibition will be in South Carolina and 4 pieces from Pocketful of Posies will be included in a group show in Illinois.
Salley Mavor: Bedtimes Stitches, the touring exhibition of original illustrations for MY BED, keeps chugging along. Since its debut in 2020 at the Cahoon Museum of American Art in Cotuit, MA, five large boxes packed with the show’s framed artwork and information panels have crisscrossed the country about a dozen times. Every time they’re shipped off, I hope and pray that everything arrives safely! I feel that it’s worth the risk because how else are people from different locations going to have the experience of seeing the detail and 3-dimentional quality of my original pieces?
The next opportunity to see Bedtime Stitches is coming right up! The exhibitionwill be on view March 2 – May 5, 2024 at the Upcountry History Museum in Greenville, SC. This is the third time that my work has been exhibited there and they always put together a beautiful display.
Bedtime Stitches exhibition at the Upcountry History Museum in Greenville, SC
I’ve spent much of this month in Rob’s workshop, customizing new extra sturdy, multi-layered cardboard boxes for shipping the framed pieces. The first set of boxes were reused so many times that they were practically held together with multi-layers of tape. These new boxes should hold up for a few more trips back and forth. Doing this kind of work isn’t as peaceful as sitting and stitching, but making sure my art is packed safely is an important part of the job!
If you have time to get totally lost in the wee world, please visit this page, which lists dozens of links to posts about the process of making the artwork for MY BED. The book is available worldwide where books are sold. Signed copies are for sale on my shop.
The Bedtimes Stitches exhibition has been such a success that I’m open to extending the tour into and perhaps beyond 2026. I do not send proposals, but inquiries and invitations from museum directors and curators are welcome. Upcoming locations for Bedtime Stitches are listed below.
A is for ART: Highlights from Past Exhibitions Feb. 25 – April 28, 2024
Four original bas-relief illustrations from Pocketful of Posies will be included in a special 50th anniversary recap exhibit at the Cedarhurst Center for the Arts 2600 Richview Rd. Mount Vernon, IL
To keep up with new posts, please subscribe to this blog. Your contact info will not be sold or shared. If you’d like to see more frequent photos tracking the projects in my studio, please follow me on Facebook and/or Instagram.
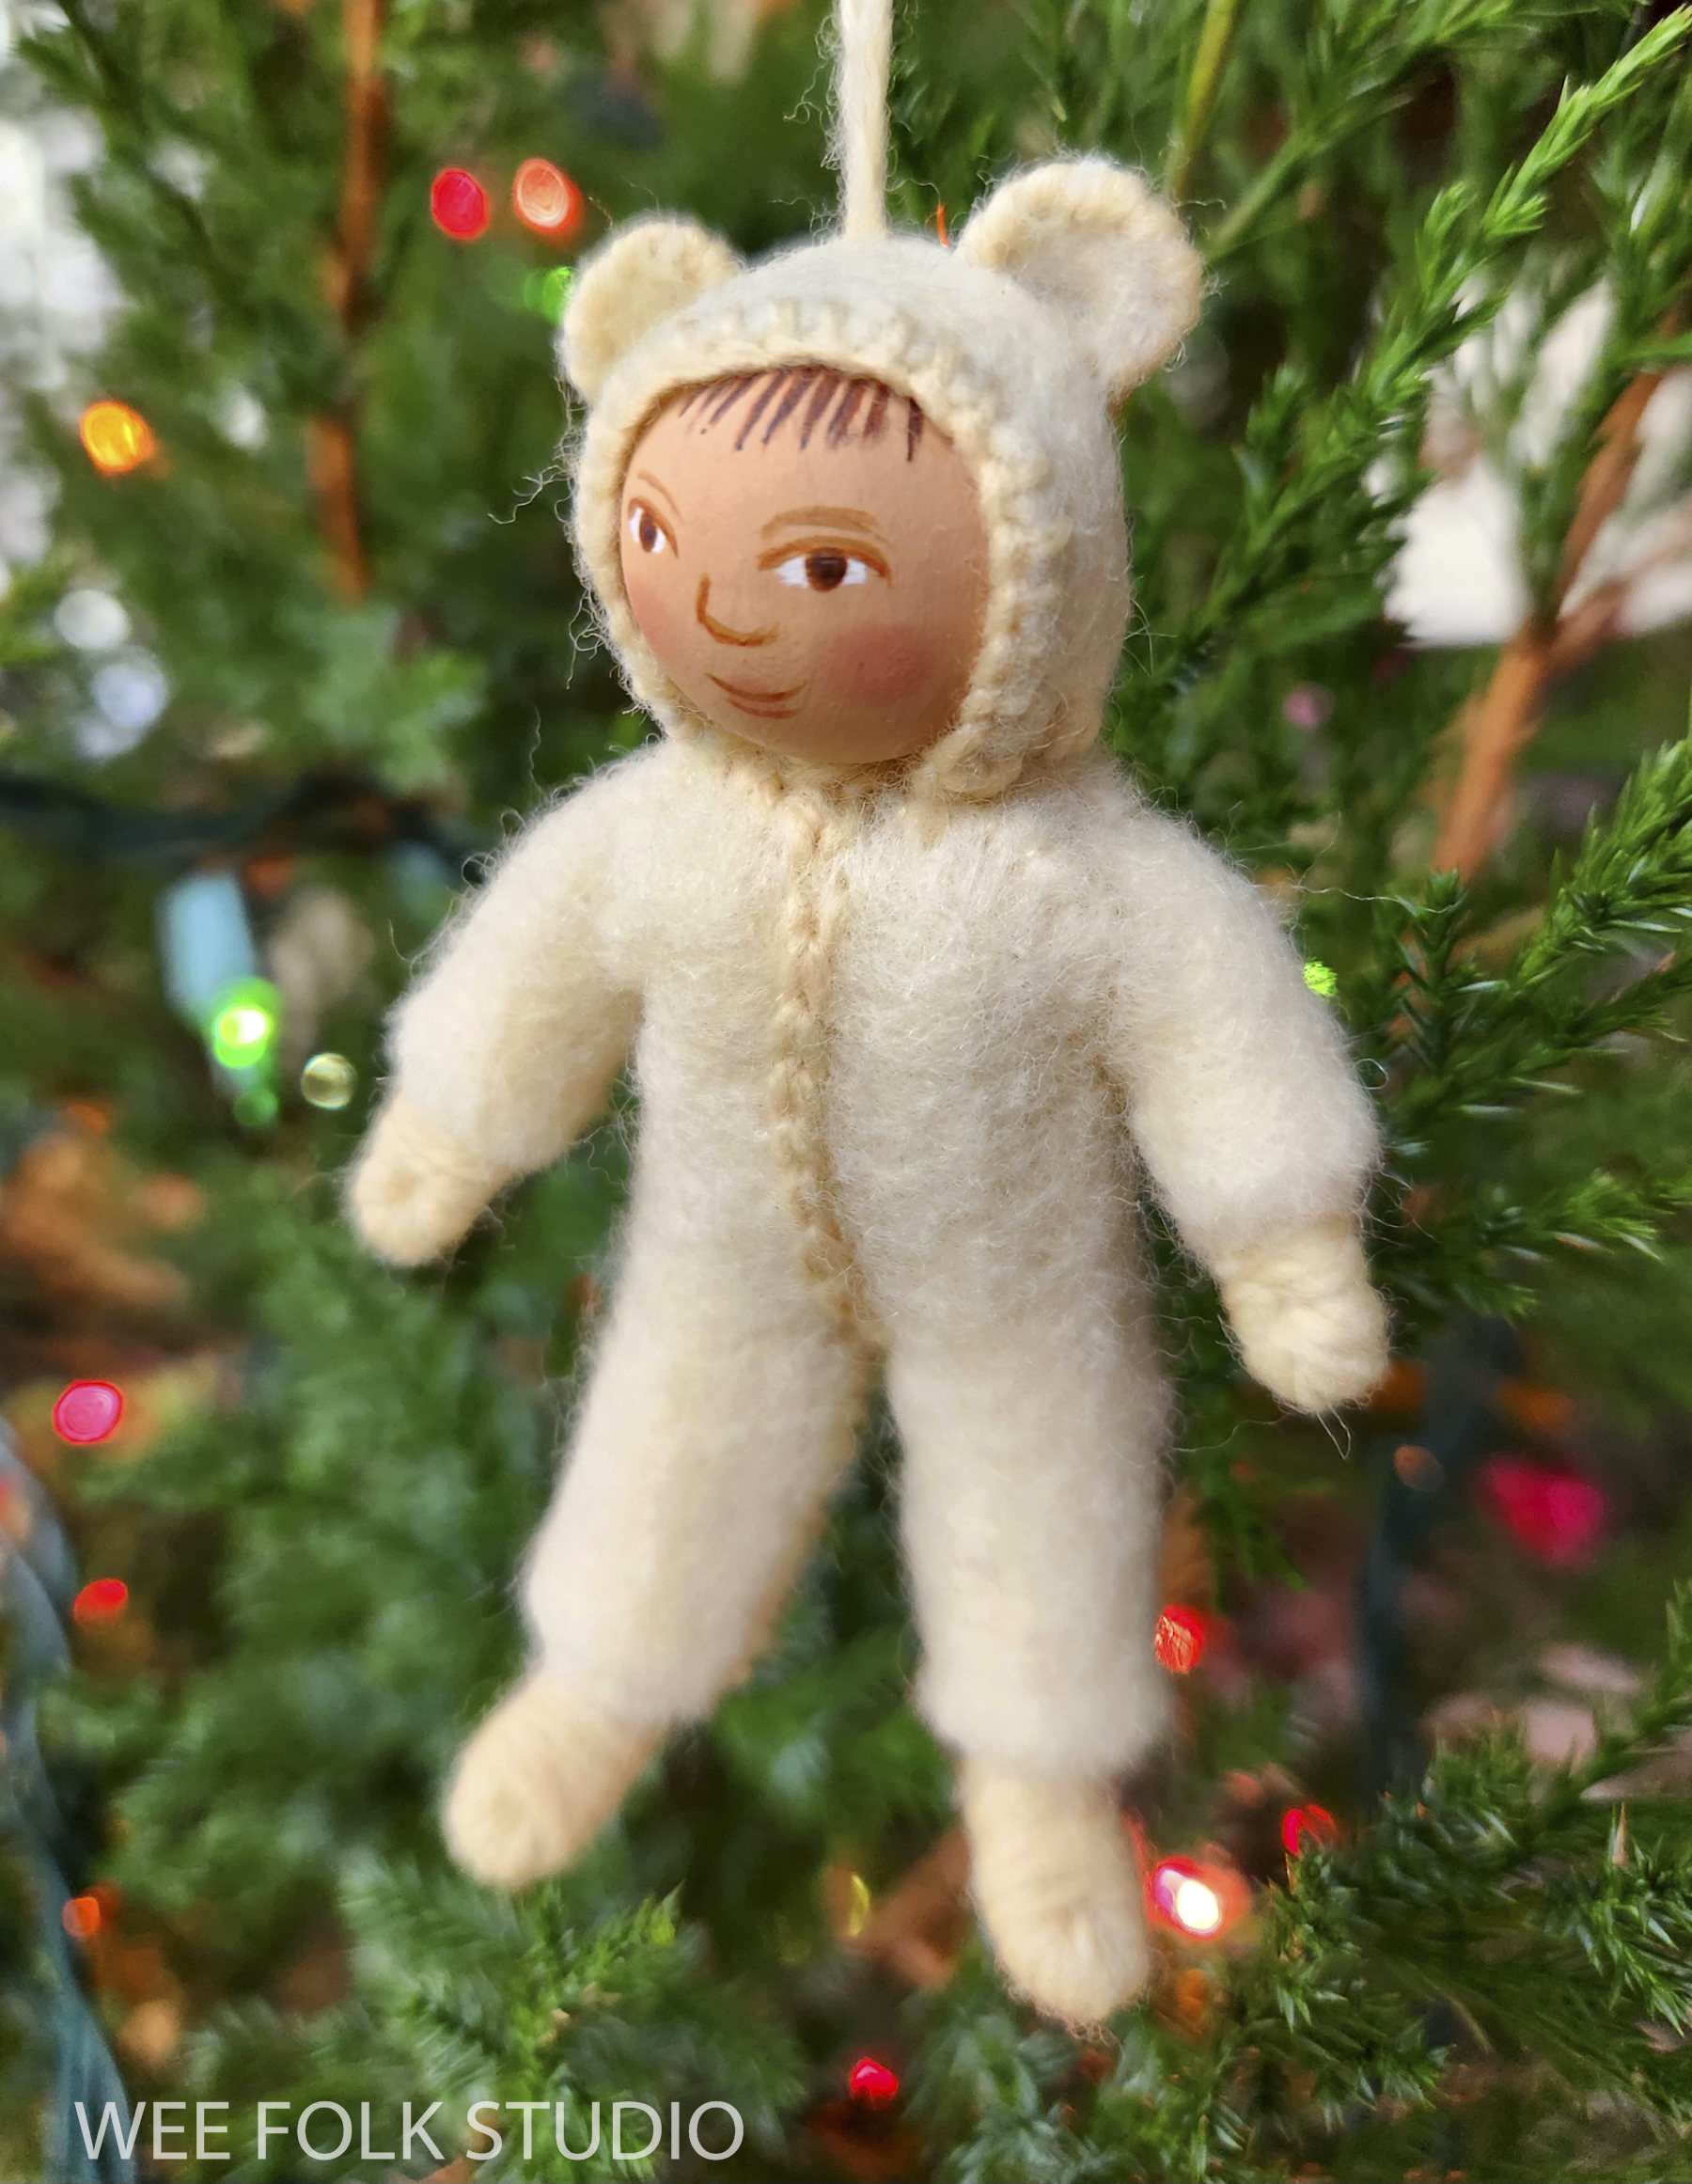
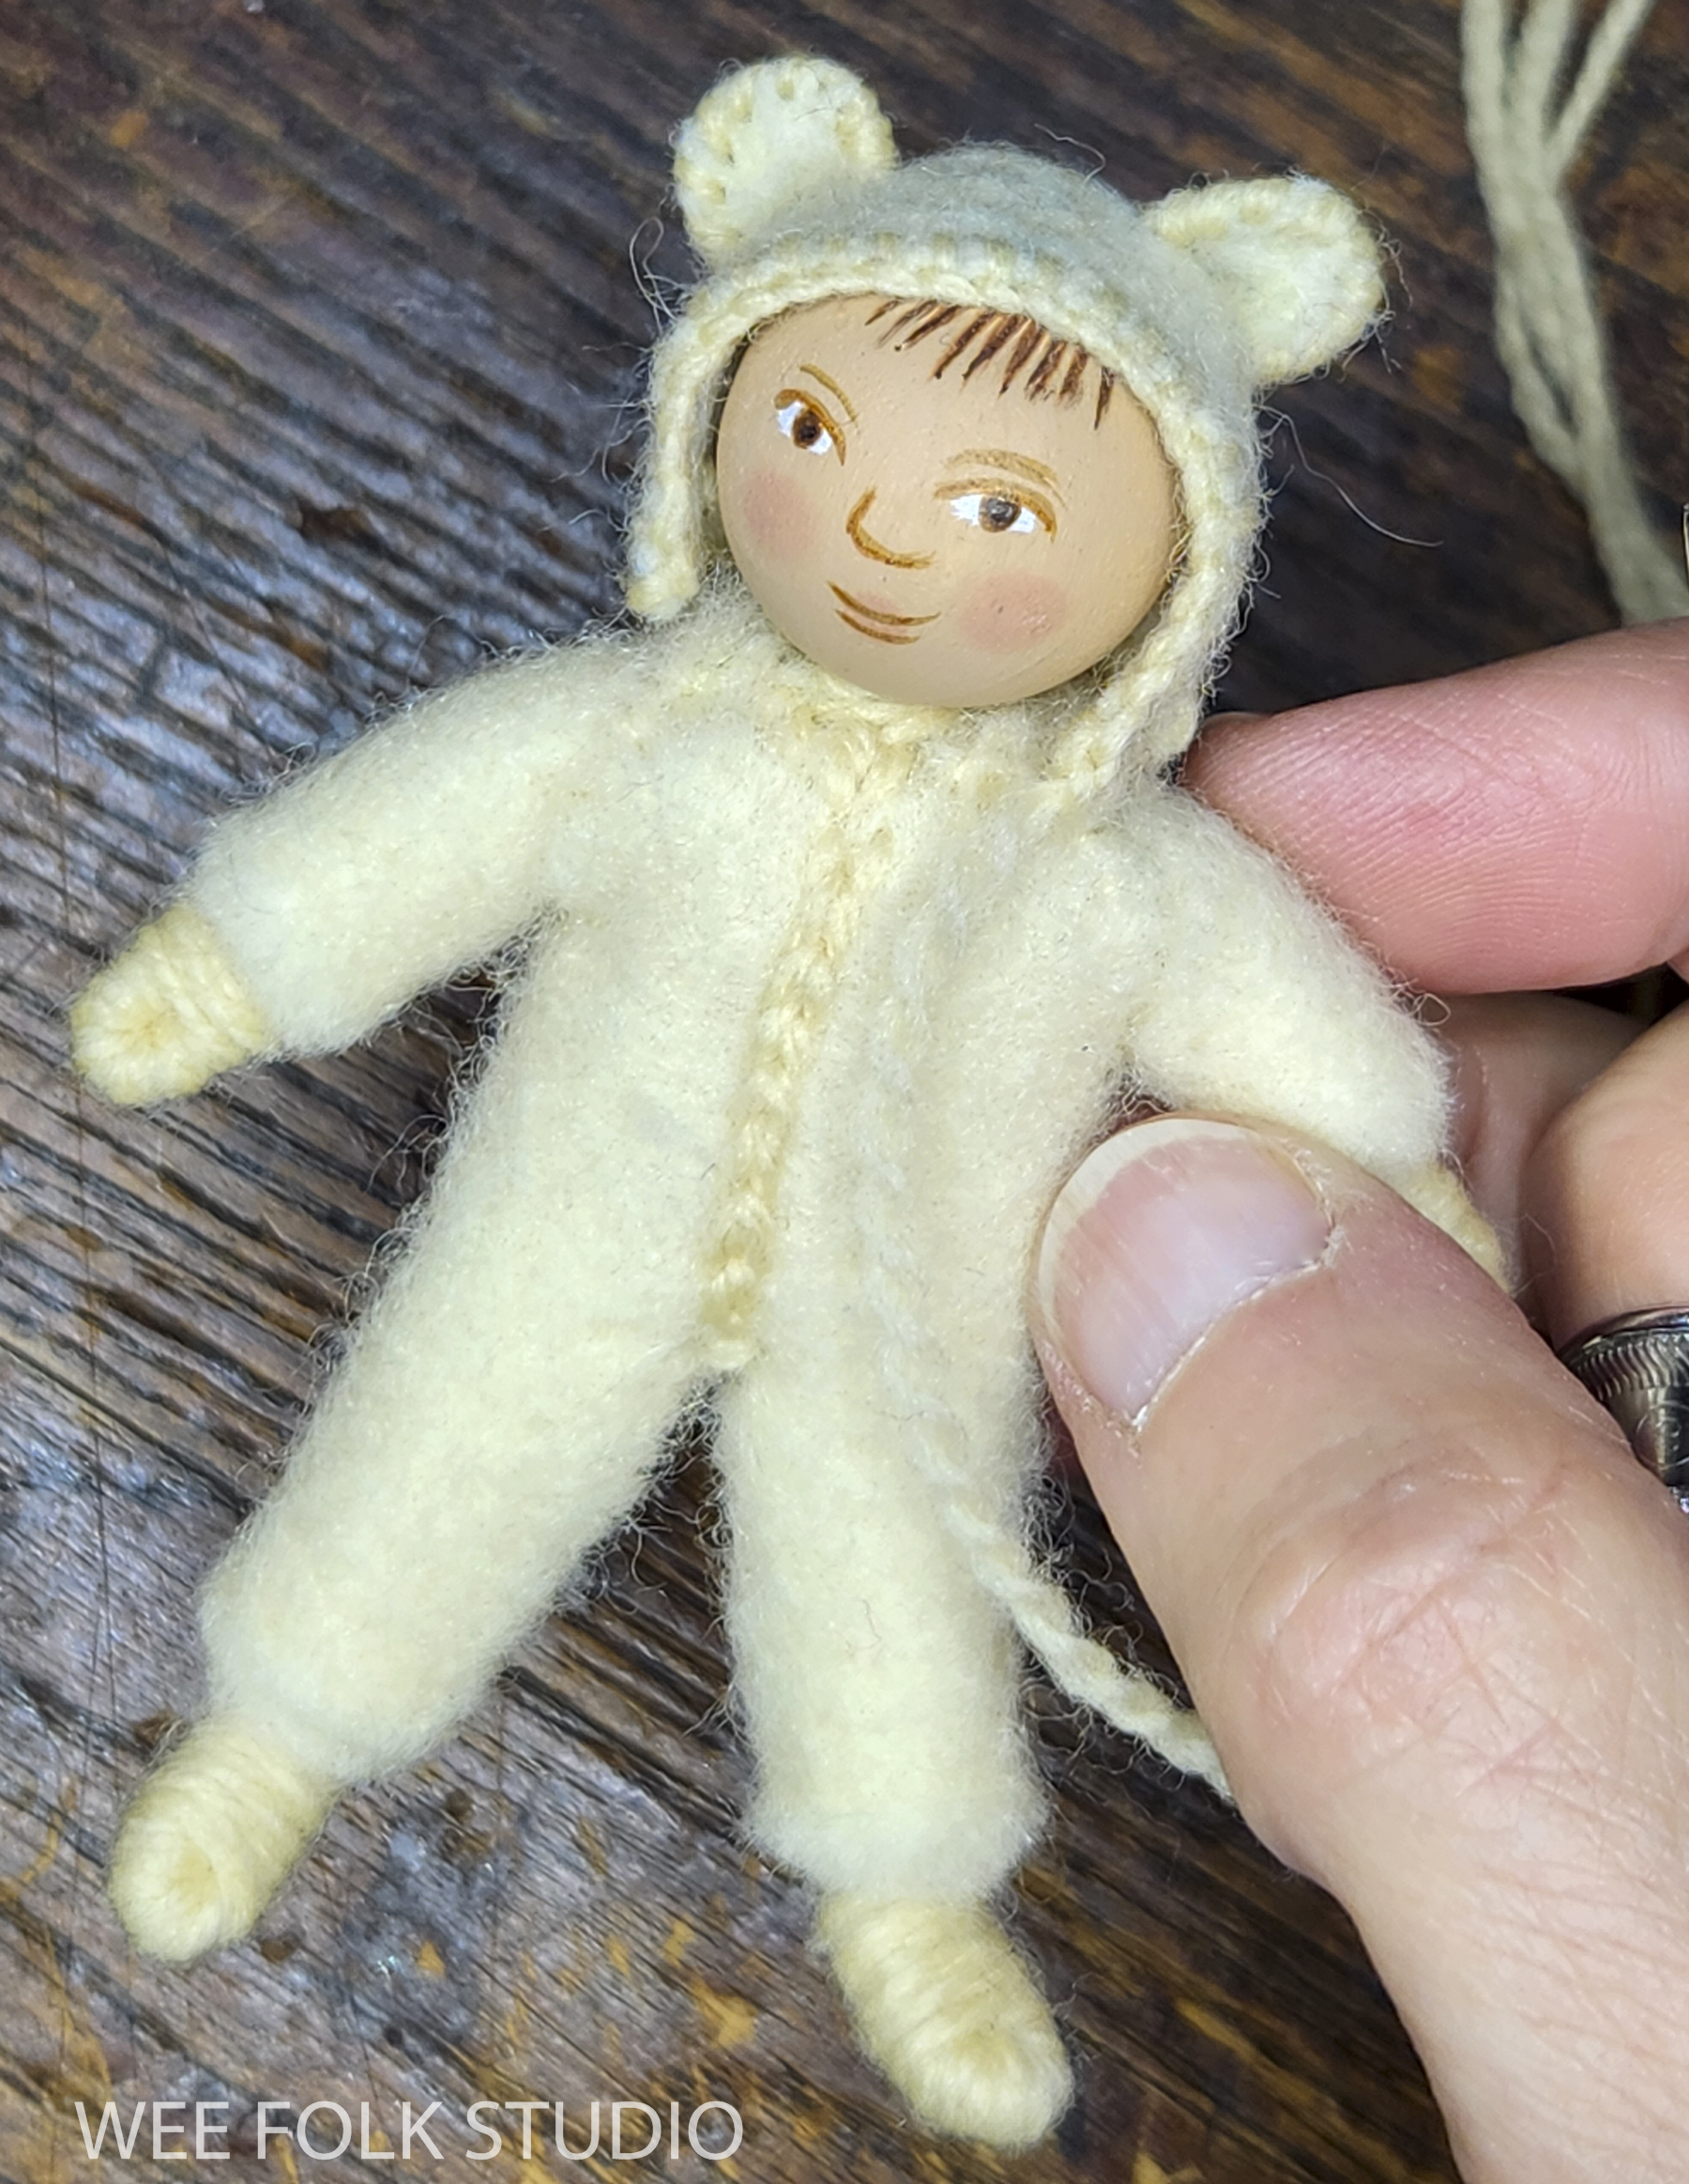
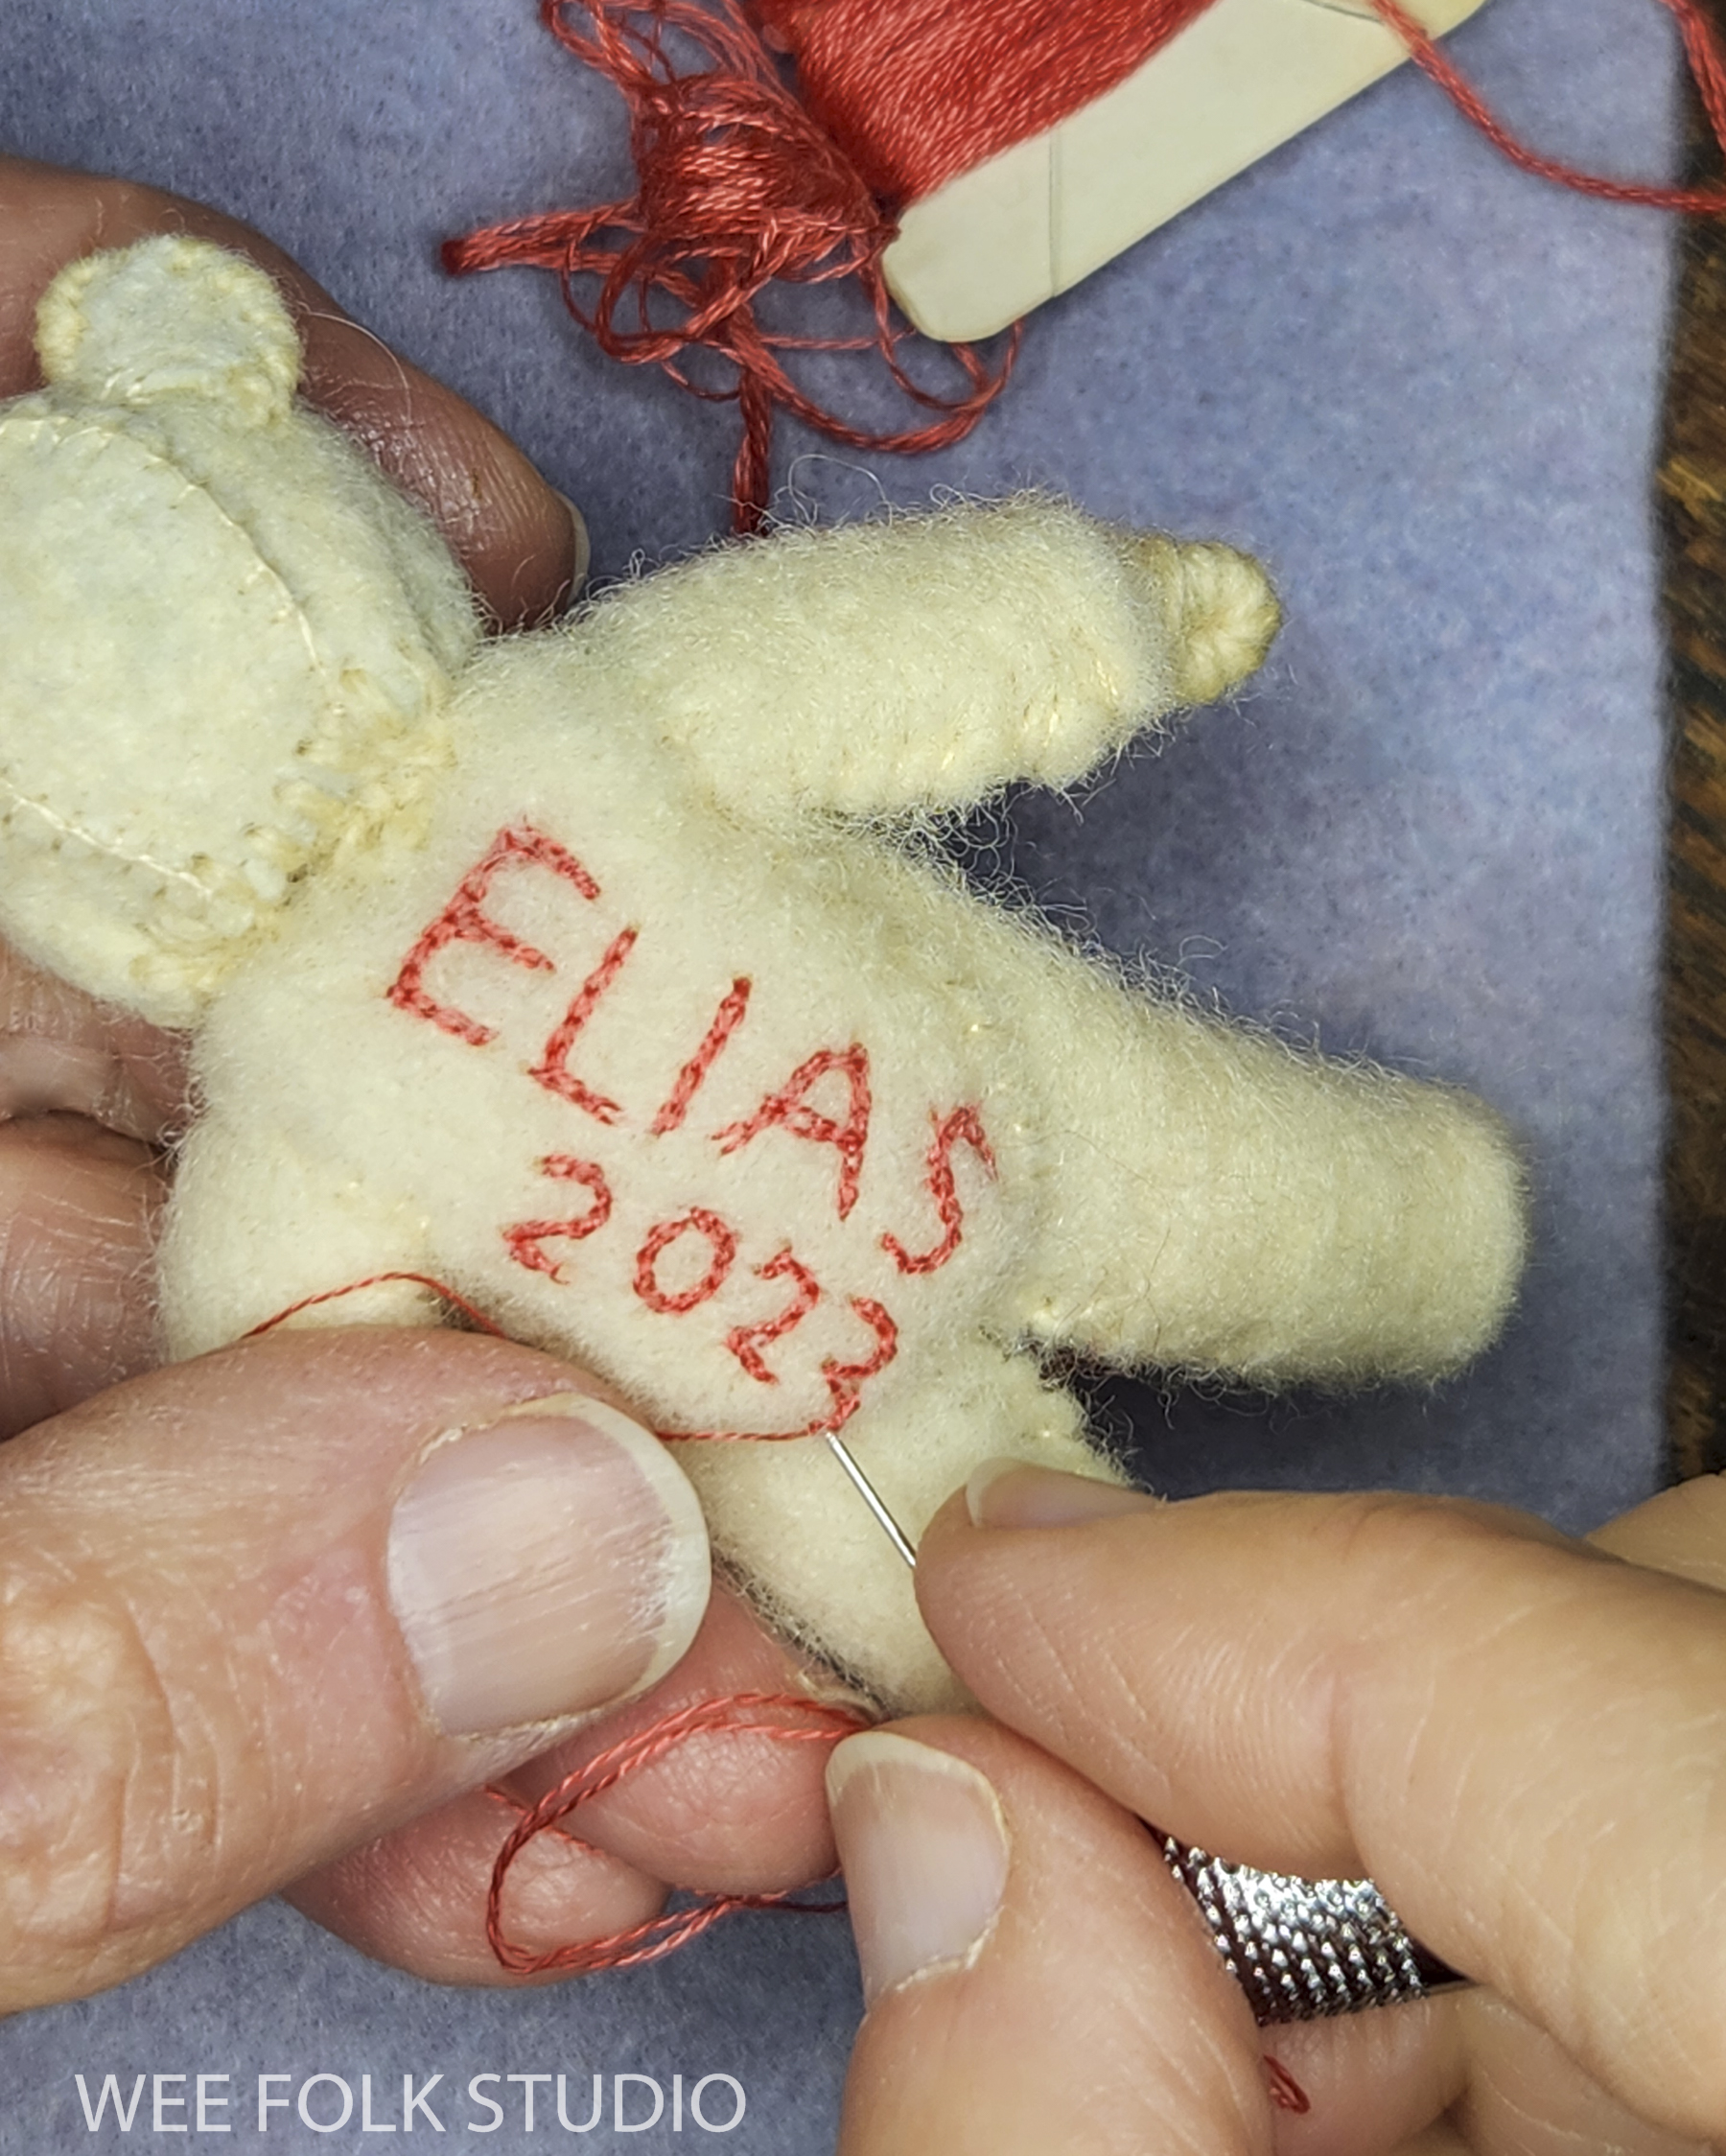
Last December, I made some small gifts, including a little version of my grandson Elias in his polar bear snow suit. I’m looking forward to making more mementos like this and hope it becomes a yearly tradition! These days, it seems that practically every children’s hat and hooded outfit comes with a pair of animal ears on top. That’s fine with me – the more playful, the better!
I also made new Inuit dolls, which I’ll write about in a future post. They are a redo of a project I originally made for my kids and designed for Better Homes and Gardens magazine in 1986.
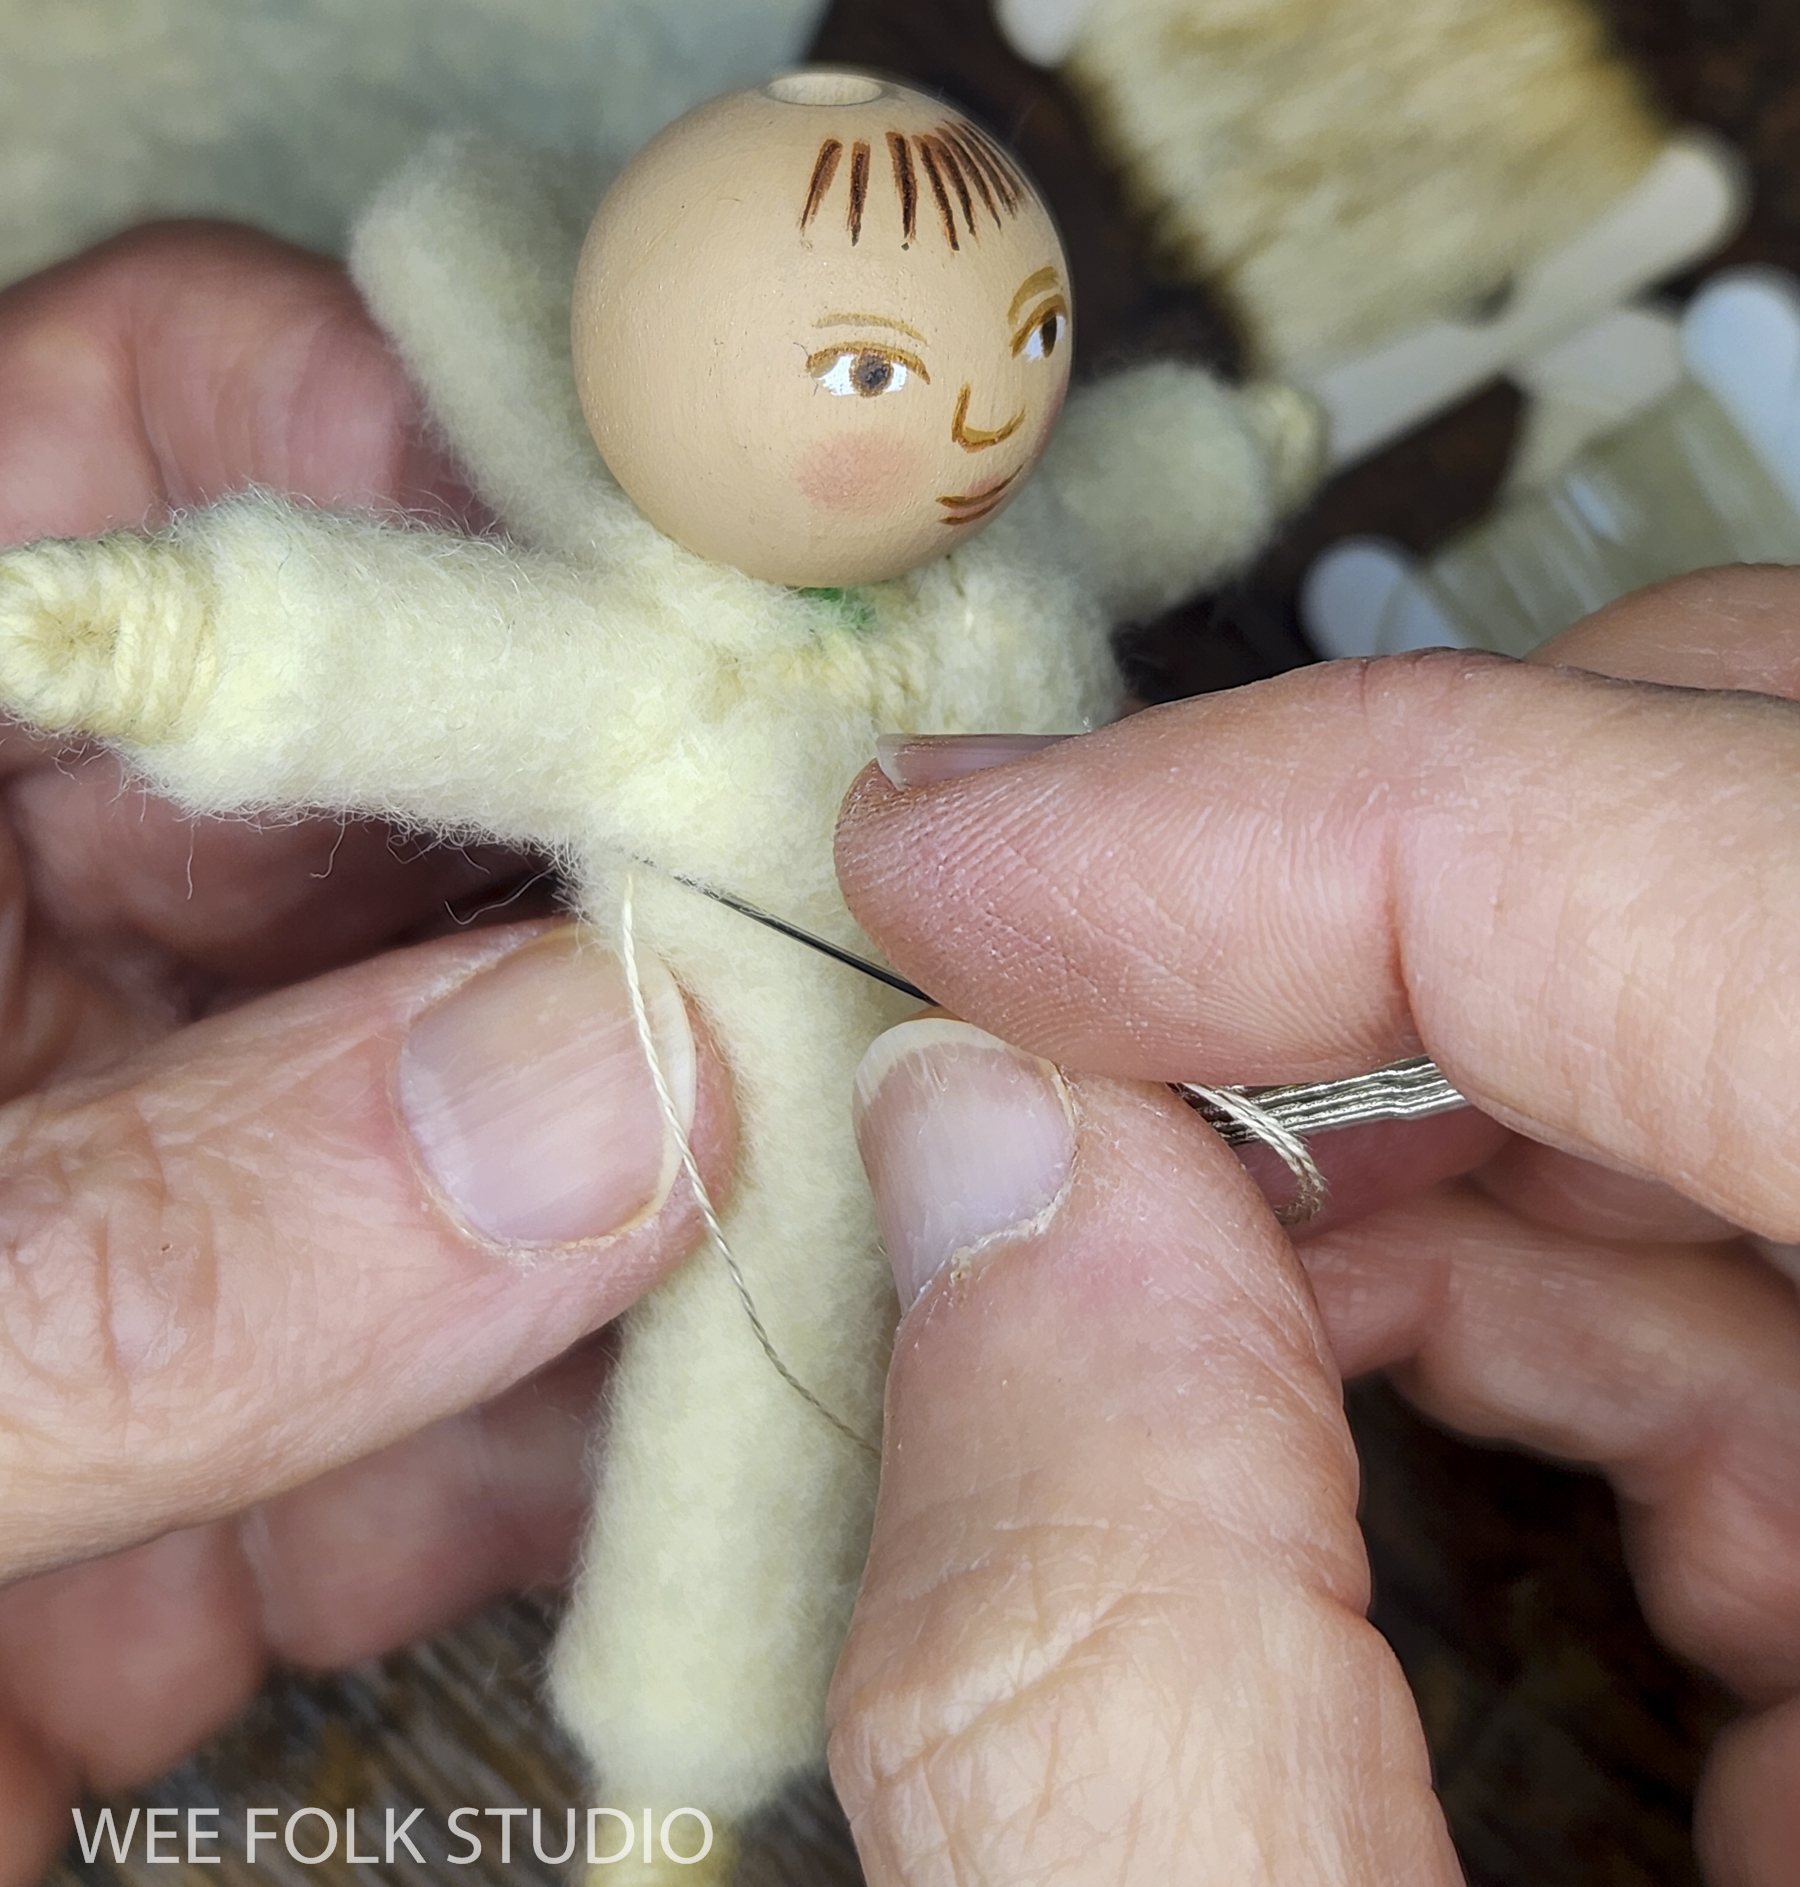
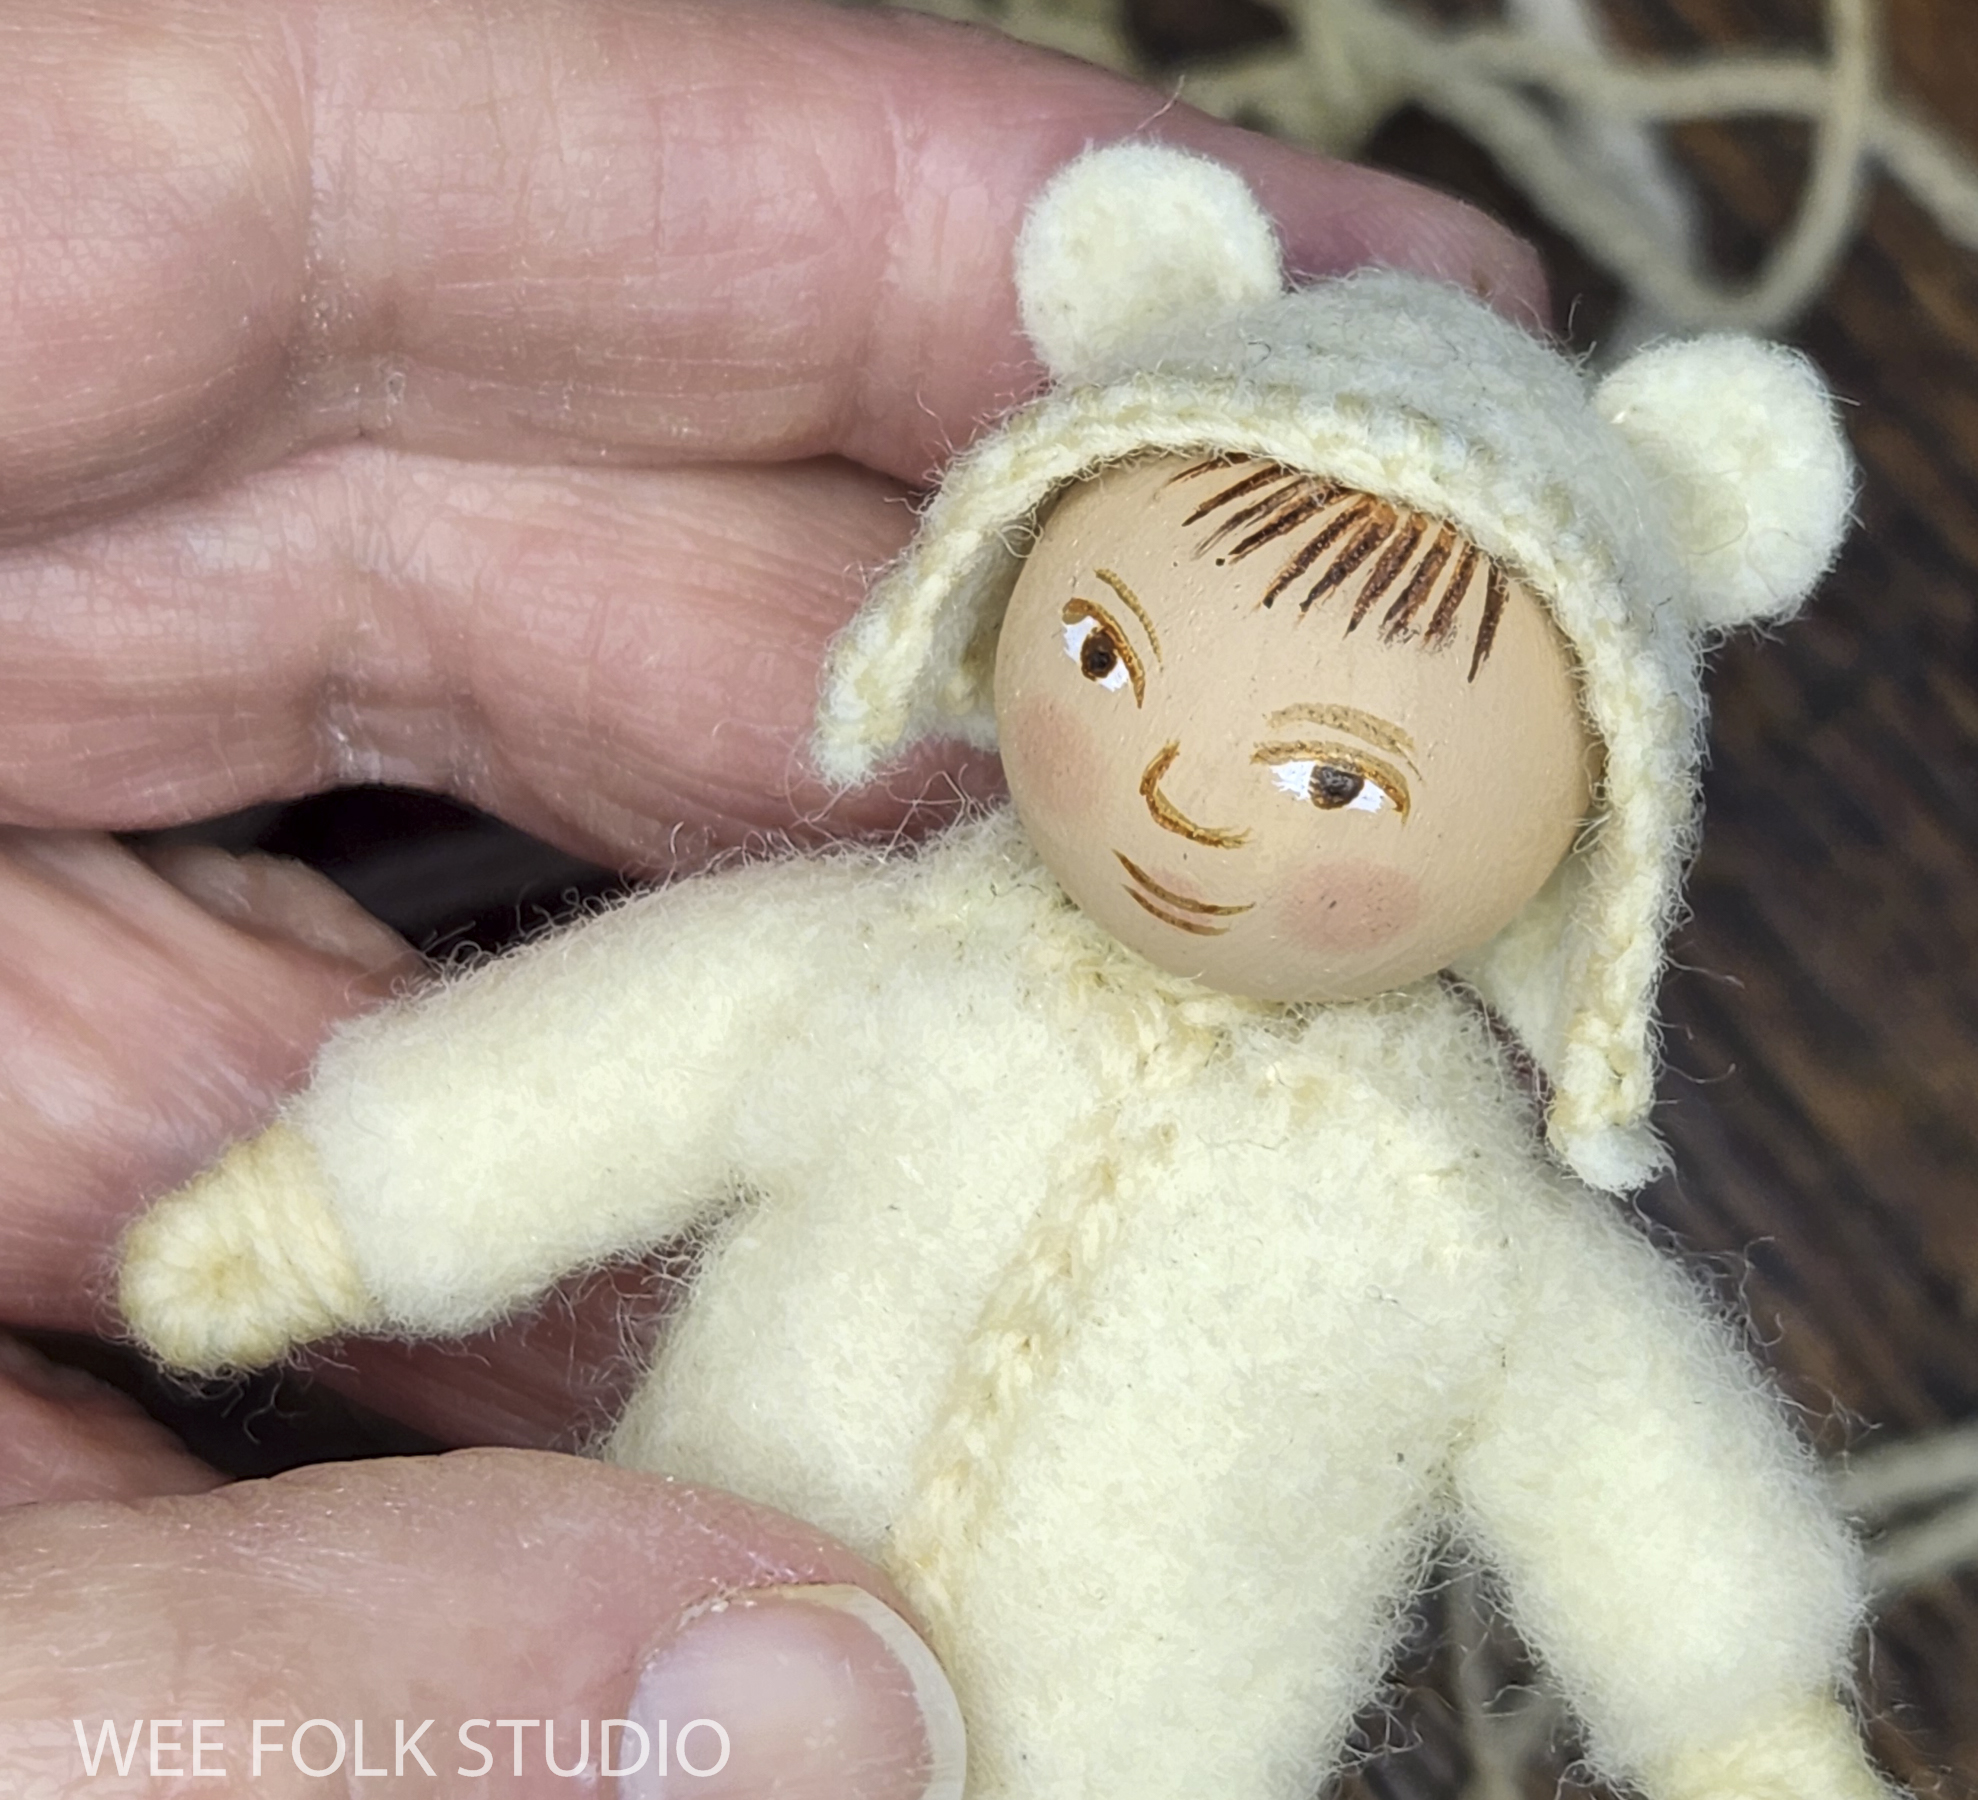
Baby Polar Bear Doll The 4″ doll is based on the figures in my how-to book, Felt Wee Folk, only I used wool needlepoint yarn (regular knitting yarn is too bulky) instead of embroidery floss to wrap the hands and feet on the pipe cleaner armature.
As usual, I painted multiple faces on wooden beads and picked out the one I like best. Even after painting thousands of faces, I still mess up sometimes.
The suit is made with some really thick wool felt that I was given years ago. It is probably manufactured for industrial purposes rather than little polar bear suits. The video below shows how I wrapped the feet and hands and sewed on the suit.
In the past year or so, I’ve used a hands-free phone/light stand made by Canvas that makes documenting my process a lot easier. I used to have to bug Rob to stop whatever he was doing and come film different steps with his camera. Now, I can take photos or videos whenever I want to. The downside is that I can’t get into the flow because I’m always thinking about recording some aspect of how I work. And there are times when I’m so engrossed that I skip entire sections of the process. That’s why my demonstration videos aren’t really tutorials. They’re more like peeking over my shoulder while I work. You might not see every detail, but you can get the gist of it.
After sewing on the suit, I made the hood – ears and all. The hood is made from a lighter weight wool felt.
The following video shows how I glued on the head and constructed the hood.
After the doll was finished, I got the idea of chain stitching Elias’s name and the year on the back. Yes, this will definitely be a yearly tradition!
To keep up with new posts, please subscribe to this blog Your contact info will not be sold or shared. If you’d like to see more frequent photos tracking the projects in my studio, please follow me on Facebook and/or Instagram.
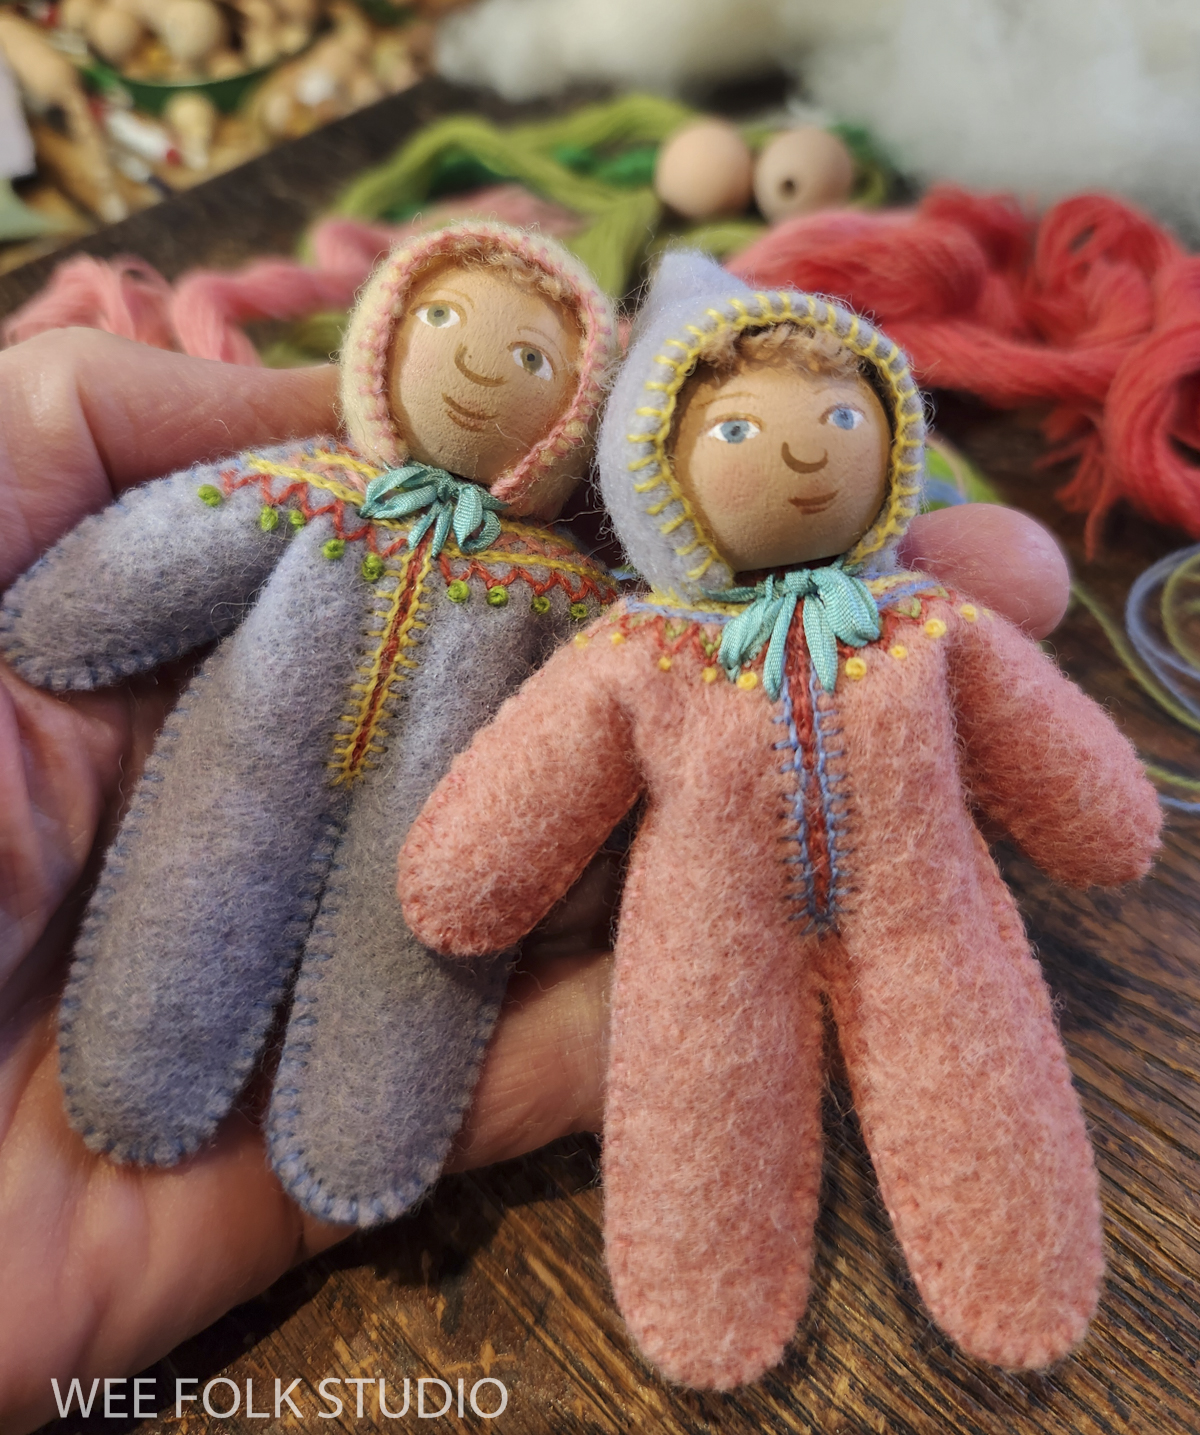
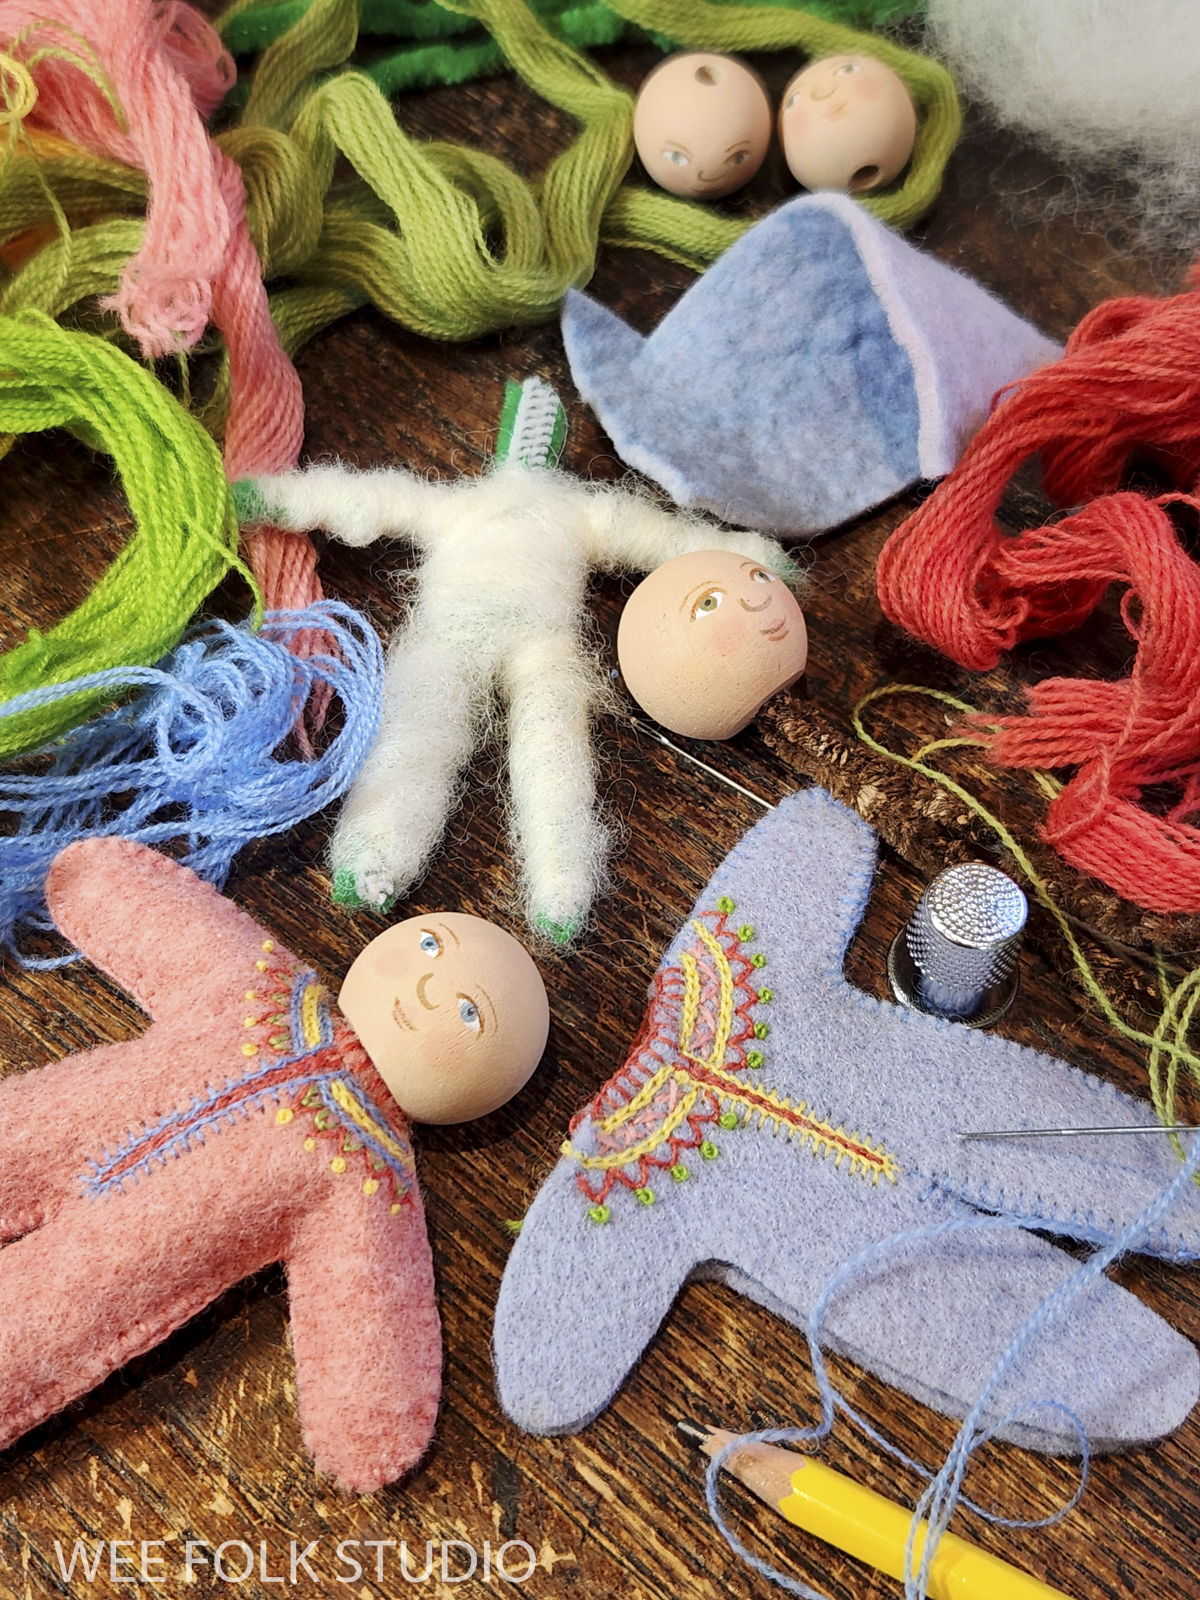
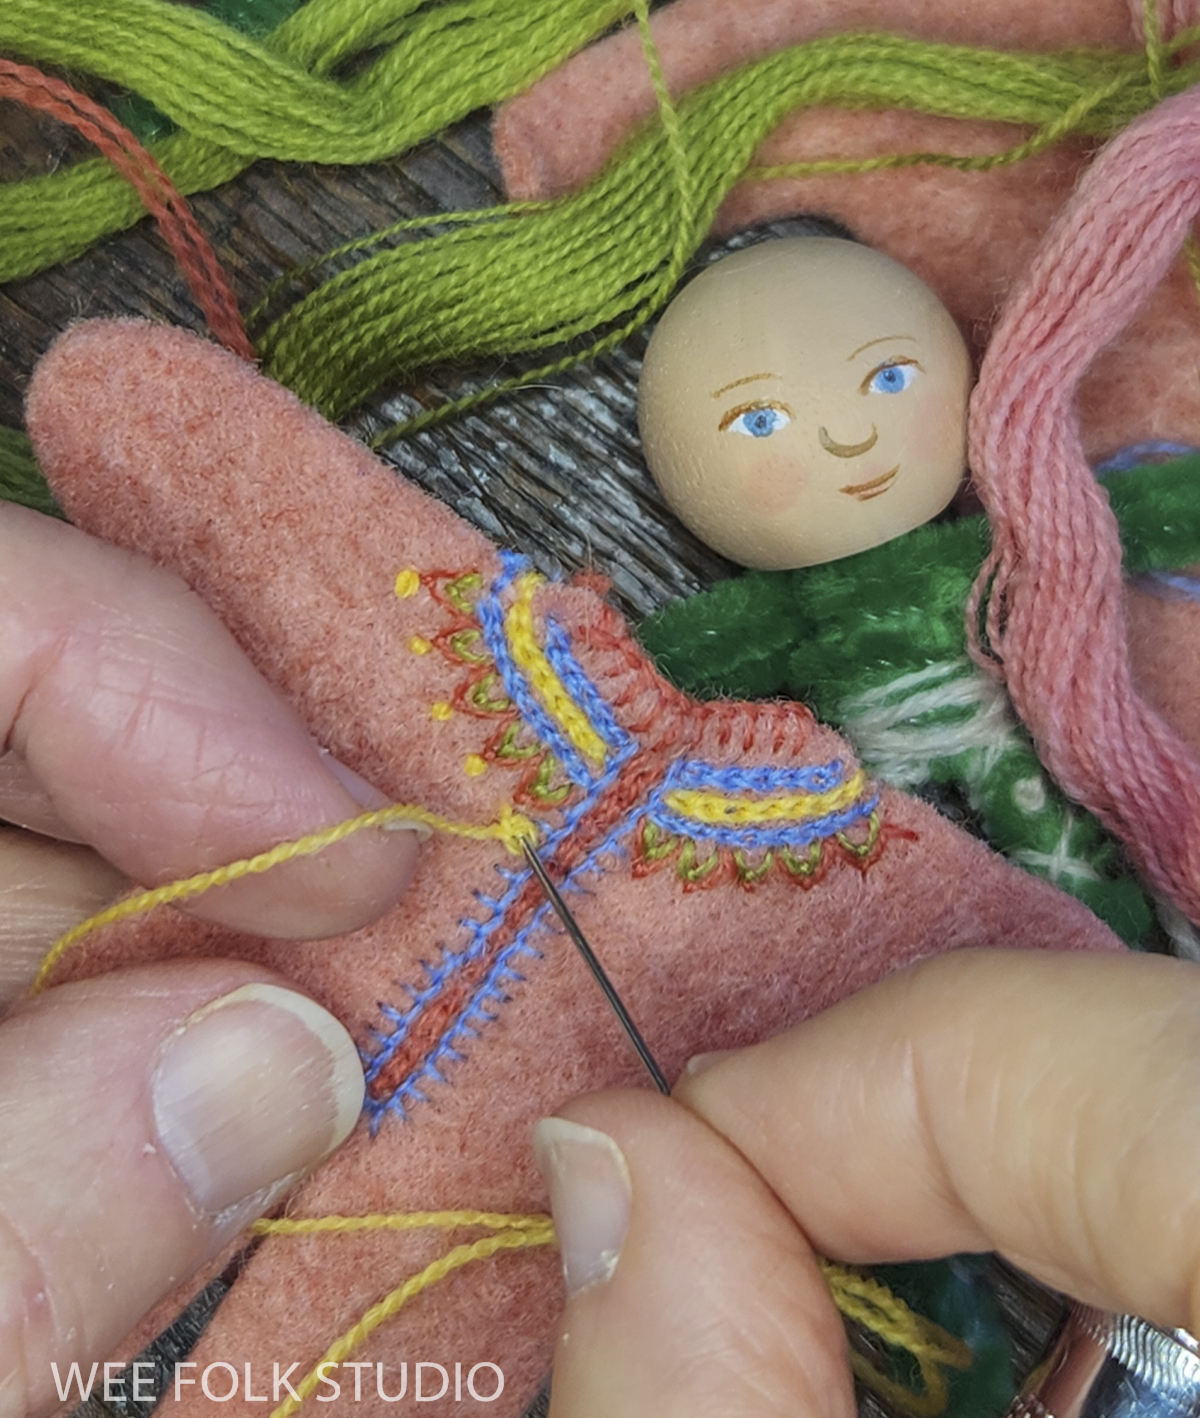
January is reserved for playing and puttering in my studio. I really look forward to this time of hibernation, without outside distractions. 31 days doesn’t seem long enough to make all of the things I’ve been dreaming about! So far, I’ve worked on simple projects that might take a few days, instead of months or seasons. I’ve already made several gifts, including a pair of Baby Buntings for twin 3 year-old girls. This post includes photos and 3 videos that show the process of making them.
The dolls are simpler than the figures with floss-wrapped arms and legs in my how-to book, Felt Wee Folk – New Adventures. The baby’s pipe cleaner body is padded and hidden inside a felt suit. Since the dolls would be played with by real children, I doubled up the pipe cleaners to make them extra sturdy. In the following video, you’ll see me forming the armature and covering it with wool batting.
The suits are made with naturally dyed wool felt and embroidered with fine wool tapestry yarn from my old stash. I’m sad to say that DMC discontinued selling the yarn years ago.
The following video shows me stitching the bunting yoke. To give an honest impression, I left in some clips that reveal snags, instead of editing them out. Maybe someday I’ll string all of the bloopers together!
I was was so engrossed with painting their faces that I forgot to take photos or videos. Their heads are made with 1′ wooden knobs (not beads), which are available here. Beads could be used as well. I just liked the size and flat bottom of the knobs.
The following video demonstrates how I attached the head, stitched the pointed hat, and formed the silk ribbon tie, which is a process I can’t describe in words.
These little dolls were so fun to make! They are now happily living with 3 year-old twins in Vermont. Stay tuned for future stories about more gifts I’ve made this month.
To keep up with new posts, please subscribe to this blog Your contact info will not be sold or shared. If you’d like to see more frequent photos tracking the projects in my studio, please follow me on Facebook and/or Instagram.
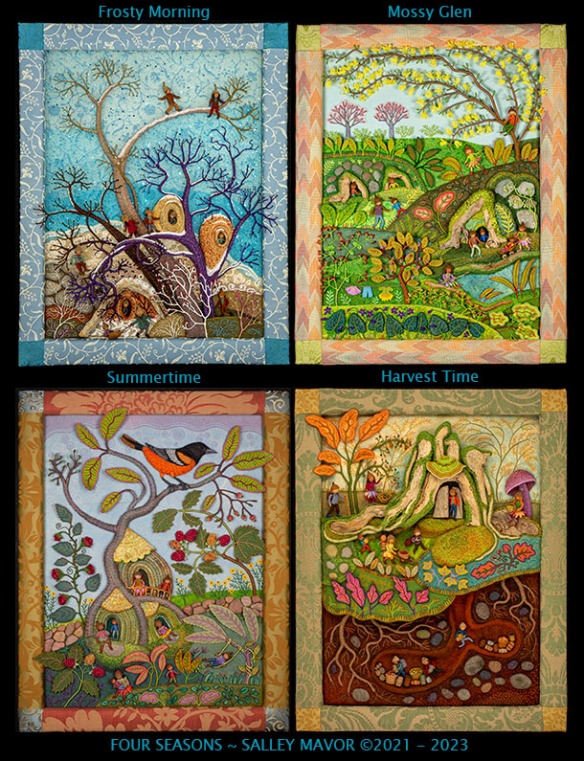
As promised, I’m winding down the string of posts about Harvest Time, the fall scene in my series of seasonal landscape. Part 9 features the embroidered trees in the background sky portion of the piece. For over a year now, I’ve shared photos, videos and commentary about different aspects of the project, from moss to underground tunnels to miniature storage containers (see list with links below). This year, I’ll be writing about Summertime, so stay tuned!
Harvest Time is the fall scene in a series of seasonal landscapes that capture the wonder and magic of the natural world. Note cards, prints and jigsaw puzzles of Harvest Time and the other scenes in the series (Frosty Morning, Mossy Glen and Summertime) are available in my Etsy Shop.
Here’s a list of the other posts about Harvest Time: The overview introduces the piece. Part 1 features moss making. Part 2 is about making the turkey tail mushroom. Part 3 shows the construction of felt leaves. Part 4 gives a peek at embroidering the plants. Part 5 is about making the toadstool mushroom. Part 6 covers the underground tunnels, roots and stones. Part 7 shows how I made the wee folk harvesters. Part 8 is about miniature storage containers
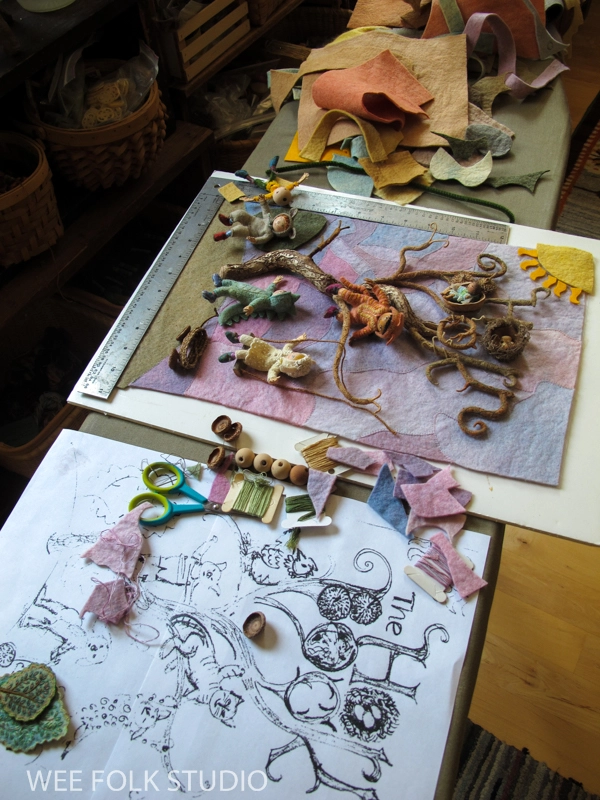
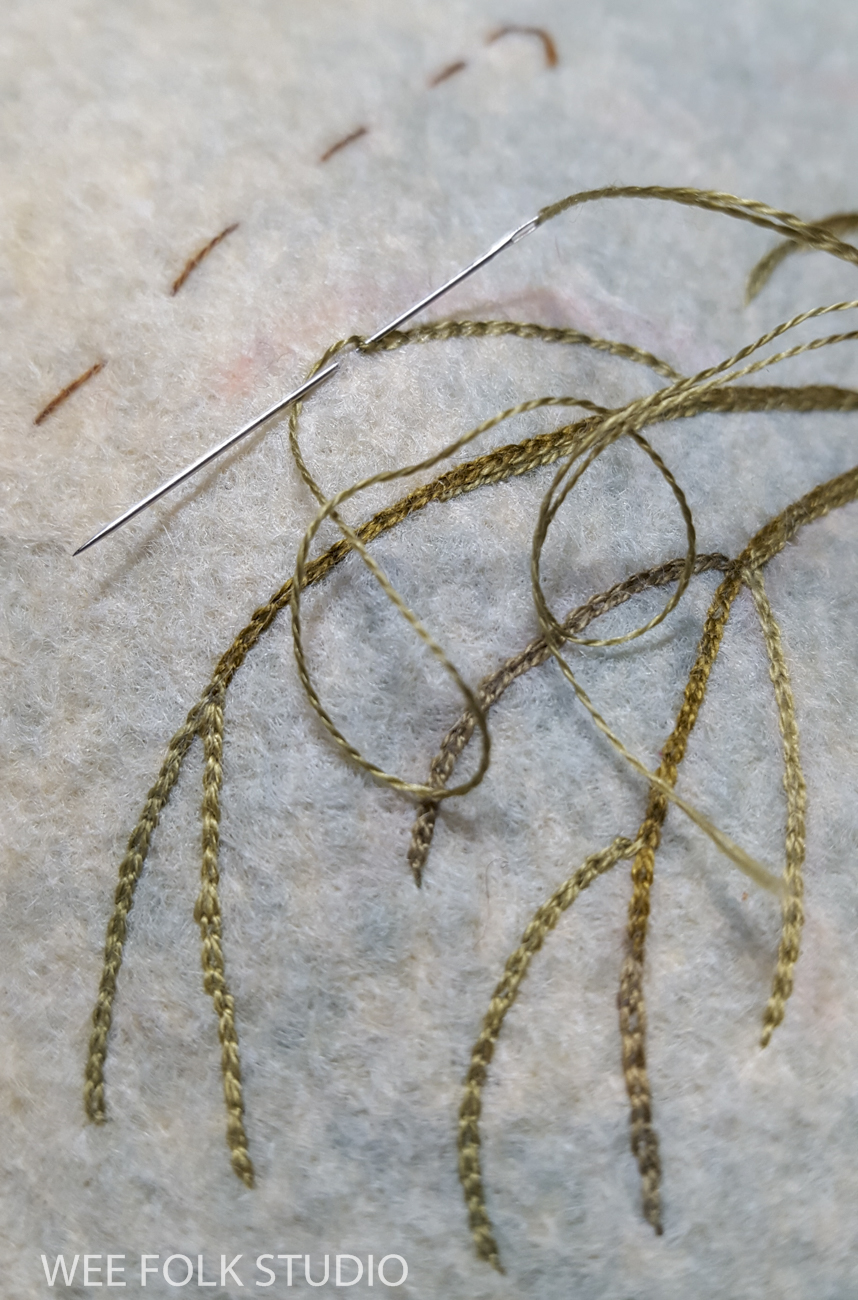
Embroidered Trees I saved this part until the very end, when it was clear how much of the sky area would be visible. During the months-long process of making this piece, all of the separate parts and figures piled up, waiting in the wings until it was time to go on stage, like scenery and characters in a play.
I used a mottled blue naturally dyed wool felt to make the sky portion. Years ago, I bought some unevenly dyed felt, which was sold as “seconds”. Unfortunately, I can’t get it anymore, so I make do with what I have. Since I didn’t have a large enough piece of this color combo, I sewed together smaller scraps from my stash. If you’re looking for naturally dyed wool felt in solid colors, check out A Child’s Dream.
This felt is so precious that I’ve kept every little scrap. I used some of the smallest pieces of blue and lavender to patch together a background for mounting the animals from my book, MY BED.
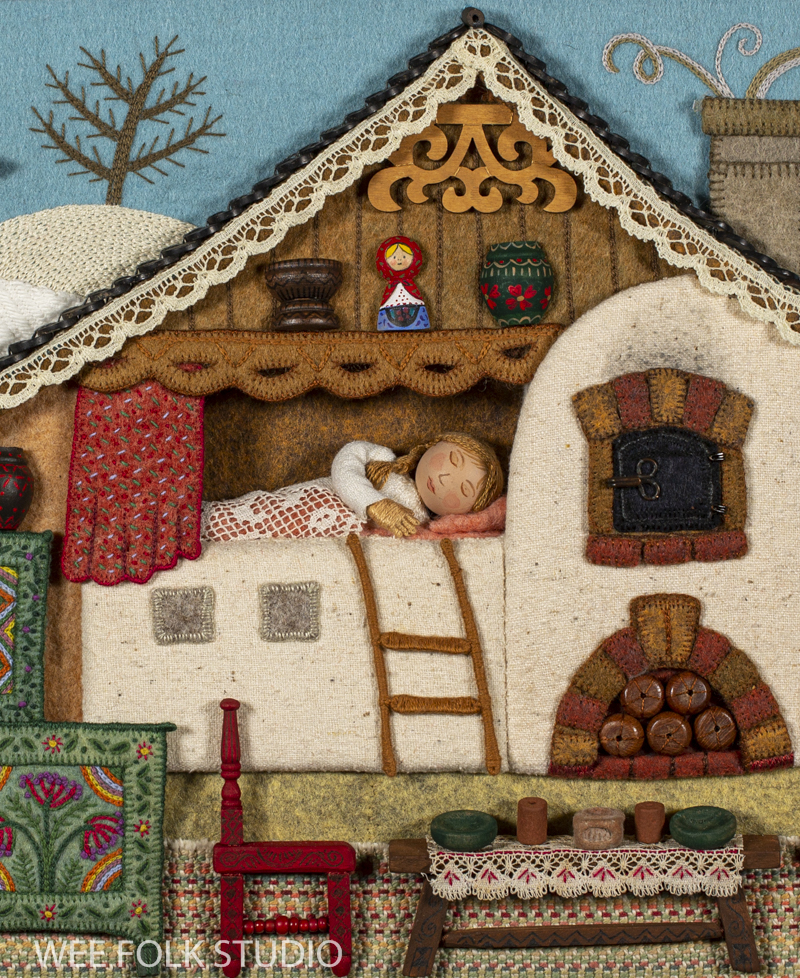
Animals from MY BED
It’s one of the 18 framed originals from My Bed included in my touring exhibition, Bedtime Stitches. For information about the book and where the show is going through 2025, please visit this page.
Bedtime Stitches at the Southern Vermont Arts Center in 2023
Now, back to Harvest Time. After sewing together the pieces of felt, I marked the edges of the open areas with large stitches.
Drawing on felt isn’t very effective, but I managed to mark a few faint lines with a pink chalk pencil. While I chain-stitched the branches and handled the felt, most of the chalk brushed away.
The next step was to add leaves along the branches with daisy chain stitches. For a naturalistic look, I used single strands of variegated embroidery floss.
I created a horizon line by sewing pieces of grayish brown felt along the bottom of the sky section. Every once in a while, I tested how it looked by temporarily positioning parts on top.
To make the leaves stand out visually, I filled them in with bright yellow floss. I then stitched blades of grass and other vegetation that was growing up along the ground.
Before assembling the scene, I covered the wooden stretcher bars with upholstery fabric. Then, I stapled the background fabric to the back of the stretcher and sewed all of the individual trees and figures in place on top. Everything is secured with a needle and thread. This video shows the whole piece put together.
I hope that you enjoyed this behind the scenes peek at my process. To start from the beginning, please go to Harvest Time’s introductory post here.
To keep up with new posts, please subscribe to this blog Your contact info will not be sold or shared. If you’d like to see more frequent photos tracking the projects in my studio, please follow me on Facebook and/or Instagram.